Wednesday, March 31, 2010

Italian Chocolate-Orange Ricotta Pie with Sambuca Spiked Strawberries (For Easter or Anytime)

Italian chocolate-orange ricotta pie with sambuca spiked strawberries

The days before Easter Sunday are hellish for supermarket workers in Italian-American cities such as Chicago, Philadelphia, and Providence. That's because every Italian woman, whether practicing Catholic or not, will be storming her local supermarket to purchase an obscene amount of eggs. (My mom used to buy between 12-15 dozen every year.) Lord help the poor dairy manager who runs out of eggs.

It's a sight to see. A gaggle of women trying to box one another one, in an effort to select the best eggs. It's the older Italian ladies who are most successful; they have honed their skills over the years. After all, they need to stockpile eggs. How else will they make  deviled eggs, braided sweet bread, sausage bread, and a host of pies?

Every Italian Easter table will have one or two savory pies, such as pizza chena (meaning "full pie"), a massive two-crusted pie filled with eggs and various Italian meats and cheeses and pastiera Neopoletana, a time-intensive pie made from ricotta cheese and soaked wheat kernels.

The jewels of the Italian Easter table, however, are the sweet pies, namely custard, ricotta, and rice. Custard pie should be dense, creamy, and mile-high. Italian ricotta pie (torta di ricotta), an Italian cheesecake closely associated with Easter, is typically laced with citrus flavors but can also be made with nuts and/or chocolate.

Rice pie (torta di riso), which is served only at Easter, is like a cross between rich ricotta pie and creamy lemon panna cotta (an Italian cooked cream). It is made with eggs, rice (usually arborio), ricotta cheese, and citrus (usually lemon). It tastes best on the Monday morning after Easter for breakfast.

Italian chocolate-orange ricotta pie

Since Jeff and I won't be in Rhode Island for Easter this year, I wanted to have a taste of Easter in San Diego. There are only two of us, so I had to be selective. I chose one traditional pie, Italian rice pie with lemon, and one with a modern twist, Chocolate-Orange Ricotta Pie with Sambuca Spiked Strawberries.

Rather than make my grandmother's famous Italian Ricotta Pie with Pineapple, I wanted  something a little different this year. Instead of pineapple, I added orange zest and melted chocolate, a pleasantly sweet and citric combination. As the ricotta cooks it seeps into the bottom crust making it almost cake-like, while the edges retain a satisfying flakiness. Each serving is enhanced with a topping of sambuca spiked strawberries. The sambuca's mild anise flavor highlights the natural sweetness of the strawberries and pairs beautifully with the creamy ricotta.

I just looked at the clock. It's 7:53 am, so I've gotta run. I want to be at market when it opens at 8am and the shelves are fully stocks with eggs. I'm not taking any chances. After all, San Diego has a sizable population of Italian women.

Italian chocolate-orange ricotta pie

Italian Chocolate-Orange Ricotta Pie with Sambuca Spiked Strawberries 
Makes one 9-inch pie.
Print recipe only here.

Crust:
1 1/2 cups all-purpose flour
1/4 cup sugar
1/2 teaspoon salt
1/2 teaspoon baking powder
3/4 stick unsalted butter (chilled)
1 extra large egg or 2 small eggs
1-2 tablespoons ice water

Filling:
3 eggs
1 cup sugar
the zest of 1 large orange (about 1 tablespoon)
2 teaspoons cointreau or orange extract
1 cup heavy cream
1 tablespoon cornstarch
1/8 teaspoon ground cinnamon
1 pound ricotta, drained (minimum 2 hours, or preferably
1/4 cup semi-sweet chocolate chips, melted and stirred until smooth

Sambuca Spiked Strawberries:
3/4 cup sugar
3/4 cup water
5 cups sliced strawberries
2 tablespoons Sambuca (an Italian anise flavored liqueur), or more if you'd like a stronger flavor

1. For the crust, combine flour, sugar, salt, and baking powder in the work bowl of a food processor fitted with a metal blade; pulse several times to combine. Add the butter and pulse about 10 times until the dough becomes pebbly in texture. Add the eggs and pulse repeatedly until the dough begins to stick together. Slow add the ice water by the tablespoon, while using a few long pulses. Add more drops of ice water as necessary, until the dough holds together well. Invert the dough onto a floured work surface. Form a ball and flatten in a disc; wrap the disc in plastic wrap, and refrigerate while preparing the filling. You can keep the dough in the refrigerator for up to 2 days before continuing.

2. If you don’t have a processor, then combine the dry ingredients in a bowl; add chunks of chilled butter, and using a pastry blender or two forks, chop the butter until it resembles little pebbles. At this point, add the eggs and ice water, and stir with a spoon until the dough begins to form. Using your hands and working the dough as little as you can, form a ball, and transfer it to a lightly floured surface. Knead until the dough holds together. Form the dough into a ball, wrap in plastic, and refrigerate while preparing the filling. You can keep the dough in the refrigerator for up to 2 days before continuing.

3. To make the filling, add the eggs, sugar, orange zest, and cointreau to a large bowl. Using a hand-mixer on medium-low, mix until well combined. Add the heavy cream, cornstarch, and cinnamon, and beat on low until well combined. Stir in the drained ricotta and melted chocolate, and mix with a rubber spatula until well combined. Place bowl in the refrigerator.

4. Place a rack in the lower third of the oven and preheat to 450 degrees F. Coat your pie plate with cooking spray. Turn out the dough onto a lightly floured surface and roll into a 10- inch circle. Transfer the dough to the prepared pie plate, gently pressing it into the bottom and sides. Prick the bottom of the crust a few times with the tip of a fork. At this point, set the crust in the freezer for about 15-20 to get it really chilled, which will make for a flakier crust.

5. Remove the chilled crust from the freezer and pour the filling to about 1/4 of an inch below the top of the crust, as it will puff up slightly when baking.

6. Bake at 450 degrees F for 15 minutes, then lower the temperature to 325 degrees F and cook for 25 minutes, or until the filling puffs up, turns golden, and is “set,” meaning it should not be jiggly when you gently move the pie plate. Remove from oven and let cool on a rack. Serve at room temperature or chilled.

7. For the strawberries, bring water and sugar to a boil in a medium heavy-bottomed saucepan. Lower the heat and simmer for about 8-10 minutes, or until the sauce begins to thicken slightly. Add the strawberries and cook 2-3 minutes, or until soft. Turn off heat and stir in sambuca. Cool slightly before serving. If not using immediately, re-heat slightly if the syrup hardens.

Note:
If you have some extra filling left over, you can pour it into a small baking dish or ramekin for a crustless version. Just reduce the baking time.

You might also enjoy these Italian dessert recipes from Food Blogga:
Italian Easter Rice Pie
Italian Easter Ricotta Pie with Pineapple
Italian Lemon Egg Biscuits

Here are more creamy ricotta desserts you might enjoy:
Ricotta Pound Cake recipe at Proud Italian Cook
Orange and Chili Pepper Ricotta Cheesecake recipe at Kitchen Unplugged
Fresh Ricotta with Warm Honey and Cinnamon recipe from Souvlaki for the Soul


Monday, March 29, 2010

An Italian Sausage Bread Recipe for Easter (Or Anytime)

Italian sausage bread DSC_0013

My grandmother was a smart woman. 16 years ago when I announced my wedding engagement, she congratulated me, told me that Jeff and I were a good match, and then gave me this warning: "Don't let his mother get in the middle of you two. That's when the problems start. You know the way Italian mothers are with their sons." She knew of course, she was an Italian mother herself.

Italian men love their mothers. And they love their mother's cooking. The key to getting along with your Italian mother-in-law, therefore, is to praise her cooking.

Trouble starts when we attempt our mother-in-law's recipes, then ask our husbands whose is better. It's a deadly trap.

Ask an Italian guy who the better cook is, his mother or his wife, and he'll tell you his mother. That is, unless his Italian wife is present. In which case, he will answer that both his mother and his wife are wonderful cooks. Then he will point out dishes for which each woman is famous, such as his mother's lasagna or his wife's eggplant parmigiana.

Now, if the wife is a nice Irish or Polish girl, he won't even hesitate to say his mother is the best cook in every instance, or else risk excommunication. (Those poor girls don't stand a chance.)

I'm a nice Italian girl who loves her mother-in-law's cooking, so I've had a pretty easy time getting along with her. (Plus, unlike most Italian mother-in-laws, she actually enjoys and compliments my cooking which helps.)

Still, it has taken me nearly 16 years of marriage to attempt her sausage bread. Of all the beloved Italian dishes my mother-in-law makes, including chocolate dipped almond biscotti, stuffed squid, and Easter rice pie, her sausage bread trumps them all.

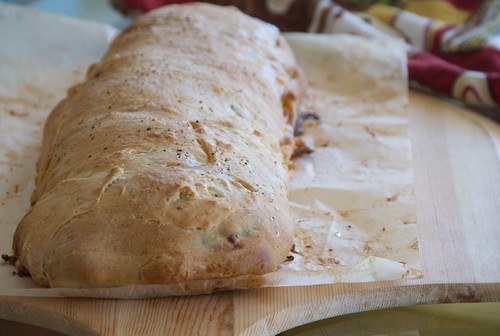
This Easter Sunday treat consists of sauteed hot Italian sausage, pepperoni, fresh mozzarella, Parmesan, eggs, and parsley, all nestled inside of a crisp, golden brown crust. Sometimes the filling will overpower the dough and pop through. Not to worry. The melty cheese adds to the rustic look of the sausage bread.

When my mother-in-law was here last week, I asked her to help me make my first sausage bread. As she cooked, I asked lots of questions and snapped lots of pics, as the rolling of the loaf is critical. Pleasantly, it turns out sausage bread is really easy to make.

Just remember to use the best ingredients you can afford, namely Italian deli hot sausage, pepperoni, and fresh mozzarella. And be kind to the dough. Overworking it will weaken it and cause tears through which the filling will escape. If that happens, patch the tear with a little piece of dough.

When I served the sausage bread to Jeff and my in-laws last week, I knew better than to ask whose was better. After a couple of bites, though, my mother-in-law announced, "This  is delicious! It tastes just like my sausage bread."

I beamed the rest of the day.

Here's how to make Italian sausage bread like my mother-in-law:

Italian sausage bread filling DSC_0008
The egg mixture should be partially cooked, as it will finish cooking in the oven.

Italian sausage bread DSC_0008
Spread the egg mixture on dough, leaving a 1-inch border all around. 

Italian sausage bread DSC_0003
Turn the shorter sides of the dough up on to the filling so it won't escape. Then roll the dough into a loaf, in a jelly-roll fashion.

Italian sausage bread DSC_0007
When you've rolled it 3/4's of the way across, grab the far end of the dough and pull it toward you, tucking in the egg mixture. Then flip it over, seam side down. Brush it with olive oil and sprinkle with black pepper.

Italian sausage bread DSC_0014
Bake until the crust is golden brown.

Italian sausage bread DSC_0013
Slice the bread after it cools for about 10 minutes.

Jeff eating Italian sausage bread
Make your husband (or anyone you love) happy the next morning by serving him or her leftover toasted sausage bread for breakfast. 

Italian Sausage Bread
Makes 10-12 slices
Print recipe only here.

1 pound pizza dough, homemade or store-bought*
2 teaspoons olive oil
1 pound hot Italian sausage, removed from the casing
1/2 cup diced hard pepperoni
6 large eggs, lightly beaten, seasoned with salt and pepper
2 small balls of fresh mozzarella (about 1/2 pound)
1/2 cup grated Parmesan cheese
1/2 cup finely chopped fresh flat leaf parsley

1. Pre-heat oven to 425 degrees F, and center a rack. Roll out 1 pound of room temperature homemade or store-bought pizza dough into a rectangle about 10 X 12 inches on an unrimmed cookie sheet coated with a little cooking spray. Cover with a kitchen towel while cooking the filling.

2. In a large skillet, over medium-high heat, warm olive oil. Add sausage. Using a wooden spoon, break up the sausage into small pieces. Cook 8-10 minutes, or until browned and crispy. Add pepperoni. Cook 2-3 minutes. Add eggs, mozzarella, Parmesan, and parsley. Cook 2-3 minutes, stirring several times. The eggs should be partially cooked, and the cheese partially melted and stringy. Overcooking the eggs will make them dry. Let egg mixture cool for about 5-7 minutes.

3. Spread egg mixture on dough, leaving a 1-inch border all around. Turn the shorter sides of the dough up on to the filling. Then roll the dough into a loaf, in a jelly-roll fashion. Turn the roll over with the seam on the bottom. Place in the middle of the pan. (You can line the pan with parchment paper for easy clean up.) Brush the top of the loaf with olive oil and sprinkle with freshly ground black pepper.

4. Bake for 20-25 minutes, or until golden brown and crisp. Cool slightly before serving. Eat hot or at room temperature. Wrap leftovers in tin-foil and refrigerate. Toasted, they make a delicious breakfast the day next.

You might also enjoy these Italian dessert recipes:
"Nan's Way: The Only Way to Make Easter Pies," one of my NPR pieces that includes recipes for Italian Ricotta Pie with Pineapple, Italian Rice Pie, and Italian Pizza Chena.
Here's a step-by-step post on how to make Italian Pizza Chena.
My dad's Italian Pizzelle Cookies
My mom's Italian Lemon Egg Biscuits

Here are a couple more versions of sausage bread you might also enjoy:
Sausage Bread recipe at SoupBelly
Sausage Bread recipe at The Teacher Cooks

Wednesday, March 24, 2010

Keeping Family Recipes Alive: Mom's Recipe for Italian Lemon Egg Biscuits

Easter lemon egg biscuits DSC_0015

My mother was a 30-year-old new mom when she made her first batch of Italian lemon egg biscuits. She wrapped a few in cellophane and gave them to my older brother to give to his kindergarten teacher. The story goes that the teacher called up my mom begging for the recipe, claiming they were the best cookies she had ever tasted.

Since that day, my mom has baked thousands of lemon egg biscuits. Infused with lemon extract and coated with a sweet, crunchy lemon icing, these cookies are light, cakey and refreshingly citrusy. They're a perennial favorite in her Christmas cookie trays; they appear at every family birthday party; and they grace the dessert table every Easter Sunday.

The kids in our family have always adored lemon egg biscuits. I grew up making them with my mom, and now she is passing on the tradition to her granddaughters. The dough is soft, springy, and easy to roll, making it ideal for children's little hands. The best part is icing and decorating the cookies. Kids love to watch the confectioners' sugar and milk transform into a smooth, creamy white, sweet icing as they stir and stir. Of course, nothing pleases them more than dipping the cookies in the icing and decorating them with loads of colored candy sprinkles.

So today's post is for my nieces, Jessica and Alexandra. Girls, please ask Daddy to print up this recipe, and put it in a safe place. There will come a day, maybe in 2070 when you'll pass it on to your granddaughters. You can tell them, "This recipe is 100 years old, and it's from your Mimi who made the world's best cookies."

Italian Lemon Egg Biscuits
Makes 72 cookies
Print recipe only here.

Cookie Dough:
6 cups all-purpose flour
1 1/2 cups granulated sugar
3 tablespoons baking powder
1 teaspoon salt
6 large eggs
4 tablespoons lemon extract
1 cup canola oil
1/2 cup whole milk

Lemon Icing:
2 1/2 cups confectioners' sugar
2 tablespoons lemon extract
A few drops of whole milk
Colored candy sprinkles (optional)

1. Preheat the oven to 325 degrees, and position a rack in the center of the oven. Line four large cookie sheets with parchment paper.

2. In a large bowl, mix flour, sugar, baking powder and salt.

3. In a small bowl, lightly whisk eggs, lemon extract, oil and milk.

4. Add the wet ingredients to the dry ingredients. Using a rubber spatula, mix until a dough starts to form. Using your hands, lightly squeeze and knead the dough. If it seems a bit dry, then add 1 teaspoon of milk at a time until it reaches desired consistency. The dough should be somewhat sticky and elastic.

5. Scoop 1 tablespoon of cookie dough and roll between lightly floured palms until a smooth ball forms. Place the balls on a parchment-lined baking sheet 2 inches apart.

6. Bake cookies for 15 to 20 minutes, or until lightly browned on the bottoms. The tops will be white but cooked through. Transfer to a rack and cool completely before frosting.

7. To make the icing, whisk the confectioners' sugar and the lemon extract in a small bowl. Add a few drops of milk and continue whisking until the icing is smooth and opaque and clings to the back of a spoon. Taste and add more lemon extract and/or confectioners' sugar, if desired. When it's ready, pour icing through a fine-mesh sieve to remove any tiny clumps of confectioners' sugar.

8. For easy cleanup, place a sheet of parchment paper under a cookie rack before icing cookies. Dip the top of the cookie in the icing, then place on the rack. Decorate with colored candy sprinkles, if desired. Allow to dry completely before storing in an airtight tin or plastic container. Place waxed paper or parchment paper between layers to protect the icing and sprinkles. Properly stored, cookies should last seven to 10 days.

You might also enjoy these Italian desserts:
Italian Easter Rice Pie
Italian Pizzelle Cookies
Italian Pepper Biscuits
Italian Pignoli (Pine Nut) Cookies
Italian Easter Ricotta Pie with Pineapple
Italian Almond Torte with Blood Orange Compote

You might also enjoy these lemon cookies:
Lemon Anise Cookies recipe at La Fuji Mama
Lemon Burst Cookies recipe at Brown Eyed Baker
Lemon Lavender Cookies recipe at Elana's Pantry
Lemon Pistachio Cookies recipe at Once Upon a Plate

Monday, March 22, 2010

Warm and Nutty Breakfast Couscous Is Not Wimpy

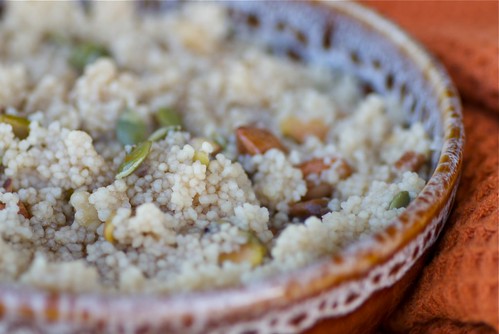
warm and nutty breakfast couscous

I blame my mom. Growing up eating her hearty Italian pasta dinners has made nearly all other grains seem insubstantial. Rice is good, but you have to eat more of it to get full. Wheatberries are filling, but they take too long to cook. Couscous is, well, wimpy. That's right, couscous is wimpy. How can anyone get full on a dinner of delicate, fluffy couscous? I can't. That's why I have relegated it to breakfast.

For breakfast, couscous works. It's a welcome change from oatmeal and is just as versatile. It can be made with water or milk and tastes great with add-ins like nuts, dried fruits, or fresh berries. Of course, a drizzle of melted butter, maple syrup, or honey only makes it better.

This Warm and Nutty Breakfast Couscous is packed with belly-filling good carbs and lean protein. It's crunchy, chewy, sweet, and filling. It's definitely not wimpy.

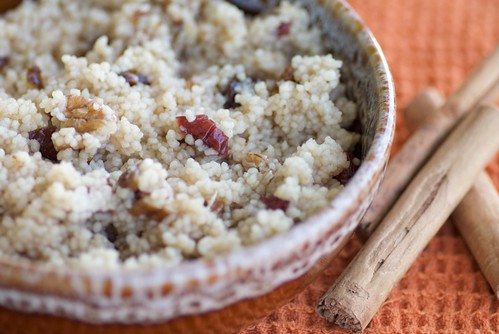
warm and nutty breakfast couscous DSC_0014
(This is another version with pecans, dried cherries, Medjool dates, cinnamon, and maple syrup. I told you it's versatile.)

Warm and Nutty Breakfast Couscous
Serves 2
Print recipe only here.

1 cup water
1/2 cup dry couscous
1/2 cup chopped mixed unsalted nuts, equal parts almond, pecans, pistachios, and walnuts
2 tablespoons unsalted pepitas* or sunflower seeds
2-3 pinches of cinnamon
3 tablespoons pure maple syrup

1. In a small pan, bring water to a boil. Add couscous. Remove from heat for 5 minutes and fluff with a fork. Add remaining ingredients and stir well. Drizzle each serving with a little extra maple syrup, if desired.

Shopping Note: Pepitas are flat, green Mexican pumpkin seeds found at Mexican markets, health food stores, and some major supermarkets. Unsalted pumpkin or sunflower seeds make good substitutes.

You might also enjoy these healthy breakfasts from Food Blogga:
Skinny Berry Parfaits
Breakfast Quinoa with Dried Cherries, Raisins, and Pecans
Swiss Chard, Potato, and Parmesan Frittata (makes a great breakfast sandwich)

You might also enjoy the warm breakfast grains recipes:
Dried Fruit Couscous recipe at Mele Cotte
Breakfast Millet with Prunes recipe at Healthy Green Kitchen
Breakfast Quinoa with Clementines, Sour Cherries, and Pecans recipe at Mostly Eating

Thursday, March 18, 2010

Dessert Panic? Martha Stewart's Lemon Custard Cakes To The Rescue

Martha Stewart's Lemon Custard Cakes

You know this has happened to you: You've got dinner guests arriving in a few hours, and your plan for dessert, well, OK, you have no plan for dessert. What should you do? Call a friend? Make a run to the nearest supermarket? Get them drunk so that they forget about dessert?

No. Your solution is right before your eyes: Martha Stewart. Yes, Martha Stewart, the queen of complexity, does have a few gems to get you out of a jam. One of the best is  Lemon Custard Cakes. These easy-peasy, impossibly cheerful custard cakes can be whipped up before dinner is served, or even after your guests have arrived. (I know. I just did it last week.)

Like a souffle, these custard cakes rise like balloons. Fortunately, unlike a souffle, they hold their shape well after being removed from the oven, so they still look pretty an hour or two later. When you nudge your spoon into the ramekin, you'll discover a fluffy, cakey layer on top supported by a pudding-like custard on bottom. The sugar and whipped eggs whites balance the tart lemon making them refreshingly tangy.

The cakes taste best at room temperature or just slightly chilled. As for garnish, a light dusting of confectioner's sugar is all they need. Though if you want to channel Martha, you should top the cakes with a few fresh berries or a mint sprig. Just don't dip the mint in gold. That's overkill.

Martha Stewart's Lemon Custard Cakes

Here is the recipe for Martha Stewart's Lemon Custard Cakes. Unusual for me, I didn't do much tweaking to the original recipe. I merely coated the ramekins with cooking spray instead of butter, used Meyer lemons instead of regular lemons, and added more lemon zest, about 3-4 teaspoons. Otherwise, I followed it exactly. I only got 5 servings instead of 6, but that will vary depending on the size of the ramekins you use.

Jeff and I enjoyed them so much, that I also made an orange version with juicy California navel oranges. Whether you use lemons or oranges, these custard cakes taste like a light and breezy spring day, just what most of us need in cold and stormy March. 

You might also enjoy these easy and cheerful desserts:
Warm Citrus and Banana Cups
Seductive Strawberry Zabaglione
Mom's Chocolate Pudding with Bananas and Graham Crackers
Pumpkin Pie Pudding with Candied Pecans and Freshly Whipped Cream

You might also enjoy these lemon desserts: 
Lemon Sour Cream Pie recipe at Chaos in the Kitchen
Isa's Recipe for Vegan Lemon Bars recipe at Wasabimon!
Blueberry Tarts with Meyer Lemon Cream recipe at Dessert First
Meyer Lemon Panna Cotta with Raspberry Sauce recipe at Phoo-D

Sunday, March 14, 2010

Home-Cooked Take Out: A Recipe for Healthier Shrimp Brown Fried Rice

shrimp brown fried rice DSC_0017

Home-cooked take out (or homemade take-away as the Brits say). It's an oxymoron, but you know what it means.

There are loads of articles in cooking / health magazines touting the benefits of making your own take out favorites. It's no surprise. At-home take out is more affordable, healthier, and often tastes better.

Without a doubt, my favorite take out food is Chinese and Thai, which unfortunately is usually loaded with sodium and excess fat from oil. So I often make my own Chinese and Thai take out favorites such as this Thai Pineapple Fried Rice.

With a few tweaks, fried rice can easily become a healthier take out dish. In this recipe for Shrimp Brown Fried Rice, brown rice and added veggies boost fiber and complex carbohydrates while reduced sodium soy sauce and unsalted cashews keep sodium levels on check. Boldly flavored toasted sesame oil is more flavorful than regular sesame oil, so less is needed without sacrificing flavor.

So tell me, dear readers, what are your favorite home-cooked take out dishes?

Shrimp Brown Fried Rice 
Makes 6-8 side servings
Print recipe only here.

3 large eggs, lightly beaten (or 2 whole eggs and two egg whites)
3 tablespoons low-sodium soy sauce
1 tablespoon light brown sugar
1 1/2-2 tablespoons fresh grated ginger
2 tablespoons toasted sesame oil, divided
24 medium shrimp, deveined, cleaned, and tails removed (about 2/3-3/4 pound)
4 cups cold cooked brown rice
1 shallot, finely chopped
1 small red or green chili, minced
1 red bell pepper, diced
3/4 cup frozen peas
3 tablespoons unsalted cashews
2 tablespoons finely chopped fresh cilantro
sliced green onions, for garnish

1. Place a small fry pan coated with cooking spray over medium high heat. Add eggs; cook until nearly set. Flip once, and cook until set and no longer runny. Set aside. Cool and cut into small strips.

2. In a small bowl, whisk soy sauce, brown sugar, and ginger; set aside.

3. In a wok or large, wide, deep pan, heat 1 tablespoon sesame oil over high heat. Cook shrimp until bright red, but not browned. Remove from pan and set aside.

4. In same wok or pan, heat remaining 1 tablespoon sesame oil. Saute shallots and chili for 1 minute, or until fragrant. Add red bell pepper for 1 minute. Add brown rice, and cook for about 8-10 minutes, or until lightly browned and crisp. Add soy sauce mixture and stir. Return shrimp to pan. Add eggs and peas and stir until well combined and heated through, about 2-3 minutes. Stir in cashews and cilantro. Garnish with sliced green onions, and serve immediately.

You might also enjoy these healthier adaptations of classic dishes from Food Blogga:
Orange Cauliflower Macaroni and Cheese
Healthy Chili
Whole Wheat Veggie Pizza
Mom's Chocolate Pudding with Bananas and Graham Crackers

You might also enjoy these fried rice recipes: 
Stir-Fried Brown Rice recipe from A Veggie Venture
Vegetable Brown Fried Rice recipe from The Perfect Pantry
Chinese Fried Brown Rice (Indian Style) recipe from My Diverse Kitchen
Fried Rice with Scallions, Edamame, and Tofu recipe from eat me, delicious

Thursday, March 11, 2010

Boozy Beef Chili for St. Patrick's Day

beef and beer chili DSC_0370

It's big. It's bad. It's Boozy Beef Chili.

Full-bodied porters or stouts, such as Guinness, add complexity and depth to otherwise ordinary beef chili. Make it for St. Patrick's Day or anytime you feel like having a belly-filling bowl of hot chili.

Boozy Beef Chili
Serves 6-8
Print recipe only here.

1 tablespoon canola or olive oil
1 large yellow onion, diced
1 large green or red bell pepper, chopped
1- 1/4 pound ground beef
1 1/2-2 tablespoons chili powder
1 teaspoon cayenne pepper
1 teaspoon ground cumin
Several shakes of salt
2 tablespoons light brown sugar
2 (14.5 oz) cans of pinto or red kidney beans, drained
1 (14.5 oz) can diced tomatoes with the juice
1 (12 oz) bottle dark beer, such as Guinness stout
1 tablespoon corn meal, to thicken, optional

1. In a large pot over medium-high heat, saute onions and pepper in oil for 5 minutes. Add meat. Cook until browned, about 10 minutes. Stir in spices and sugar. Add beans, tomatoes, and beer and stir. Bring to a boil. Reduce to low and simmer for 20-25 minutes, or until thick and soupy. Stir in cornmeal if you want the chili thicker. Taste, and adjust seasonings as necessary.

2. Top servings with any of the following: shredded Cheddar cheese, sour cream, diced avocado, sliced green onions, or fresh cilantro. This chili tastes even better the next day.

You might also like these beefy dishes by Food Blogga:
Chocolate Chipotle Chili
The Southwest Burger
Grilled Rib Eye Steak with Chimichurri Sauce

You might also like these chilis made with beer:
Crock Pot Chili recipe from Savour Fare
Turkey Chili recipe from A Good Appetite
Beef and Three Bean Chili recipe from Pinch My Salt

Wednesday, March 10, 2010

Celebrate St. Patrick's Day with a Beer Ice Cream Float

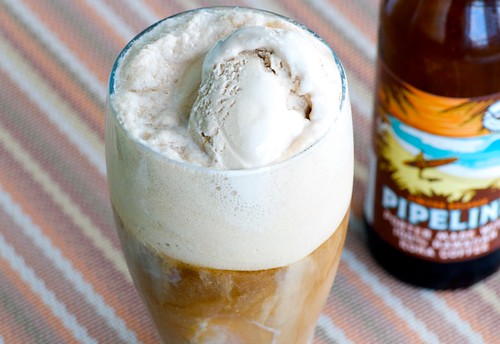
beer ice cream float DSC_0018

St. Patrick's Day. It's all about meat, 'taters, cabbage, and leprechauns. No wonder this Italian girl from New England has never gotten excited about it. Fortunately, it's also about beer, and that does get me excited.

I'm a late-comer to beer, but I love it; since I live in San Diego, that's a good thing. With a whopping 33 breweries producing craft beer, San Diego was recently crowned the top beer city in the country by Men’s Journal.

I just discovered an amazing seasonal beer called Pipeline Porter. It's brewed by Kona Brewing Company in Hawaii but distributed to only a handful of markets including San Diego. It may just be the perfect beer for a Beer Ice Cream Float.

Made with rich, freshly roasted 100% Hawaiin Kona coffee, Pipeline Porter is a smooth, dark, complex beer with a distinctive espresso flavor. It's delicious on its own, but it's downright decadent when paired with premium coffee ice cream for an authentic Beer Ice Cream Float. If you can't get Pipeline Porter, then substitute another porter or stout with chocolate or espresso notes. Then celebrate St. Patrick's Day, with or without the leprechauns.

Beer Ice Cream Float
Makes 1
Print recipe only here.

2-3 scoops premium coffee ice cream
1 bottle Pipeline Porter (for San Diegans) or other rich, dark, coffee flavored porter or stout

1. Fill a tall chilled glass with ice cream, and slowly pour beer over it. Enjoy!

You might also enjoy these recipes featuring beer from Food Blogga:
Dill and Beer Quick Bread
Chocolate Stout Pudding (for adults only!)
Roasted Sweet Potatoes with Maple Smoked Bacon and Beer (made with San Diego Arrogant Bastard Ale)


You might also enjoy these beer cocktails:
5 Beer Cocktails for St. Patrick's Day at YumSugar
Michelada (a beer cocktail) recipe at Serious Eats
Beer Margarita recipe from The Kitchn

Monday, March 8, 2010

Cardamom is Captivating: A Recipe for Banana Apple Cardamom Cake with Cardamom Icing

banana-apple cardamom cake with cardamom icing DSC_0271


Few spices can excite your taste buds as powerfully as cardamom. Have you ever noticed how someone will take a bite of a cardamom-laced dessert, declare instant love, yet not be able to identify the spice?

That's because cardamom is enigmatic. Think about it: Is it spicy or sweet? Citric or floral? Does it taste like lemon? Cinnamon? Anise? Christmas? Yes. Cardamom embodies all of these flavors in one glorious spice, which is why baking with cardamom is so popular.

As this Banana Apple Cardamom Cake bakes, it will permeate your home with the sweet and spicy aromas of cardamom, nutmeg, ginger, and coconut. With mashed ripe bananas, butter, and coconut milk, this is an especially moist cake that is punctuated with bits of chewy raisins, crisp apples, and crunchy nuts. It makes a sweet start to the day when paired with a mug of hot coffee or a relaxing afternoon snack with a cup of tea or a glass of milk. It also has the added benefit of tasting even better the next day.

Banana Apple Cardamom Cake with Cardamom Icing
Makes 2 (9-inch) round cakes; serves 16-20
Print recipe only here.

2 2/3 cups all-purpose flour
1 1/4 teaspoons baking soda
1/2 teaspoon salt
1 teaspoon cardamom
1/2 teaspoon ground cinnamon
1/2 teaspoon ground nutmeg
1/4 teaspoon ground ginger
1 1/2 sticks (12 T) unsalted butter, at room temperature
1 cup light brown sugar
1/2 cup granulated sugar
2 large eggs
3 tablespoons honey
2 teaspoons pure vanilla extract
3/4 cup canned unsweetened coconut milk
2 very ripe bananas, mashed (about 1 cup)
1 1/4 cups chopped fresh apple, peeled (such as Fuji, Rome Beauty, or Honey Crisp)
1/2 cup raisins (or chopped dates)
1 cup sweetened shredded coconut, toasted
3/4 cup coarsely chopped walnuts or pecans

Icing and Garnish:
1 cup confectioners' sugar
1/2 teaspoon cardamom
several droplets of milk

1.  Place rack in center of oven and preheat to 350 degrees F. Butter or coat with cooking two (9 X 2-inch) round cake pans.

2.  In a medium size bowl, whisk the flour, baking soda, salt, cardamom, cinnamon, nutmeg, and ground ginger.

3. In a large bowl, beat the butter until creamy. Add the sugars and beat at medium speed for a couple of minutes. Add eggs and beat well. Add the honey, vanilla, and coconut milk, and beat until batter is silky. Lower the speed, add the bananas, and beat briefly.

4. Add the dry ingredients to the liquid ingredients, and mix until just incorporated. Using a rubber spatula, gently stir in the apples, raisins, coconut, and nuts. Divide the batter evenly between the pans.

5. Bake for 40 minutes, or until the cakes are a deep golden brown. You'll know they're done when a toothpick or cake tester inserted in the middle comes out clean. Transfer the cakes to a rack and let cool for 10 minutes before removing from pans.

6. Meanwhile, make the icing in a small bowl by whisking together confectioners' sugar and cardamom. Add a few droplets of milk and continue whisking until the icing is smooth and thin yet clings to the back of a spoon. When it's ready, pour it through a fine-mesh sieve to remove any tiny clumps of confectioners' sugar.

7. Invert cakes onto a rack, then turn right side up. Using a spoon, drizzle the icing over the top of the cakes, and spread it with a thin, metal spatula. Sprinkle each cake with 1/4 cup of toasted coconut, and 1 tablespoon chopped pistachios. Allow to set for at least 15 minutes before slicing.

You might also enjoy these cake recipes from Food Blogga: 
Coconut Lemonquat Tea Cake
Upside-Down Clementine Cake
Pear and Cardamom Coffee Cake with Pecan Streusel
Italian Almond and Orange Torte with Blood Orange Compote
Spiced Sweet Potato, Cranberry, and Pecan Cake with Orange-Cinnamon Glaze

Here are more lovely cardamom cake recipes you might enjoy:
Cardamom Cakelets recipe at Kitchen Unplugged
Cardamom Vanilla Bundt Cake recipe at The Food Librarian
Walnut, Lemon, and Cardamom Cake recipe at Bon Vivant
Orange and Cardamom Upside-Down Cake recipe at David Lebovitz
Glazed Crumb Cake with Cardamom and Pecans recipe at Sass and Veracity

Wednesday, March 3, 2010

Oscar Night Food Ideas: Maple Walnut Popcorn (Recipe)

maple walnut popcorn DSC_0021

This Sunday night is the Oscars, the night when millions of Americans will tune in to see which actress is wearing the ugliest gown. Since this event will drag on for hours, you'll need lots of snack foods, like my Maple Walnut Popcorn.

This New England inspired popcorn is everything a snack food should be: sweet, salty, sticky, and crunchy. Since the Oscars are at least three hours long, you might want to make a double batch. You might also want to make a Blood Orange Vodkatini.


Maple Walnut Popcorn
Yields 10-12 cups
Print recipe only here.

3 tablespoons canola oil
1/2 cup popcorn kernels
1 cup coarsely chopped walnuts

1 cup pure maple syrup
2 tablespoons butter
1 1/4 teaspoons salt


1. Preheat oven to 325 degrees F.  Coat two large rimmed baking sheets with cooking spray.

2. Pour oil in a large saucepan over high heat and cover. After 1-2 minutes, toss a couple of kernels inside. Listen for the shimmering oil as it heats up, then drop a couple of kernels in the pan. When they start sizzling and spinning, the oil is ready. Add remaining kernels. Cover the pan, and give it a couple of shakes so the kernels get coated with oil. Now listen for the popping. Once it really starts popping quickly, listen carefully. Remove the pan from the heat once the popping slows down to every few seconds, or it could burn quickly. Pour popcorn into a big bowl coated with cooking spray, and add nuts.

3. In a small saucepan over medium heat, bring maple syrup, butter, and salt to a boil. Cook 1 minute. Lower to a simmer for 2 minutes. Pour syrup over popcorn and nuts, stirring to coat. Transfer popcorn mixture to prepared baking sheets. Bake for 10 minutes. Remove from oven and cool. Break into small clusters.

You might also enjoy these snack foods from Food Blogga:
Doughboys
Spicy Black Bean Dip
Buffalo Wings with Blue Cheese Dressing
Goat Cheese and Poblano Quesadillas with Pinapple-Mango-Habanero Salsa

You might also enjoy these popcorn recipes:
Peanut Butter Popcorn recipe at The Kitchn
Truffled Popcorn recipe at Alice Q. Foodie
Caramel Popcorn with Almonds and Pecans recipe at Lisa is Cooking
Popcorn with Brown Butter, Rosemary, and Lemon recipe at Andrea's Recipes