Monday, January 30, 2012

Santa Maria-Style Barbecue

Cowboy # 5

Barbecue. You know what it means, right? Are you sure? Having grown up in Rhode Island I always thought a "barbecue" referred to an outdoor cookout featuring grilled hot dogs and hamburgers. It wasn't until we moved to North Carolina that we discovered "barbecue" had nothing to do with hot dogs and hamburgers and everything to do with slowly cooking a whole hog over some flames.
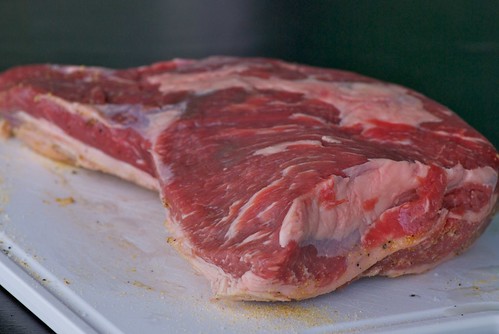
tri-tip roast

Now that we live in Southern California, I've fallen for Santa Maria-style barbecue made from tri-tip, a flavorful, triangular cut of beef from the bottom sirloin.

Santa Maria-style barbecue originated in the Santa Maria Valley in Central California in the 19th century. After cattle round-ups, American cowboys, known as vaqueros, would host huge gatherings that featured beef skewered and cooked over a red oak fire. The beef was simply seasoned with salt and pepper and served with Pinquito beans, salsa, bread, and simple desserts. It hasn't changed much in almost two centuries.
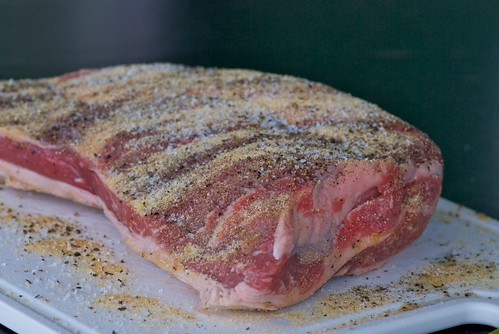
tri-tip with dry rub

So when my local supermarket had tri-tip roast on sale recently, I bought one, then I came home and emailed my friend Joe (@steakperfection on Twitter) for a recipe. A beef aficiando, I knew Joe would have a tried-and-true tri-tip recipe; I didn't know that he'd kindly take the time to write remarkably detailed instructions for me. (Thank you, Joe!)

Below is Joe’s recipe and instructions for his authentic Santa Maria-style tri-tip. It’s long, but just read it through first before doing anything, and you’ll see, it’s really not complicated, just very detailed, and oh-so-worth the effort. The finished tri-tip is unabashedly rich, tender, and juicy.

And just in case you're wondering, tri-tip tastes better if it you eat it while wearing a cowboy hat.

rare tri-tip

Santa-Maria Style Barbecue from Joe 
Serves 6 to 8
Printable recipe.

Ingredients:

A very well-marbled tri-tip roast, 2 to 3 pounds
Inexpensive vegetable oil
Garlic powder, not garlic salt (or raw garlic)
Black pepper, coarsely ground
Kosher (big-grain) salt

Equipment:

A corning bowl big enough to lay the tri-tip in and season
Tongs
An instant-read thermometer (or two is better)
A rack (like a cookie rack) over a cooking sheet, where you'll let your tri-tip rest for 5 minutes after cooking
Aluminum foil to cover the tri-tip when it's cooked
A non-carbon knife (ceramic is best) for slicing the tri-tip before serving (carbon imparts a metallic taste)

Preparation:

Did you remember to fill your grill's gas tank?  Hope so . . .

20 to 30 minutes before you want to start cooking, clean the grill, turn the temperature to its highest settings, and close the lid. If possible, it should reach 750F at grill level. You can tell without an infrared thermometer by doing this: if you can put your hand 3" above the grill and count to 3, it's not hot enough.

Remove all layers of fat, fat chunks, and silver-skin from the tri-tip.  Make sure to remove the fat from the pocket on the short side of the triangle. When removed, there will be a deep pocket there.  Discard the fat (or use it for tallow). The only visible fat remaining will be tiny specks and streaks of fat, which are too small to trim and which will melt quickly on the fire.

Dry the tri-tip with paper towels (including inside the pocket). Bring it to room temperature. If you're doing this alone, use one hand (I use my left) to get "dirty" holding the tri-tip and rubbing in the rub, and use the other hand (I use my right) to pour on the ingredients.

Before you start, take the tops off the oil, salt, garlic and pepper containers (remember you'll have only one hand, once you start). Place the tri-tip into a corning or glass bowl with 2" edges. We'll first season one side of the tri-tip, then flip it over to do the other side. Ready, set, go -

(a)  Pour a thin layer of vegetable oil on the outside and into the pocket of the tri-tip.  Then rub it all over fairly evenly (with the 'dirty' hand). The only purpose of the oil is to make sure that the seasonings stick.

(b)  Next, pour a very thick layer of garlic powder on the top. (If you're using fresh garlic, rub in several cloves of fresh garlic all over, leaving a thick layer of paste.) The tri-tip should be almost completely yellow with the garlic powder.

(c)  Now pour lots and lots of black pepper on the tri-tip. Rub it in gently (so that it coats the tri-tip). If the pepper begins to fall off, pour a little more oil into your 'dirty' hand, and "pat" the oil onto the tri-tip, so that the pepper sticks. If you've used enough garlic powder and pepper, there will be one or two tablespoons extra in the bottom of the dish. The tri-tip should be almost completely black with the pepper.

(d)  Finally, you're ready for the Kosher salt.  Usually, I have to add more oil at this point, so that the salt will stick. Add lots of salt, so that the surface is white with lots of black-pepper highlights and the occasional yellow background. The idea is to create a thick layer of seasoning on the outside of the tri-tip, that will create an exterior with a dry, crunchy texture and intense flavor profile, to contrast with the lush, beefy, juicy interior.

Now use your 'dirty' hand to flip over the tri-tip, and repeat the process from (a) through (d). There is usually enough seasoning in the bottom of the pan to start the second side, but you'll probably have to add more of each. Again, don't forget to season the pocket and the three edges of the triangular tri-tip.

If you want, you can cover and hold the tri-tip for 2 hours before cooking. (If you need longer, refrigerate it.)

I'll assume that your grill temperature is almost 750F, that the outside temp is around 70F, and that there is no huge humidity or breezes/winds. (All three affect cooking time.)

When you're ready to start grilling ready, set your iPhone's (or your kitchen) timer for two minutes. You're going to flip the tri-tip from one side to the other every two minutes during the cooking process. Put the tri-tip on the grill (use tongs, not a fork, to prevent loss of juices) and close the lid as fast as possible. Start your timer. Don't peek. After two minutes, quickly open the grill, flip the tri-tip and close the lid. Continue to do this for a TOTAL of 8 minutes (rare - my fav) or 10 minutes (med-rare). If your grill isn't hot enough (I'll bet it isn't), the tri-tip will take up to twice as long.  Use an instant read thermometer (or two of them, which is better in case one if off - just average the two thermometers) to tell when the tri-tip is done. Take it off at 115 (rare) or 125 (med rare), measured in the middle of the tri-tip  Insert the thermometer(s) from the side of the tri-tip, so that they go into the center. Put the cooked tri-tip onto the rack, and cover it with a "tent" of aluminum foil. The goal: don't let the foil touch the tri-tip, because you don't want to lose that exterior crust that you worked so hard to create.

Let it rest for 5 entire minutes. (This will total about 7 minutes by the time you start slicing:  that's a good thing.) Now move the tri-tip to your cutting board. Using a very sharp knife, cut slices about 1/8" thick (i.e. thin) across the grain.  The tri-tip has a strange grain structure -- hard to explain, but you'll know it when you see it. You'll be cutting almost perpendicular at the point of the triangle and then angle in more and more as you reach the middle of the triangle. Watch for the meat grain, and you won't have any problem. If your cutting board has a little juice from the cutting, dribble it only your serving platter.

For more information about steak, visit www. SteakPerfection.com.

Top photo credit: FCC, randy pertiet. Remaining photos, Susan Russo.
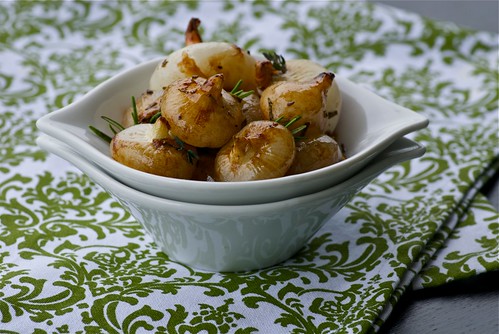
Monday, January 23, 2012

Balsamic Roasted Cippoline Onions from Frieda's, Inc.

balsamic roasted cippolini onions

Onions have their place. I wouldn't dream of starting a marinara sauce without sauteed shallots. Nearly every soup I make starts with sauteed brown onions. Red onions enliven fruit salsas, and scallions add depth to guacamole. And let's face it, a bratwurst without grilled Vidalia onions is a crime.

What about cippoline onions? Believe it or not, they've never even visited my kitchen, that is, until a few weeks ago. Now, they're nestled in the onion basket alongside my beloved shallots and brown onions.

Why this sudden change of heart toward cippoline onions? It's because of Frieda.  I'm unable to resist her charms, and if you taste her cippoline onions, you'll find yourself equally captivated.

These cippoline onions are from Frieda's Inc., The Specialty Produce People. I've had the pleasure to do some recipe development with Frieda's and have tasted many of their products from onions and potatoes to pine nuts and dried cranberries. The cippoline onions are wonderful.

Cippoline onions which look like little flying saucers are naturally sweeter than most onions, and roasting them only enhances their sweetness. In the recipe below, the contrasting flavors of tangy vinegar and sweet sugar add depth of flavor while the fresh rosemary lends fragrance and earthiness. Serve these balsamic roasted cippoline onions with roasted pork tenderloin, grilled steak or chicken, or even a bowl of wild rice for a hearty vegetarian entree.

Then make some room in your onion bowl for the cippoline onions you'll be buying next time you're at the supermarket.

Balsamic Roasted Cippoline Onions
Makes 4 servings
Printable recipe.

1 pound cippolini onions, preferably from Frieda's Inc.
1 tablespoon olive oil
3 tablespoons balsamic vinegar
1 teaspoon light brown sugar
1/2 tablespoon finely chopped fresh rosemary
A couple of pinches of salt and freshly ground black pepper

1. Position a rack in the center of the oven and preheat to 350 degrees F.

2. To easily remove the onion skins, cut a small x in the bottom of each onion. Place onions in a pot of boiling water for 2 minutes. Drain and plunge in a bowl of cold water for 2 minutes. Then the skins will easily slide off with even the gentlest nudge. Scouts honor. Place onions in a large glass or ceramic baking dish.

3. In a small bowl, whisk olive oil, balsamic, brown sugar, rosemary, salt, and pepper.  Pour over onions and toss to coat. Cook 40 to 45 minutes, turning a couple of times, until the onions are browned and tender and the sauce thickens and becomes bubbly.

You might also enjoy these cippoline onion recipes:
Five Onion Confit recipe from Sass & Veracity
Pickled Cippolini Onions recipe from A Jersey Girl in Portland
Roasted Brussels Sprouts &  Cippolini Onions recipe from Gluten Free For Good

Monday, January 16, 2012

Chipotle Chili Butternut Squash Soup is Hot

chipotle chili butternut squash soup

I'm not exactly sure when it happened, but at some point in the last several years, ginger butternut squash soup became America's #1 vegetarian soup of choice.

Ginger butternut squash soup is everywhere. Google it, and you'll get hundreds of recipes (I stopped counting after the eighth full page load). Every vegetarian cookbook has a recipe for it. It's the go-to soup for Thanksgiving holidays and dinner parties, and 9 times out of 10, it's the only vegetarian soup available at cafeterias and supermarkets food courts. I've seen brawls break out in Trader Joe's as people frantically try to scoop up as many cartons of butternut squash soup as possible.

I understand the love. I made my first pot of ginger butternut squash soup about 15 years ago from a vegetarian cookbook I bought right after we moved to North Carolina. It was a revelation: creamy, refreshing, soothing. I have made that soup so many times, the recipe is etched in my brain along with my telephone number and birth date.

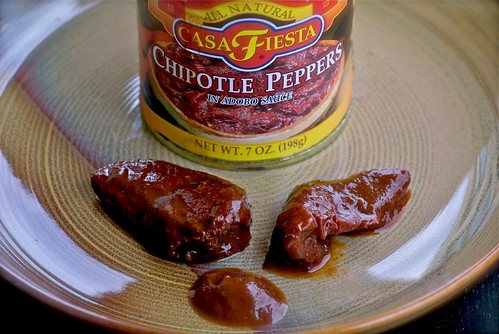
chipotle chilis in adobo sauce

Yet, my love has grown weary. I'm tired of ginger butternut squash soup. I need something bolder, zestier, hotter! So for today's butternut squash soup recipe, I swapped my gentle ginger for assertive chipotle chilis in adobo sauce. Smoky, fiery chipotle chilis are the perfect antidote to boring butternut squash soup. With cilantro, onions, and cumin, this soup has a decidedly southwest flair, so I won't need to tell you that big hunks of warm, buttery cornbread are the only accompaniment it needs.

How about you? Doing anything different with butternut squash soup lately?

Chipotle Chili Butternut Squash Soup
Serves 6-8
Printable recipe.

Chipotle chilis in adobo sauce can be found in the Mexican food section of most major supermarkets or at specialty Mexican markets.

1 (1 1/2-2 pound) butternut squash (about 4 cups cooked)
2 tablespoons olive oil, divided, plus a little for brushing the squash
1 yellow onion, diced (about 1 cup)
3 celery stalks, chopped (about 1 cup)
2 carrots, peeled and chopped (about 1 cup)
4 cups low-sodium vegetable broth
2 tablespoons chopped chipotle chilis in adobo sauce, (about 2 chilis tablespoon)
1/2 teaspoon ground cumin
3/4 cup chopped fresh cilantro

1. Position a rack in the center of the oven, and preheat to 400 degrees F. Slice butternut squash in half. Scoop out the seeds and discard. Brush the flesh with a little bit of olive oil. Roast flesh side down on an aluminum foil-lined baking sheet for 40-45 minutes or until tender when pierced with a fork. Let cool slightly before scooping out flesh. Discard skin.

2. In a deep pot over medium-high heat, warm oil. Saute onions, celery and carrots for 5 to 7 minutes, or until softened and lightly browned. Add the cooked squash and broth. Bring to a boil, then reduce to low, and cook for 5 to 7 minutes. Add chilis, cumin, and cilantro. Turn off heat, and let cool 10 minutes before pureeing. Taste it. If you’d like it spicier, then add more chilis.

3. Working in batches, puree the soup in a blender until smooth, and return to the pot over low heat. Stir occasionally until the soup is thoroughly heated, about 10 minutes. If you prefer it thinner, then add a bit more broth or warm water, and stir well. Season with salt and pepper as desired. Garnish individual servings with fresh cilantro, if desired.

You might also like these recipes featuring chipotle chilis in adobo sauce:
Sweet Chipotle Glazed Baby Back Ribs recipe from Sippity Sup!
Chipotle Turkey, Black Bean, and Corn Soup recipe from Soup Chick
Healthy Chipotle Chicken Chili with Spiced Tortillas recipe from Food Blogga
Beef Enchiladas with Chipotle-Pasilla Chili Gravy recipe from Homesick Texan

Monday, January 9, 2012

Forget Food Trends. What Will YOU Be Eating in 2012?

What is going on ?Can you hear it? It's the heading scratching, hand-wringing, coffee-buzzed clatter of food editors and writers across the country desperately attempting to predict the biggest food trends of 2012. Here's a sampling:

Yahoo News and the Food Channel predict the rise of Peruvian food in 2012. "No chance," counters Esquire's John Mariani, who claims that beyond ceviche, "there's not a helluva lot more to Peruvian cuisine."

Meanwhile, The James Beard Foundation (JBF) predicts a Thai food "revival," while Fox News says it'll be Moroccan and Jewish foods.

The new "it" dessert of 2012: the humble doughnut. That is, according to the JBF. YumSugar thinks it's going to be kouign-amann, a buttery French cake. My money's on doughnuts for this one. Who is ever going to know how to spell or pronounce "kouign-amann"? I mean, really, come on.

A few more predictions for the hottest food trends in 2012 include unusual pizza toppings (cardoons, anyone?), exotic seafood (uni), and more animal parts (bone marrow, tripe).

These folks really shouldn't stress about being right. Because when December 2012 rolls around, they'll all be writing articles about the actual hottest food trends of 2012, and it won't matter if their December lists are completely different from the January ones.

I'm not too interested in predicting this year's food trends, but I am interested in learning about what foods YOU'll be eating of 2012. Below you'll find eight foods I'll be eating more of in 2012 not because they're trendy, because they're delicious, healthy, and easy to cook at home.

How about you? Which foods do you intend to eat more of in 2012? How do you feel about food trends? 

1. Almond Milk: Since I'm lactose-intolerant, I've been drinking soy milk for years, but lately I've come to love unsweetened vanilla almond milk. A mere 40 calories per cup, its nutty, mildly sweet flavor makes it ideal for breakfast smoothies.

How to enjoy: Use in place of milk in smoothies, oatmeal, and other recipes, such as pudding.
Sample recipesCranberry, Banana, and Honey Smoothie and Mom's Chocolate Pudding with Bananas and Graham Crackers.

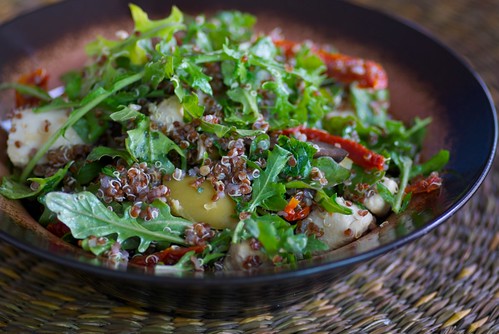
2. Red Quinoa (pronounced KEEN-wah): Because it's a gluten-free, high-protein, remarkably nutty, chewy, versatile whole grain. And because it's red.

How to cook it: Boil -- follow instructions on package.
Sample recipesWarm Red Quinoa, Chicken, and Arugula Salad (below)

warm red quinoa, chicken, and arugula salad

3. Leafy Greens including Kale, Red Kale, Mustard Greens, Swiss Chard, Collards, Turnip Greens, and Spinach. You see them at the market, pick them u[, wonder what to do with them, then put them back. Don't! Saute them with olive oil and garlic; add them to soups, stews, pastas, and grain dishes; eat them raw in salads. On average, 1 cup of cooked leafy greens without salt ranges between 35-45 calories and contains between 2-6 grams of protein.

How to cook them: Boil; steam; saute; roast; raw in salads.
Sample recipesRaw Greens, Apple, and Carrot Salad with Warm Maple-Mustard Vinaigrette and Easy Butternut Squash, Kale, and Chickpea Soup.

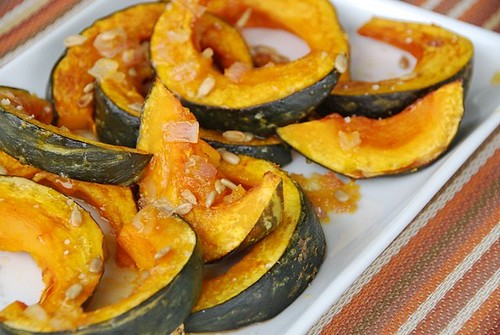
4. Kabocha Squash (pronounced kuh-boh-cha). Because its sweet, fluffy orange flesh tastes like a sweet potato. Because it's only 30 calories per cup. And because you're tired of buying butternut squash.

How to cook it: roast; steam; boil.
Sample recipeRoasted Kabocha Squash with an Orange-Honey Glaze (below)

roasted Kabocha squash with an orange-honey-ginger glaze

5. Scallops. Among the least "fishy" of seafood, scallops are usually liked by everybody at the dinner table. That's a good thing since 4 ounces of scallops are only 125 calories and boast 28 grams of protein. They also pair well with just about any type of vegetable from roasted spaghetti squash and sweet potatoes to sauteed escarole and spinach.

How to cook them: Pan-sear or bake.
Sample recipe: Pan-Seared Sea Scallops with Kumquats

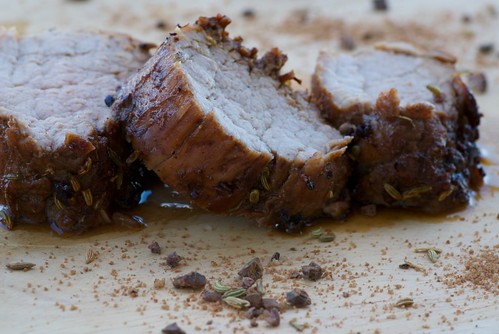
6. Pork tenderloin. It's inexpensive, easy-to-make, endlessly versatile, and healthier than you might think. An average 4-ounce serving of pork tenderloin is 195 calories, 25 grams of protein, and 9.5 grams of fat.

How to cook it: Pan-sear, then roast in oven; grill.
Sample recipe: Chipotle-Cocoa Rubbed Pork Tenderloin (below)

cocoa nib and fennel encrusted pork tenderloin

7. Grass-Fed Ground Bison/Buffalo. I love ground beef burgers and meatballs and don't plan to stopping eating them, but I will be introducing more ground bison into my diet in 2012. Why? It's got a fresh, robust meat flavor, sort of like a souped-up steak burger, and it's lower in fat, calories, and cholesterol as compared to ground beef. A 3.5 ounce serving of 95% lean ground bison is 146 calories, 20 grams of protein, and 7.2 grams of fat.

How to cook it: Pan-sear; oven bake; grill; broil.
Sample recipe: Buffalo Burger from Simply Recipes

8. Almonds:While some women's purses contain hair brushes and coupon holders, mine contains a Ziploc snack bag of about 14 roasted, unsalted almonds. I can't tell you how many times that bag of almonds has saved me from a hunger attack while waiting in line at IKEA or Costco. And at only 100 calories, it beats the heck out of a Swedish meatball plate or slice of pizza.

How to enjoy almonds: As a snack; mixed with dried fruit; baked into muffins and breads; swirled into oatmeal and yogurt; tossed into salads, pastas, and whole grain dishes.
Sample recipes: Warm and Nutty Breakfast Couscous and Cherry, Prune, and Almond Granola.

Top photo credit: FFC, San_Drino.

Thursday, January 5, 2012

Cookbook Review: Cooking Light, The Complete Quick Cook


Did your New Year's resolution include losing weight or eating more healthfully? You're not alone. Millions of Americans have made the same resolutions. I just hope you don't go on a diet. Because if you go on a diet, you'll eventually go off a diet.

Here's my advice: skip the diet and buy a book instead, specifically Cooking Light: The Complete Quick Cook by Bruce Weinstein and Mark Scarbrough. Having written more than 20 cookbooks together, Weinstein and Scarbrough know how to develop recipes that work. If they say a recipe takes 30 minutes or less, is good for you, and tastes great too, then you can believe them.

In The Complete Quick Cook, you'll learn how to be a savvier shopper, faster cook, and healthier eater, all of which will help you lose weight and keep it off. The book includes over 200 healthy, quick-cook recipes organized into chapters including Fast & Fresh Salads, Convenience Cooking, Stir-Fry, Fast & Fancy, and Sweet Endings. Most are written in short, clear sentences, and have relatively short ingredients lists with easy-to-find ingredients. Nearly all recipes are accompanied by a color photo. 

Though many of the recipes call for low-fat ingredients such as fat-free yogurt and reduced-fat cheese, you'll find plenty of indulgent ones including Pear and Prosciutto Pizza with provolone cheese, Spicy Sweet and Sour Pork, and Espresso-Walnut Cake. Not surprisingly the book leans heavily toward skinless chicken breast, turkey, and beans as protein sources, but there are many more tempting options such as Balsamic Steak au Poivre, Clams Casino Stew, and Veal Scaloppine with Mustard Cream Sauce.

Many traditional long-cooking recipes are made-over to suit the time-strapped cook: The Speedy Chicken and Cheese Enchiladas call for rotisserie chicken and pre-chopped onions and bell peppers, while the Quick Paella calls for boil-in-bag brown rice.


The Complete Quick Cook is more than just a wonderful collection of easy, healthy recipes; it’s an invaluable resource for home cooks. You’ll learn the top 10 secrets of a quick cook including how to keep a well-stocked pantry (they provide you with list of essential ingredients), how to embrace convenience  foods (rotisserie chicken, anyone?), and which foods are quick-cooking (flank steak, pork chops, onions) and long-cooking (brisket, Boston butt, potatoes).

Here's to keeping your New Year's resolutions and to a happier, healthier 2012.

Szechuan Pork
YIELD: 4 servings (serving size: 1 cup pork mixture and 1/2 cup noodles).
Printable recipe.

For the best taste, use natural-style, no-sugar-added peanut butter, a savory flavor against the fiery mix. If peanut allergies are a problem, use cashew butter or tahini.
6 ounces soba (buckwheat noodles), uncooked
2 teaspoons dark sesame oil
1 (1-pound) pork tenderloin, trimmed and cut into 2-inch strips
1 tablespoon chili garlic sauce
1 teaspoon bottled ground fresh ginger
3/4 cup red bell pepper strips (about 1 small pepper)
1/4 cup fat-free, lower-sodium chicken broth
11/2 tablespoons lower-sodium soy sauce
1 tablespoon peanut butter
3/4 cup (2-inch) diagonally cut green onions (about 4 green onions)

1. Cook noodles according to package directions, omitting salt and fat. Drain and rinse with cold water; drain.

2. Heat oil in a wok or large nonstick skillet over medium-high heat. Add pork, chili garlic sauce, and ginger to pan; stir-fry 2 minutes. Add bell pepper to pan; stir-fry 2 minutes. Add broth, soy sauce, and peanut butter to pan. Reduce heat to low; cook 1 minute or until sauce is slightly thick. Stir in onions. Serve over noodles.

CALORIES 338; FAT 8.6g (sat 2.2g, mono 3.5g, poly 1.9g); PROTEIN 30.4g; CARB 36.8g; FIBER 1.7g; CHOL 63mg; IRON 2.9mg; SODIUM 693mg; CALC 40mg