Monday, March 31, 2008

Savory Sausage and Fennel Galette and My New Best Friend

I have a new friend I'd like you to meet. I've never had a friend like her before-- she's fast and easy. So I was skeptical when my parents, of all people, insisted I would like her.

I don't like her, I love her. Readers meet Miss Cuisinart.
Cuisinart food processor

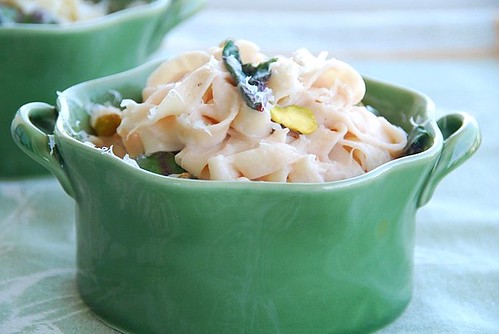
She is now my new best friend. Pie crusts (see ricotta pie and rice pie) are a snap thanks to her. She's also really neat; I no longer have to suffer sticky fingers and counter tops; she keeps everything to herself.

In full disclosure, our relationship was a bit bumpy at first. I wasn't sure when her dough needed more water or was ready to come out, and she wasn't forthright with me. So last time my mom visited, she conducted an intervention between Miss C. and me. Mom gave me suggestions such as how much water to add and how much to pulse. She did not give Miss C. any suggestions though; I guess I was the source of all our problems.

After that, Miss C. and I made pate brisee, a French buttery crust that is wonderful for pies and tarts. We also made a basic sweet pie crust for strawberry pie (coming soon). I was so elated at this turn of events, I would have kept making more crusts, but how many pies can two people eat?

Though Miss C. and I are tight now, I still won't invite her over when I make homemade pizza dough. Pizza dough is always made by hand; I'm just old school that way.

If you're looking for a new friend to hang out with in the kitchen, Miss C. has lots of sisters; you can find them at the Cuisinart site. So go ahead and splurge. OK, maybe not on the $800 one, (we are in a recession after all) but perhaps on the $150 or $200 model. She'll be one of the most reliable friends you've ever had.

savory sausage, fennel, and sun-dried tomato galette

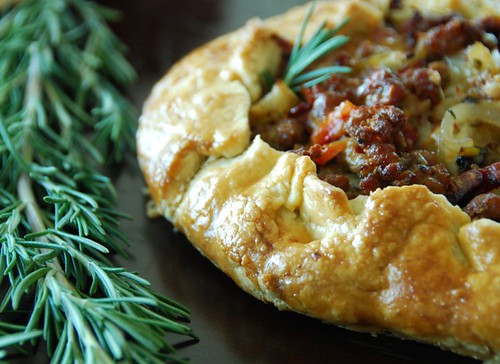
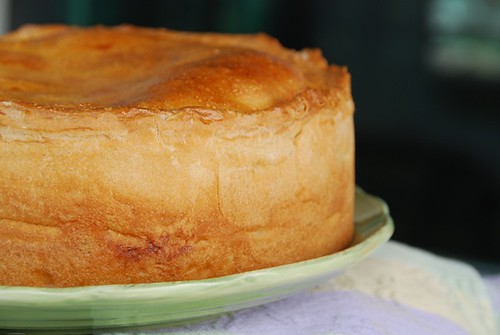
My pate brisee (from Martha Stewart's Baking Handbook) is the basis of this savory galette. A galette, which I like to call the "Lazy Susan's Pie," is an open-faced, free form pie that can be filled with savory or sweet fillings. Think of galettes as low maintenance pies-- they don't have to look perfect; a few little cracks are "rustic."

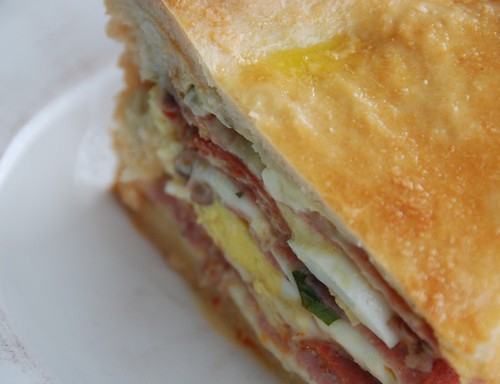
I made a savory filling of hot Italian sausage, crisp fresh fennel, salty sun-dried tomatoes, and rich smoked mozzarella. Though the aroma will entice you to eat two or three pieces, I'd suggest just one; the crust is rich, and buttery, and the filling is, well, filling. Serve it as an appetizer or with a simple side salad of arugula and cherry tomatoes for a dinner.

Savory Sausage and Fennel Galette
Serves 6-8
Print recipe only here.

Pate Brisee: (from Martha Stewart's Baking Handbook)
1 1/4 cups all-purpose flour
1/2 teaspoon salt
1 stick unsalted butter, cold, cut into small pieces
1/8 cup ice water, plus more if needed

Filling:
(from Food Blogga)
2 tablespoons olive oil, divided
1 medium onion, thinly sliced
1 pound hot fennel sausage, removed from the casing
1 medium fennel bulb, thinly sliced
2 teaspoons sugar
6 sun-dried tomatoes, soaked in oil, patted dry and thinly sliced
1 cup shredded smoked mozzarella
1/4 cup chopped fresh sage
1/4 cup chopped fresh rosemary

1 egg, lightly beaten, and 1/2 teaspoon water for egg wash

In the bowl of a food processor, combine flour and salt; pulse to combine. Add the butter, and pulse until mixture coarse crumbs with some larger pieces remaining, about 10 seconds. (To mix by hand, combine dry ingredients in a large mixing bowl, then cut in butter with a pastry blender.)

With the machine running, add the ice water through the feed tube in a a slow, steady stream, just until dough holds together without being wet or sticky. Do not process more than 30 seconds. Test by squeezing a small amount of the dough together; if it is still too crumbly, add a bit more water, 1 tablespoon at a time.

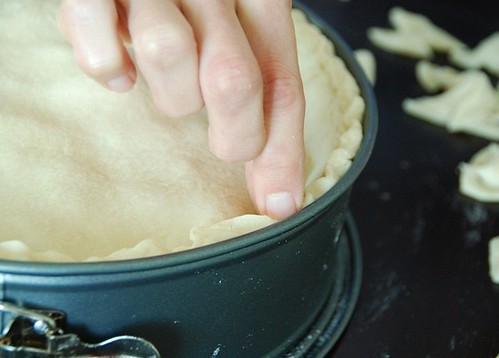
Turn out the dough onto a clean work surface. Divide in half, and place each half a piece of plastic wrap. Shape into flattened disks. Wrap in plastic, and refrigerate at least 1 hour or overnight. (The dough can be frozen for up to 1 month; thaw overnight in the refrigerator before using.)

To make the filling, warm olive oil in a large skillet over medium-high heat. Add onions and sausage, stirring occasionally until lightly browned, about 3-4 minutes. Add sliced fennel and sugar, and continue sauteing until sausage is cooked through and vegetables are lightly browned, another 3-4 minutes. Add sun-dried tomatoes, and cook for 1-2 minutes. Turn off heat, and stir in smoked mozzarella and fresh herbs, until well combined.

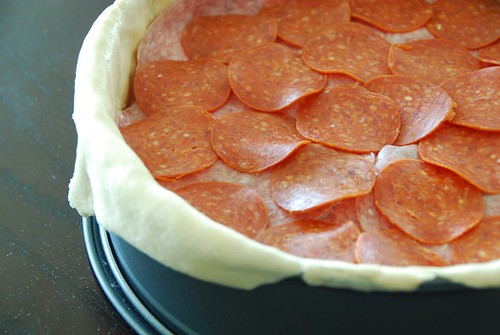
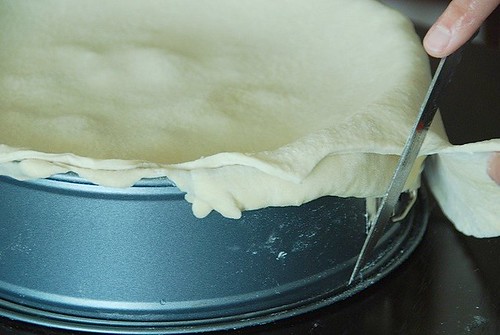
On a lightly floured surface, roll out the dough to a 12-inch round, about 1/8 inch thick. Transfer dough to a large parchment-lined baking sheet. Refrigerate until ready to use, up to 1 hour. Meanwhile, preheat the oven to 375 degrees F.

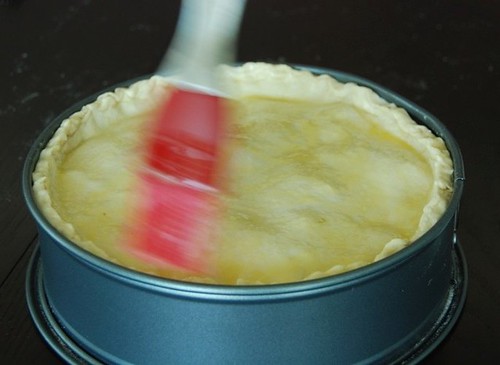
Arrange filling on top of dough, leaving a 2-inch border all the way around. Fold the border over the filling, overlapping where necessary and pressing gently to adhere the folds.

Brush dough with egg wash. Bake for 35-45 minutes, or until crust is golden brown and the filing is crispy. Transfer the baking sheet to a wire rack to cool the galette. Serve warm or at room temperature.

(The second piece of dough can be frozen for up to 1 month; thaw overnight in the refrigerator before using.)

savory galette slice

You might also like:

Save This Page on Del.icio.us

Thursday, March 27, 2008

Seductive Strawberry Salad

seductive strawberry salad

Think a salad can't be seductive? Think again.

strawberries at the farmers' market

Seductive Strawberry Salad
Makes 4 servings.
Print recipe only here.

Salad:
4 cups wild arugula
3 cups baby spinach
2 medium blood oranges, peeled and sectioned (about 1 cup)
10-12 fresh strawberries, hulled and sliced (about 1 cup)
1 medium mango, diced (about 1 cup)
1 tablespoon thinly sliced fresh mint leaves
1 tablespoon thinly sliced fresh basil leaves
2 tablespoons toasted nuts (such as pistachios, pecans, or walnuts)

Vinaigrette:
1 tablespoon extra-virgin olive oil
1 tablespoon white balsamic vinegar
1 tablespoon fresh Meyer lemon juice (or regular lemon)
2 tablespoons freshly squeezed blood orange juice
1/4 teaspoon grated lemon zest
Salt and pepper, to taste

To toast the nuts, place them in a small, dry skillet over medium heat. Shake the pan handle back and forth for 1-2 minutes, or until the nuts are golden brown and aromatic. Set aside.

In a large bowl, gently toss all salad ingredients (excluding nuts).

In a small bowl, whisk all vinaigrette ingredients until well combined. Pour over salad and toss gently until well coated. Divide the salad among four plates and sprinkle with nuts.

seductive strawberry salad

I hope Mike of Mike's Table likes fruit in his salad because I'm sending this to him for his Strawberry Seduction event.

You might also like these fruity salads:


Save This Page on Del.icio.us

Sunday, March 23, 2008

Creamy Goat Cheese and Beet Green Pasta

creamy goat cheese and beet green pasta

A few weeks ago at the farmers' market I asked for a bunch of beets. The farmer grabbed a beautiful bunch: five crimson colored globes topped with remarkably long, red stalks and large, crisp leafy greens. I could practically taste them.

Then right in front of my eyes, before I could utter a word, he beheaded my beautiful beets and flung the greens into a dirty cardboard box with other sad, misfit vegetables.

"What are you doing?" I asked.

"What? You didn't want them did you?" he asked, incredulous.

Didn't want them?
! The beet greens are the best part.

It made me miss Carlos, the farmer from whom I bought beets all last year when we lived in LA. One Sunday when Carlos saw me coming, he ran from the table into the back of his van. He motioned me to follow him. When I reached the back of the van, he uncovered a big box full of fresh bunches of beet greens and flashed me a smile. "For me?" I asked. "For you, Miss."

I actually got a little welled up. In the midst of a bustling market, he thought to save me the beet greens and was less concerned with making extra money off of them than of making me happy.

Though no one could ever replace kind-hearted Carlos, I've met a new, super nice farmer, Sam. The first time I bought beets from Sam, I commented on how beautiful the beets greens were; he asked, "Would you like some more?"

"Really, are you sure you don't want them?" I asked.

"Yeah, you can have them," he said.

Imagine. Giving beet greens away. What is the world coming to?

beets greens on the red carpet

If you've never cooked with beet greens, then you're in for a treat. They taste similar to Swiss chard (slightly earthy and nutty) and are a delicious alternative to spinach. Though they can be eaten raw in salads, I prefer them cooked, which softens their texture and draws out their flavor.

Beet greens are true health food: One cup of cooked beets greens is only 39 calories and provides 220% (that's not a typo) of your daily vitamin A (for healthy eyes, cells, skin, and hair) and 60% of your daily vitamin C (a health-promoting antioxidant). It's also full of other nutritious vitamins and minerals. See below for tips on selecting, storing, and cooking with beet greens.

ahh...fresh fettucine

Though you can use any type of pasta you prefer for this creamy goat cheese and beet green pasta, I bought freshly made fettucine from Assenti's Pasta here in Little Italy. With so few ingredients in this dish, the light and chewy fresh pasta really stands out. It bears little resemblance to the dried boxed variety. Plus the creamy goat cheese sauce clings deliciously to it as you twirl it on your fork.

Creamy Goat Cheese and Beet Green Pasta

Serves 4
Print recipe only here.

1 tablespoon plus 1 teaspoon olive oil
6 cups washed and sliced beet greens

1/2 pound fettucine (or other noodle)

1/2 cup heavy cream or half n' half
4 ounces goat cheese
1/4 teaspoon fresh thyme
salt and freshly ground black pepper, to taste
2 tablespoons pistachios
1/2 cup grated Parmesan or Asiago cheese

To prepare the beet greens, cut off the thick stalks. Submerge greens in a large bowl of cool water to remove dirt. Drain, rinse thoroughly, and pat dry. Remove any tough inner stalks of the beet green leaves, then slice cross-wise into thin strips. Set aside.

In a deep, heavy pot, cook pasta in salted water according to directions, preferably al dente. If using fresh, it should cook within 3-5 minutes.

In a large skillet, warm olive oil over medium heat. Add sliced beet greens, until wilted, about 2-3 minutes. In a small bowl, whisk the cream and goat cheese until well blended. Add to the skillet, and reduce heat to medium-low. Cook for 3-4 minutes, or until sauce begins to thicken slightly. Add fresh thyme, and season with salt and pepper. Add the cooked pasta to the skillet and toss until well coated. Divide among two plates; top with pistachios and extra grated cheese. Serve immediately.

Serving Suggestion-- This pasta pairs well with spicy and fruity salads, such as:
Selecting and Storing Beet Greens:
  • Look for unwilted, green leaves with bright red spines. If they're shriveled or full of holes, then skip 'em.
  • To prepare beet greens, cut off the thick stalks. Submerge greens in a large bowl of cool water to remove dirt. Drain, rinse thoroughly, and pat dry. Remove any tough inner stalks of the beet green leaves. Wrap loosely in paper towel and place in a Ziploc bag or an air-tight plastic container. They should last 2-3 days in the refrigerator this way. You can also remove the beet greens and store them unwashed in the refrigerator for up to 4-5 days, assuming they weren't too old when you purchased them.
  • If you aren't going to use your beet greens right away, then clean them as usual and par-boil them by dropping them in boiling water for about 1 minute; remove and plunge into a bowl of ice water. Shocking the greens will keep them bright and beautiful. Drain, and store in an air-tight container in the fridge for up to 3-4 days.

Other delicious ways to enjoy beets greens:
  • Thinly sliced and added raw to salads
  • Sauteed in olive oil and garlic, and placed on crostini with goat or blue cheese
  • Added to vegetable soups and stews
  • Added to frittatas with cheese such as ricotta, Parmesan, or goat
  • Simply sauteed in olive oil and garlic, then topped with raisins and toasted pine nuts
  • Creamed with milk or heavy cream, butter, flour, and nutmeg
I hope Ramona of The Houndstooth Gourmet likes beet greens because I'm sending this pasta dish to her. She's hosting Weekend Herb Blogging created by Kalyn of Kalyn's Kitchen.

You might also like these pasta dishes:


Save This Page on Del.icio.us

Wednesday, March 19, 2008

What's Better Than Desert Wildflowers? Shrimp Tacos, That's What.

more purple wildflowers

Ever since we moved to Southern California five years ago, every spring we hear the same chorus: “You’ve got to go to Anza-Borrego. They have the most gorgeous wildflowers you’ve ever seen.”
Every spring Jeff tries to convince me to drive the 2 ½ hours to see them, and every spring I find some excuse not to. It’s not the drive (I love driving). It’s just that we have flowers everywhere we look here. Plus, I'm a fall foliage girl.
Two weekends ago, however, San Diego was all abuzz about this being the BEST wildflower season since 2005 (because of our unusually high rainfall-- a whopping 4.43 inches since last July). Jeff asked again, and I just couldn't say no. So we packed a lunch, grabbed our maps, and drove to Anza Borrego Desert State Park.
Apparently every person within the San Diego county limits decided to go to Anza-Borrego that day too. After waiting in line at the visitors’ center for nearly 30 minutes, a park ranger told us, “It’s a sea of brilliant color out there. Almost as good as 2005! You guys definitely picked the right day.” Jeff flashed me a big smile and said, “See, we picked the right day!”
We followed his directions and ended up on a dusty, dirt road. Jeff hopped out of the car, and said, “Wow! Look at those purple flowers!”
“You mean the weeds?” I said.
“They’re not weeds, they’re wildflowers. Look at them all!” he said.
“They look like weeds,” I said.

purple wildflowers at Anza-Borrego Desert Park

Anza-Borrego is technically a desert, which in my translation means sand with weeds in it. Based upon the “oohs” and “aahs” I was hearing, and the obscene number of Nikon D80's snapping pictures, it seems I was the only one not impressed.
So I went along: “Ooh, look at all those purple weeds.”

yellow wildflowers

OK, I admit, there were some lovely flowers, but the best part of the day was the ride home. We stopped at an orange and grapefruit grove where we bought a 15-pound bag of freshly picked navel oranges for $3 and a 15-pound bag of pink grapefruits for $4! Fresh fruit at a bargain price—it just doesn’t get better. I was very impressed.

fresh grapefruits and oranges

The scenery was spectacular; we finally saw the “sea of brilliant colors” we were promised, and it was awe-inspiring. We even spotted a few idyllic farms.

wildflower landscape near Anza-Borrego Desert Park

We ended the day with a simple, delicious meal of shrimp tacos with citrus-avocado salsa. Our fresh sweet oranges and tart grapefruits were tossed with creamy local avocados (from Terri, who you’ll learn more about in a later post) and sprinkled on top of spicy, crispy shrimp tacos. I took one bite and declared, “Now this was worth 5 hours of driving.”

shrimp tacos with citrus-avocado salsa

Shrimp Tacos with Citrus-Avocado Salsa
Makes 4 servings
Print recipe only here.

Salsa:
1 teaspoon extra virgin olive oil
3 scallions, finely chopped
2 teaspoons minced fresh ginger
1 ruby red or pink grapefruit, peeled, de-seeded, and diced
1 navel orange peeled, de-seeded, and diced
1/4 cup peeled jicama, diced
1 avocado, diced and sprinkled with lime juice to prevent discoloration
juice of 1 lime
1 teaspoon cayenne pepper or 1 teaspoon minced jalapeno pepper (without seeds)
1 tablespoon minced fresh cilantro

Tacos:
24 extra large or jumbo shrimp, peeled and deveined
1 tablespoon olive oil
salt and pepper, to taste

1 to 2 tablespoons canola oil, for searing shrimp
juice of 1/2 lime
1/4 teaspoon cayenne pepper
8 flour or corn tortillas

To make the salsa, simply combine all ingredients in a medium size bowl and toss gently until well combined.

Place the shrimp in a large bowl with olive oil, salt and pepper. Toss well to coat and set aside for 5-10 minutes.

Heat canola oil in a large skillet over medium-high heat. Add shrimp and cook 5 to 6 minutes, turning to ensure that they brown evenly on both sides. Squeeze the juice of 1/2 lime over the shrimp and sprinkle with cayenne pepper. Toss to coat evenly. Remove to a plate when cooked.

To assemble tacos, heat tortillas in a dry skillet over medium heat for 1 minute per side or, using metal tongs, simply hold over an open flame until warmed and slightly charred. Place three shrimp on each tortilla; serve with salsa and extra fresh cilantro for garnish. Serve immediately.

You might also like these citrus-y dishes:


Save This Page on Del.icio.us

Sunday, March 16, 2008

Bring Back The McDonald's Shamrock Shake


Tomorrow is St. Patrick's Day, which reminds me of two things: getting my wisdom teeth extracted and McDonald's Shamrock Shakes.

It was the Monday of my freshman spring break, and rather than frolic on a Florida beach, I got my four impacted wisdom teeth removed. I developed "dry sockets," another name for pain. It was a blast.

My face blew up to gargantuan proportions, and with all the bruising, I looked like Violet from Willie Wonka and the Chocolate Factory. I couldn't eat any solid foods, so after work, my dad surprised me with a coffee milkshake from McDonald's. He knew it was my favorite, and that frosty, creamy milkshake was just what I needed to soothe my aching mouth.

When he saw how much I loved the milkshake, he came home Tuesday grinning from ear to ear with a special St. Patrick's Day green Shamrock Shake (and a coffee one, just in case I didn't like the Shamrock Shake).

I was skeptical. I have never been fond of mint (it reminds me of Milk of Magnesia; not good), but after a couple of sips, its refreshing flavor left a pleasant minty tingling sensation in my dry socketed mouth.

Each night that week, my dad brought me a Shamrock Shake. By Friday, however, I was green at the thought of drinking another one. But when your dad stops at McDonald's after a long day at work, waits in line to buy you a milkshake, and delivers it to you, you drink it.

Though I've never told him, those milkshakes made me feel better than just about anything that week, and I think about it every year at St. Patrick's Day. I only wish I could have one again. Unfortunately, McDonald's doesn't carry them in the US anymore.

Homemade Shamrock Shake

After 15 years of waiting, I decided to make my own Shamrock Shake. It was cold, minty, and delicious just as I remembered. It also made my teeth ache a little, but I think that was just in my head.

So Dad, this "McBlogga Mint Shake" is for you. By the way, thanks.

I hope Michelle's kids like mint cause I'm sending this to her for the final month of her Winter Bazaar. Her kids weren't even born when the Shamrock Shake came out, and I wouldn't want them to be left out of an American classic. I'm also sending it to Danielle of Habeas Brulee, the host of Sugar High Friday #41, who would like you to share your "sweet gifts" with her.

making a shamrock shake

Shamrock Shake (a.k.a. The McBlogga Mint Shake)
Makes 2 servings
Print recipe only here.

1 cup milk
1/4 teaspoon peppermint extract
1/4 teaspoon green food coloring
2 cups vanilla ice cream

Place milk, extract, and food coloring in a blender; blend on high for about 10 seconds. Add ice cream and blend another 15 to 20 seconds on low so the ice cream doesn't melt too much. It should be thick and frothy.

For a Chocolate Shamrock Shake, just use chocolate ice cream instead of vanilla, but skip the green food coloring. It's not pretty when mixed with chocolate.

Happy St Patrick's Day!


Save This Page on Del.icio.us

Thursday, March 13, 2008

How to Make Easter Pizza Chena (Pizza "Gaina")

Italian Easter Pizza Chena "full pie"

Next week, Italian women everywhere will be knee deep in eggs, butter, sugar, and ricotta cheese -- it's time for making Easter pies. Easter, as with most holidays for Italians, is a time for culinary celebration.

Both sweet and savory pies are a hallmark of an Italian Easter. Last year I shared the story of my grandmother's famous Italian Easter ricotta pie with pineapple that solidified her place as the best ricotta pie baker in the family. Then, last Sunday, I shared my personal favorite: sweet Easter rice pie. I'd feel remiss if I didn't share the granddaddy of all Easter pies: Pizza Chena.

Every year my grandmother made countless delicious Easter pies. And every year starting several weeks before Easter, anyone who even remotely knew her would start visiting or calling her. Their motive: to butter her up enough to get a piece of her Pizza Chena.

Nan, as my mother would say, "was dumb as a fox;" she knew when people were only after her Pizza Chena, and she wasn't going to give it to just anybody. That's because it was time-intensive and expensive to make. Of course, her mailman always got a piece because he would tell Nan that of all the Italian women in the neighborhood her Pizza Chena was the best. (Not too subtle, but it worked every time.)

making pizza chena
(layering the Pizza Chena)

Since Nan moved into an Alzheimer's unit several years ago, we haven't had Pizza Chena. It's one of a few dishes that my mom lost the desire to make after Nan wasn't able to cook anymore. So my mom was both delighted and nostalgic when I called her for the recipe.

Pizza Chena, a Neapolitan dialect term meaning “full pie,” is a colossal two-crusted savory pie stuffed with various Italian meats, cheeses, and eggs. All of that savory “fullness” is encased in either a flaky pastry crust or, as my family made, a satisfyingly chewy pizza dough crust.

trimming dough
(trimming the dough)

Pizza chena
, is often mispronounced by Italian-Americans (including my family) as “Pizza Gaina.” We always joked that when you eat it you "gain-a" a lot of weight.

There are many regional differences in making Pizza Chena; my grandmother made hers with hot sausage, fresh basket cheese, mozzarella, and hard boiled eggs, preferences passed down from her Campanian mother-in-law. Thank goodness her mother-in-law, known as "Big Nana," liked my grandmother so much. If she didn't, then my family might never have enjoyed so many of these scrumptious Easter dishes.

pinching dough
(pinching the dough)

When Jeff called my dad to tell him how delicious my Pizza Chena was last week, he asked if we had eaten it all. "All of it? Dad, there's enough 'Pizza Gaina' for 12 people!" Jeff said.

My dad replied, "You know, 'Pizza Gaina' freezes really well. You could just slice the rest of the pie and freeze the individual pieces. Then you could take out a couple when company comes." (Not too subtle, but it works every time.)

I wanted to surprise him, but what the heck. Don't worry, Dad, there are a couple of thick wedges of Pizza Chena in the freezer with your name on them.

egg wash on dough

(adding the egg wash)

I'm sending this special recipe to a special blogger friend, Alanna of A Veggie Venture, who is hosting Pi Day, in honor of pi, the mathematical constant of 3.14 and a trillion more digits. Just the thought of pi brings back nightmares of high school geometry, but I persevered because I couldn't pass up sharing this amazing recipe with you.

I just realized that my friend Chris from Melecotte is guest hosting this month's Apple and Thyme event (created by the ladies of Vanielje Kitchen and The Passionate Palate), so I had to submit this story to her. Chris also writes lovingly about her family, so check out her blog if you're not familiar with it.

Here's how to make traditional Italian Pizza Chena (for Easter or any time of the year):

a big wedge of pizza chena

Italian Pizza Chena
Serves 10-14
Print recipe only here.

Dough:
Makes approximately 2 pounds.

1 packet of active dry yeast
1 tablespoon sugar
1 tablespoon salt
2 cups of warm water
5-6 cups all-purpose flour
2 tablespoons olive oil

Filling:
1 teaspoon olive oil
1/2 pound fresh, hot Italian sausage (in casing)
1/2 pound capocollo, thinly sliced
1/3 pound Genoa salami, thinly sliced
1/3 pound pepperoni, thinly sliced
1 pound fresh basket cheese***
1/2 pound mozzarella cheese, thinly sliced
1 dozen eggs (8 will be beaten, 4 will be hard boiled)
1/3 cup minced fresh flat leaf parsley
15-20 cranks freshly ground black pepper
1 egg beaten with 1 teaspoon water for egg wash

In a large bowl, dissolve in 2 cups of warm water, yeast, sugar, and salt. Using a spoon, gently blend. Add 5 cups of all-purpose flour and 2 tablespoons of olive oil to start. Blend with a spoon just until the dough starts to form, then using your hands, transfer to a floured surface.

Knead well, adding flour if it’s too sticky, until the dough becomes springy and smooth. It should take a good 5-10 minutes of vigorous kneading. It will be soft and silky when done.

Place the dough ball in a large, clean bowl coated with olive oil and rub some olive oil on top of the dough. Cover with a clean, dry dishtowel and let rise in a warm, draft-free area until doubled in size (at least 2 hours). (For more tips on making fail-proof pizza dough, click here.)

Meanwhile, fill a large, heavy-bottom saucepan halfway with water. Bring to a light, rolling boil, and place four room temperature eggs in the water. Maintaining a light, rolling boil, cook them for 18-20 minutes. Using a slotted spoon, remove the eggs, place in a colander, and run under cool water. Tap the eggs against the counter top to crack the shells; remove the shells, and rinse the boiled eggs under cool water. Slice thinly and set aside.

Meanwhile, heat 1 teaspoon olive oil in a large skillet over medium heat. Remove the sausage from its casing and add to the pan. Cook for 5-6 minutes, or until browned and crispy. Transfer to a small bowl and set aside.

Place oven rack in center of oven and preheat to 350 degrees F. Brush the inside surface of a 10 X 3 spring form pan with olive oil.

Once the dough is risen, punch it down to release air bubbles. Transfer dough to a lightly floured surface, divide in half, and roll one half into a 12-inch round. Transfer the dough to a 10-inch spring form pan. Using your hands, fit the dough snugly in the pan, gently stretching it to hang 1 inch over the edge of the pan.

In a medium bowl, whisk together the 8 eggs, parsley, and black pepper.

Fill the inside of the dough with alternating layers of sliced meats, cheeses, and sliced hard-boiled eggs. After 5-6 layers, pour half of the egg mixture over the filling allowing it to seep down. Continue layering the meats and cheeses, then pour the remainder of the the egg mixture evenly over the top. You should have enough for 10-12 layers.

On a lightly floured surface, roll out the second half of the dough to a 12-inch round. Place the dough over the filling, and using a sharp knife, trim excess dough until it just meets the rim of the pan.

Using your fingertips, pinch the edges of the dough together, and gently roll the bottom layer over the top layer creating a seal. Then pinch the dough between your thumb and index finger creating a slightly fluted edge all around. Brush the top of pie with the egg wash.

Bake pie for 60- 75 minutes, or until the crust is golden brown. Remove from the oven and allow to cool at least 20-25 minutes. Release the spring and transfer the pie to a serving plate. Cut into wedges and enjoy at room temperature.

Leftover pizza chena can be stored in an air-tight container in the refrigerator for 5-7 days. Individual slices can also be wrapped tightly in tinfoil and placed in a heavy-duty freezer bag for up to two months.

***Fresh basket cheese is a semi-soft cheese that is used primarily for binding ingredients together. It can be found at Italian markets and cheese shops. If you can't find it, then substitute one (15-ounce) container of ricotta cheese (drained) and whisk it with 2 large eggs.

You might also like these savory Italian calzones, pizzas, and sandwiches:


Save This Page on Del.icio.us

Sunday, March 9, 2008

Traditional Italian Easter Rice Pie

An actual conversation between Food Blogga and her mom last week:

"Hi, Mom. Can I have your recipe for rice pie?"

"You mean Nan's recipe? I've always made Nan's recipe."

"OK, then can I have Nan's recipe for rice pie?"

"What for, your ba - log?"

"Yeah, I want to do a post on Italian Easter pies."

"Ooh, isn't that nice, honey."

(silence)


"So, do you still have the recipe?"

"Yeah, first you start with -- "

"What, you found the recipe already?"

"Aaaa-y I've been makin' rice pies for so many years, I know it by heart. First, you start with 2 dozen eggs, then you add --"

"Two dozen eggs? Ma, it's just Jeff and me, remember?"

"Yeah, but you want it to come nice and thick. Plus, you only have it once a year, so you might as well make a big one."

"How big?"

"Make it in like a deep 15 X 13 inch dish."

"Ma, I couldn't even fit a dish that big in my kitchen cupboard."

"Well, if you had told me sooner, I would have sent you one. I've got a couple extra in the basement."

This is the essence of an Italian mom -- she always wants you to eat, and she's always ready to give you something.

Growing up in my family, Easter was defined by my mother's Italian rice pies and my grandmother's famous Italian Ricotta Pie with Pineapple, which was so good, it practically caused a family feud back in the day.

Of all the Easter pies, my favorite has always been rice pie (torta di riso). Though there are regional variations for it, most sweet rice pies are made from eggs, rice (usually Arborio), ricotta cheese, and citrus (orange, lime, or, most popularly, lemon).

What makes Italian rice pie so irresistible? It's like having two pies in one. When it bakes, a bottom layer of dense, chewy rice forms that is topped with a separate layer of creamy, lemon-laced custard. (I even added Meyer lemon zest because there is no such thing a rice pie that is too lemony.)

Rice pie is traditionally served alongside ricotta pie for Easter Sunday dessert, but I'll let you in on a secret: the best time to eat it is Monday morning. Rice pie is served at room temperature, and Easter Sunday night, the leftovers get wrapped and refrigerated. Come Monday morning, that same rice pie is even better -- imagine rich, ricotta pie, creamy panna cotta, and old-fashioned, chilled lemon pudding all rolled into one amazing pie.

You don't have to be Italian or celebrate Easter to enjoy rice pie; it's a wonderful dessert anytime of the year. Since it's not overly sweet, it also makes a lovely brunch dish. Plus, for a pie, it's pretty low maintenance. All the ingredients get mixed together, and it only has a bottom crust, so there's no fussy lattice work to worry about.

There is one caveat: Never use Uncle Ben's rice.

My mom used it once instead of the starchier Arborio; the rice separated and became mushy, causing the custard to collapse. It happened about 20 years ago, and she still mentions it every year. (I think she has PTPS -- Post Traumatic Pie Syndrome.)

Nan would be happy to know that her rice pie recipe is being sent to the lovely Barbara of Winos and Foodies who is hosting LiveSTRONG Day 2008. To celebrate her own survival of cancer and to raise awareness of the Lance Armstrong Foundation, Barbara would like you to share a recipe that contains yellow food and send it to her by April 19th. Need some inspiration? Check out last year's round-up of 149 yellow colored dishes including my Swordfish with Pineapple Mango Salsa.

Italian Easter Rice Pie
Makes 10-12 servings.
Print recipe only here.

Makes (one) 10.5-inch pie

Crust:
1 1/2 cups all-purpose flour
¼ cup sugar
½ teaspoon salt
½ teaspoon baking powder
¾ stick unsalted butter (chilled)
1 extra large egg or 2 small eggs
1-2 tablespoons ice water, or as much as needed

Filling:
1/2 cup uncooked Arborio rice
4 cups water or whole milk*

7 large eggs
1 cup sugar
2 teaspoons lemon extract (or the zest and juice of 1 Meyer lemon)
2 teaspoons pure vanilla extract
1 pound ricotta cheese (drained)


For the crust, combine flour, sugar, salt, and baking powder in the work bowl of a food processor fitted with a metal blade; pulse several times to combine. Add the butter and pulse about 10 times until the dough becomes pebbly in texture. Add the eggs and pulse repeatedly until the dough begins to stick together. Slowly add the ice water by the tablespoonful, while using a few long pulses. Add more drops of ice water as necessary, until the dough holds together well. Invert the dough onto a floured work surface. Form into a circle, flatten into a disc, wrap in plastic wrap, and refrigerate while preparing the filling. (Dough can be kept in the refrigerator for up to 2 days before continuing.)

If you don’t have a processor, then combine the dry ingredients in a bowl; add chunks of chilled butter, and using a pastry blender or two forks, chop the butter until it resembles little pebbles. At this point, add the eggs and ice water, and stir with a spoon until the dough begins to form. Using your hands and working the dough as little as you can, transfer it to a lightly floured surface. Knead until the dough holds together. Form the dough into a ball, flatten into a disc, wrap in plastic, and chill while preparing the filling. (Dough can be kept in the refrigerator for up to 2 days before continuing.)

To make the filling, place the rice and water in medium heavy-bottom saucepan and bring to a boil. Reduce the heat to low and cook the rice, uncovered, stirring occasionally for about 15-20 minutes, or until the water is absorbed and the rice is sticky. The rice should still be firm as it will finish cooking in the oven. Remove from heat and set aside.

Add the eggs and sugar to a large bowl and using a hand-mixer, beat until well combined. Add lemon extract and vanilla extract, and beat on low for about 10 seconds. Add the drained ricotta and beat on low for a few seconds until just combined. Add cooked rice and mix with a rubber spatula until well combined, making sure there are no clumps of rice. Place in the refrigerator.

Place a rack in the lower third of the oven and preheat to 375 degrees F. Coat the 10.5-inch pie plate with cooking spray. Turn out the dough onto a lightly floured surface and roll into an 11- inch circle. Transfer the dough to the prepared pie plate, gently pressing it into the bottom and sides. No fluted crust in necessary since, like a tart, the crust is flush with the filling. At this point, set the crust in the freezer for about 10-15 minutes to get it really chilled, which will make for a flakier crust.

Remove the chilled crust from the freezer and pour the filling to about 1/4 of an inch below the top of the crust, as it will puff up slightly when baking. Note: If you have some extra filling left over, then you can pour it into a small baking dish or ramekins for a crustless version, and follow the same baking instructions.

Bake for 1 hour or until the filling puffs up, turns golden, and is “set,” meaning it should not be jiggly when you gently move the pie plate from side-to-side. Remove from the oven and let cool on a rack. Serve at room temperature or chilled.

Note: Though 1/2 cup arborio rice to 4 cups water or milk usually works perfectly, depending on the brand of rice, some absorb more, some less. If you find the rice is completely cooked after the 20 minutes and there is still some water left, you can simply drain it.

Note: I use a 10.5-inch pie plate, slightly larger than average. You can also make it in a 10-12- inch square or rectangular glass dish.

Note: Leftover rice pie can be stored in an air-tight container in the refrigerator for up to 3-4 days.

You might also like:


Save This Page on Del.icio.us

Thursday, March 6, 2008

How to Make a Frittata Like My 99-year-old Italian Grandmother

When I was a kid, Lent never seemed that hard to me. I had to give up something I really loved like Snickers (which I seriously needed to cut back on anyway) and avoid meat on Fridays (which meant eating my grandmother's fri--taaa-taas). Eating Nan's frittatas was not a sacrifice.

Frittata is nothing more than eggs with vegetables, cheeses, or meats cooked into it. Yet, my grandmother's frittatas were always something special -- delicious, healthy, and comforting.

Whether or not you recognize Lent or have an Italian grandmother, there are many reasons why you should know how to make a frittata:
  • They're ridiculously fast and easy to make.
  • They're the perfect meal for the end of the week when you've run out of food. You could put just about anything in a frittata, (though I'd avoid chocolate chips).
  • They're endlessly versatile. Make them with whole eggs, egg whites, or Egg Beaters; add meats, cheeses, or veggies; and eat 'em for breakfast, lunch, or dinner.
  • They make great leftovers for tomorrow's lunch. Try some in a sandwich.
  • They're so much fun to say. Come on, you know you want to say it like Nan used to. So in your best Italian grandmother accent and say, "fri--taaa-taa" as if it's the greatest word in the world. I know for Nan, it was right up there with "pizzelle" or her favorite word, "bingo."

Here's how to make a great frittata in 5 easy steps:

1. Saute fillings before adding them to the eggs. This will impart more flavor and ensure that the fillings are thoroughly cooked.
2. Lightly whisk eggs with herbs and seasonings before adding to the pan.
3. Cook frittata in a heavy, flat-bottomed skillet over medium heat.
4. This one is important: Using a fork, gently push the egg mixture from side to side, allowing it to seep to the bottom of the pan. This will ensure that the eggs cook thoroughly.
5. Place the frittata under a broiler to create a puffy, golden brown topping.

Nan hasn't made a frittata in a few years. She is 99 years old and lives in the Alzheimer's unit of a nursing home, but it's like she's here with me every time I make one. Today's frittata combines two of Nan's favorite vegetables: tender asparagus and earthy mushrooms.

When I served it to Jeff, I said in true Nan fashion: "Come on, have a nice piece of frit--aaa--taa with asparagus and mushroonz." For some reason, Nan could never pronounce the final "m" in mushrooms; it always came out as "mushroon," which would inevitably make me laugh, which would inevitably lead to Nan saying, "What? What's so funny?"

I'm sending my Italian asparagus, mushroon, and Parmesan frittata to Maryann of Finding La Dolce Vita and Marie of Proud Italian Cook who are hosting the fabulous Festa Italiana. They'd like you to share your favorite Italian dish with them. I couldn't possibly choose just one favorite Italian dish, but frittatas are right up there with homemade pizza and Sunday gravy and meatballs.

Now, it's time to mangia!

Italian Asparagus, Mushroom, and
Parmesan Frittata

Makes 2 servings.
Print recipe only here.

1-2 teaspoons olive oil
10 asparagus spears, cut into 1-inch slices
1 cup sliced white button mushrooms
6 large eggs (Egg Beaters or whites only are fine)
1/3 cup grated Parmesan cheese (divided)
1 1/2 tablespoons chopped fresh parsley
1/4 teaspoon crushed red pepper flakes
A few dashes of salt

Bring a small saucepan of water to a boil. Boil the asparagus for 2 minutes; drain, then place in a bowl of ice water. Shocking it will maintain its vivid green color. Drain and set aside.

Meanwhile, beat the eggs in a small bowl with half of the cheese, the fresh parsley, and salt and red pepper.

Add olive oil to an 8-inch non-stick skillet over medium-low heat. Add mushrooms and sauté for 5 minutes or until golden brown; add the asparagus and cook 1 more minute. Pour the egg mixture into the skillet. With a fork, gently move the egg mixture from side to side allowing the egg to seep to the bottom of the pan. Do this for 5-7 minutes, until the eggs start to solidify and a crust begins to form around the edges. Give the pan handle a jiggle, and when the eggs appear nearly set, evenly sprinkle the second half of the cheese over the top of the frittata.

Remove the pan from the stove top and place under the broiler for 4-5 minutes, or until the top begins to puff up and turn golden brown. Keep a close eye on it so it doesn’t burn. Let cool for a couple of minutes before slicing. Serve hot or at room temperature.

Other Nan dishes you might like:
Other vegetarian, Lent-friendly dishes you might like:
PS-Mansi just invited me to send my frittata to her for the 20th round of Weekend Breakfast Blogging created by Nandita. Why not send Mansi your well-balanced breakfasts by March 31st? Everybody knows that breakfast is the most important meal of the day. (My mother taught me well.)

Save This Page on Del.icio.us

Monday, March 3, 2008

Sunday, Bloody (Orange) Sunday

Blood Oranges at Farmers' Market

It rained here for the last three weekends. As a result, the Sunday farmers' market was nearly empty. (Southern Californians don't go out in the rain.) So, it's been just a few farmers, some die-hard vegetarians, and a handful of New England transplants.

This all changed yesterday. It was the quintessential San Diego day -- a glorious 72 degrees, sunny, with a light breeze. You couldn't move at the farmers' market. People were clamoring for colorful rainbow carrots, luscious Meyer lemons, and tart pink grapefruit.

The biggest attraction was the exceptionally juicy, tangy blood oranges that beckoned market-goers with their ruby-colored flesh. One poor farmer handing out samples nearly got trampled on by a gaggle of Red Hats who were visiting. And there I was without my camera. Ugh.

So what's all the fuss about? Anthocyanin, the same chemical that makes blueberries blue and cranberries red, gives blood oranges their characteristic "bloody"color. It can range from bright ruby red to deep burgundy and has an exceptionally pleasing sweet-tart flavor unlike any other orange.

It's more than just their brilliant flesh that makes them so prized, it's their unique flavor -- like a sweet orange that has been infused with tangy tangerine and tart cherries.

Blood oranges are pricey--usually $3.00/ lb here-- but they're worth it. Their season generally runs from January-April, so now is the time to get them.

citrus and arugula salad

Try them in savory salads of bitter greens, zesty salsas for seafood, or even grain dishes. As for sweets, they're amazing in marmalades, delicious in baked goods, and sophisticated when paired with simple vanilla ice cream or pudding. Or you could eat 'em plain. Just don't wear a white shirt while doing so. Take my word for it.

Sicily has some of the world's must sought-after blood oranges, which was my inspiration for this peppery wild arugula salad with juicy blood oranges, tart pink grapefruit, and tangy minneolas (another citrus hybrid that is half grapefruit and half tangerine). Crispy, salty prosciutto contrasts pleasingly with the sweet-tart fruit while earthy pine nuts add complexity and texture. This is a salad that isn't easily forgettable.

Wild Arugula and Blood Orange Salad with Prosciutto
Serves 4
Print recipe only here.

Salad:
6 cups of wild arugula**
2 blood oranges, peeled and sliced cross-wise
1 pink grapefruit, peeled and sliced cross-wise
1 Minneola tangerine, peeled and sliced cross-wise
3 ounces proscuitto, torn into small strips
2 teaspoons toasted pine nuts

Orange-Fennel Vinaigrette:
1/2 teaspoon fennel seeds, toasted
1 tablespoon extra virgin olive oil
1 tablespoon rice vinegar
1/4 cup freshly squeezed blood orange juice or navel orange juice
1/4 teaspoon orange zest
2 teaspoons Dijon mustard
salt and pepper, to taste

To toast the pine nuts, place them in a small, dry skillet over medium heat. Shake the pan handle back and forth for 1-2 minutes, or until the nuts are golden brown and aromatic. Set aside.

To make the vinaigrette, place fennel seeds in a dry skillet over medium heat. Shake the pan handle back and forth for 1-2 minutes, or until slightly toasted and aromatic. Place in a bowl, and whisk in remaining vinaigrette ingredients.

Layer prosciutto slices in a medium skillet over medium heat for 30 seconds. Flip once and cook an additional 20-30 seconds or until crispy. Set aside.

Arrange fruit slices on a plate, top with a bunch of arugula, and 1/4 of the prosciutto. Drizzle with dressing, and sprinkle with pine nuts.

**Wild arugula is a svelter version of regular arugula and has a slightly more peppery flavor; it can be found in most organic stores such as Whole Foods. Of course, regular arugula can be substituted.

You might also like:


Save This Page on Del.icio.us