Showing posts with label cooking. Show all posts

Friday, September 5, 2008

Skillet Boneless Pork Chops with Rosemary Peaches

boneless pork chops with rosemary peaches

I have always associated peaches with July and August. That is until a few years ago when I discovered the most succulent peaches I ever tasted -- in September.

Peach season in California is long and abundant; it runs from May to October and peaks from July through September. In general, peaches are picked early to withstand shipping and to have a longer shelf life. The problem is when you take home many of these peaches, they are as hard as a rock (and taste like one too). That's why buying locally grown peaches is a better option when possible.

A couple of years ago at a local farmers' market I discovered Summerset peaches, which peak in September. Like a California sunset, these fruits are a dazzling blend brilliant reds, warm oranges, and golden yellows. In addition to being visually beautiful, they emit a delicate floral aroma and are amazingly juicy and succulent, as if warmed by the sun.

Of course, you don't need Summerset peaches to enjoy this recipe; there are plenty of late summer varieties from which to choose. And though peaches are delightful eaten out of hand or in desserts, they are surprisingly delicious in savory dishes. They pair brilliantly with arugula and prosciutto and are wonderful grilled and filled with savory cheeses and herbs.

My favorite way to enjoy them though is by sauteeing them on the stove with some tangy honey and woodsy rosemary. The sweet, acidic, and earthy flavors blend harmoniously to make a remarkable companion to pork for an easy yet stylish weeknight dinner.
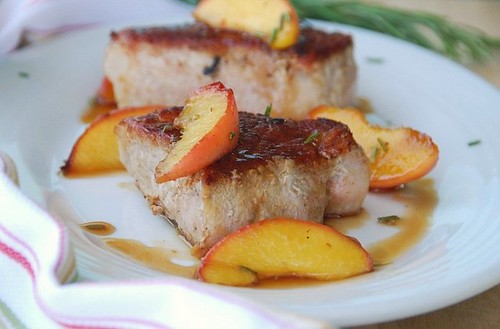
boneless pork chops with rosemary peaches

Skillet Boneless Pork Chops with Rosemary Peaches
Serves 4
Print recipe only here.

Pork:
4 boneless pork chops (about 4-6 ounces each)
salt and freshly ground black pepper
2 teaspoons olive oil
2 teaspoons butter

Rosemary Peaches:
4 teaspoons butter
4 ripe yet still firm yellow peaches, sliced with the skins on
2 teaspoons apple cider vinegar
1/4 cup light brown sugar
1 teaspoon finely chopped fresh rosemary
salt and freshly ground black pepper, to taste

Trim any fat off of the pork chops. Season well with salt and black pepper and let rest for 5 minutes.

In a large skillet over medium-high heat, warm 2 teaspoons olive oil and butter. Add pork chops. Cook 4-5 minutes, then flip once, and cook another 4-5 minutes, or until the outside is browned and crisp and the inside is cooked through yet still tender.

Meanwhile, to make the peaches, heat 4 teaspoons butter in a large skillet over medium-high heat. Add the peach slices and cook 2-3 minutes, until lightly browned. Add the vinegar, brown sugar, rosemary, and salt and pepper, and stir. Lower heat to medium-low, and cook for 3-5 minutes, or until the sauce begins to bubble up and thicken. Spoon peaches and sauce atop hot pork chops, garnish with additional chopped rosemary, if desired, and serve immediately.

You might also like:

Pork Tenderloin with Strawberry-Mango Salsa


Boneless Pork Chops with Persimmon and Pomegranate Salsa


Grilled Steak Tacos with Watermelon-Mango-Jicama Salsa


Dhanggit's Lemon, Rosemary and Honey Roast Pork
Lydia's Pork Tenderloin with Lavender Grilled Peaches
Rachel's Island Pineapple Pulled Pork

Save This Page on Del.icio.us

Tuesday, June 10, 2008

Creamy Lobster Risotto for Father's Day

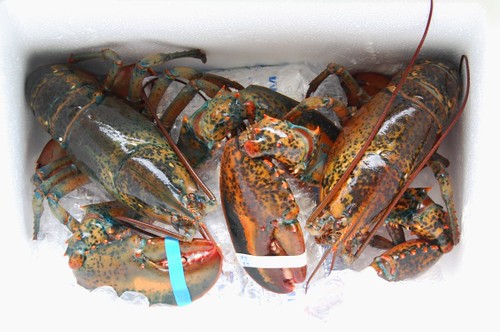
losters in box

I've got the best Father's Day gift idea!
  • It doesn't involve neck ties or golf shirts.
  • There will be no trips to Lowe's or Home Depot (you're welcome, ladies).
  • You get to enjoy it too.
So what is it? Risotto made with fresh Maine lobsters from Sagamore Lobster.

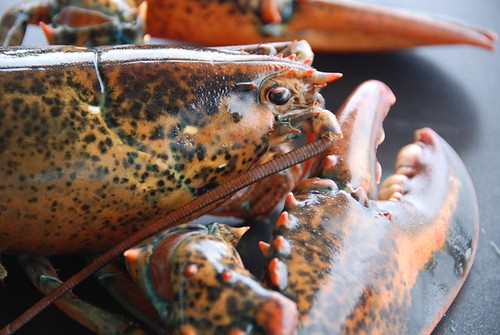
Now that we live in Southern California instead of New England, we really miss fresh Maine lobsters. A couple of months ago, I wanted to make risotto with Maine lobster instead of with smaller spiny lobsters (which are plentiful here on the West Coast). Not only did I have trouble finding fresh Maine lobsters here, but when I did, they were prohibitively priced -- about $50/pound. Thankfully, Sagamore has made it cheaper to buy live lobsters and have them shipped 3,000 miles than to buy them in a store here (these live lobsters were courtesy of them).

lobster live close

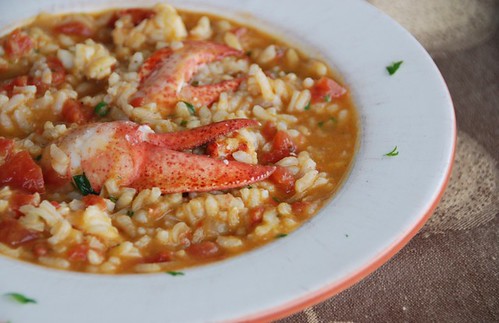
Though lobster is often best enjoyed simply boiled, there is something sumptuous about a creamy lobster risotto. That's because chewy Arborio rice is cooked to perfection in flavorful broth, dry white wine, and savory San Marzano tomatoes. Silky butter and aromatic fresh parsley only enhance the flavor of the succulent lobster meat. Dad won't soon forget this dinner.

The only thing left to buy now is a Father's Day card. Unfortunately, I didn't see any on Sagamore's web site. Maybe they can work on that.

lobster risotto

Lobster Risotto
Makes 2 main or 4 side servings.
Print recipe only here.

1 (1 1/4 pound) live lobster
2 teaspoons olive oil
2 teaspoons butter
1 finely diced large shallot
3/4 cup Arborio rice (risotto)**
4-5 cups low-sodium broth, or as much as needed
1/2 cup dry white wine
1 (14-oz) can diced tomatoes with juices, preferably San Marzano tomatoes
2-3 tablespoons finely chopped fresh Italian parsley
1 tablespoon butter, not optional
Salt and pepper, to taste
Good extra virgin olive oil, for drizzling

Heat broth in a medium saucepan over medium heat. Once it's hot, lower to a simmer.

Bring a large pot (big enough to submerge the lobster completely) of salted water to a boil. To kill the lobster, hold a butcher knife over its head, about an inch behind its eyes; puncture and slice forward in one motion. Plunge the lobster head first into the boiling water for 7-8 minutes. The shell should be bright red, though the meat will finish cooking in the risotto. Remove the lobster from the pot, rinse, and allow to cool.

To remove the meat, twist off the claws; crack them open with nut crackers, and extract the meat. Bend the lobster's body back from the tail until it cracks; remove it. Then push the tail meat out. Crack the lobster body open and break off the legs; use a skewer to push the meat out of the legs.

For the risotto, saute the shallots in olive oil and butter. Add the Arborio rice; toast for 1 minute. Cook the risotto at a slow simmer, adding heated broth ½ cupful at a time. Most cookbooks will tell to stir continuously; I don’t, and you don't have to either. You can stir occasionally; just make sure the risotto absorbs the liquid before adding more. It will become tender and creamy as it cooks. Season will some salt about halfway through so it blends well, and add the white wine. Add the tomatoes with their juices. 4-5 cups of broth works for this recipe, but use more or less as needed. I prefer a soupier risotto for this recipe since it makes the lobster that much more tender. Add the lobster meat to the risotto, and cook 4-5 minutes.

It takes about 20 minutes total for the risotto to become completely cooked. Taste it -- it should be wonderfully creamy and thick. It’s best al dente, which means it should still retain some firmness when you chew it. Season with salt and pepper. Remove risotto from heat, and add 1 tablespoon butter for added creaminess. Add fresh parsley, and stir well.

Plate your risotto. Top it with a sprinkling of fresh parsley and a drizzle of extra virgin olive oil and serve immediately.

**I used 3/4 cup of Arborio instead of 1/2 cup as I would normally do since I used both tomatoes and more wine. Plus, I wanted more risotto to balance the rich lobster. If you choose to use less risotto, then just reduce the amount of liquid you use.

Here are more delicious Father's Day dinner ideas:

Grilled Lobster (there's a video!)


Lamb Kebabs


Baby Artichoke and Asparagus Risotto


Pasta Shells in Creamy Saffron Sauce with Shrimp and Fresh Peas


Save This Page on Del.icio.us

Friday, May 16, 2008

A Pineapple Chutney that June Cleaver Would be Proud Of

I've never been one for canning, jarring, or preserving. So when Pixie and Rosie announced their Putting Up Event, I thought, Yes! Now I have a reason to make homemade jam.

I immediately began jotting down essentials I would need, like gelatin and old-fashioned Ball glass jars. I had visions of myself in a 1950's full-skirted dress, spotless white linen half apron, and pearl necklace and heels. I was going to be sooo June Cleaver.

june cleaver

Then I double checked the event and saw that they would accept chutney as well, which doesn't need gelatin, special jars, heels, or pearls to make properly. So I made this simple savory chutney instead.

Chutneys are sweet and spicy condiments, which are remarkably versatile. Thanks to dear Deeba, I now know chutney derives from the East Indian word chatni, which is Hindi for "to crush." That's because chutneys are often made by crushing the ingredients together with a stone.

I like sweet and sour chutneys, which often get their sweetness from fruit and sugar and their sourness from vinegar.
Ingredients are simply mixed together and simmered slowly until the sugar bubbles up and thickens, creating a jam-like sauce. They're generally cooled before being eaten and can last for at least a couple of weeks in the refrigerator.

My two favorite chutneys are this mouth-puckeringly tangy kumquat and dried cherry chutney that I made several times this past winter, and today's fresh pineapple chutney. I know I'd also like Deeba's delicious spicy coriander-mint chutney.

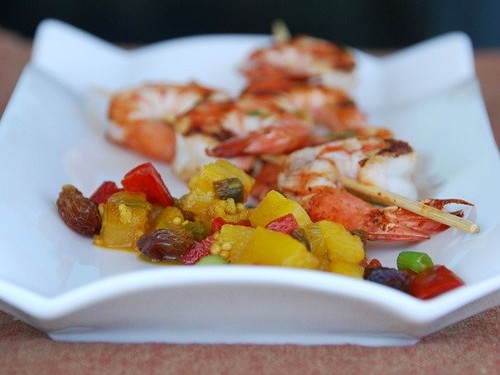
Sweet pineapple and raisins balance the sour vinegar, hot chili, and fragrant spices of this aromatic and bold chutney. It's especially tasty with grilled shrimp but also pairs well with tofu and pork; or you could just enjoy it with some freshly baked Naan or warm pitas.

Now if only I could find my silk sari ....

pineapple chutney skewers

Grilled Shrimp Skewers with Fresh Pineapple Chutney

Yields approximately 1 1/2 cups
Makes 4 entree or 8 appetizer servings
Print recipe only here.

Marinade:

24 extra large or jumbo shrimp, cleaned and deveined
1 tablespoon sesame oil
3 tablespoons low-sodium soy sauce
juice of 1/2 lime
1/2 teaspoon cumin
1/2 teaspoon cayenne pepper

Chutney:
1 teaspoon canola oil
2 green onions, thinly sliced (about 1/4 cup)
1 red bell pepper, diced (about 1 cup)
1 serrano chili, minced with some seeds
2 cups fresh pineapple, diced
1/4 cup golden raisins
3 tablespoons apple cider vinegar
1/2 cup white sugar
1/2 cup brown sugar
1/2 cup orange juice
1 1/2 tablespoons fresh ginger, minced
1/2 teaspoon ground coriander
1/2 teaspoon mustard seeds
1/4 teaspoon ground cinnamon
salt, to taste
1 tablespoon fresh cilantro, finely chopped

To make the marinade, whisk all ingredients in a bowl. Pour into either a large Ziploc bag or a plastic container. Add the shrimp, shaking well. Refrigerate for at least 30 minutes or up to 1 hour.

To make the chutney, mix all ingredients from apple cider vinegar through ground cinnamon in a small bowl and set aside. Heat canola oil in a medium pot over medium-high heat. Saute green onions and red peppers for 3 minutes, or until slightly softened. Add chili, pineapple, and raisins, cooking for an additional 2-3 minutes. Add the vinegar mixture to the pot; bring to a boil. Reduce heat to medium-low; simmer uncovered, until thick and reduced, about 35-45 minutes. Once cooked, stir in fresh cilantro, and season with salt, to taste. Allow to cool before serving. (This chutney will keep for up to 2 weeks if refrigerated in an airtight container.)

Remove the shrimp from the marinade; place 3 shrimp per skewer. Grill for 2 minutes, flipping once, or until the meat is opaque and the outside is lightly charred.

You might also like:

Lamb Kebabs with Minted Cucumber Chutney


Shrimp Tacos with Citrus-Avocado Salsa


Goat Cheese and Poblano Quesadillas with Pineapple-Mango-Habanero Salsa


Save This Page on Del.icio.us

Thursday, April 24, 2008

Roasted Rainbow Carrots and String Beans with Citrus-Sage Glaze

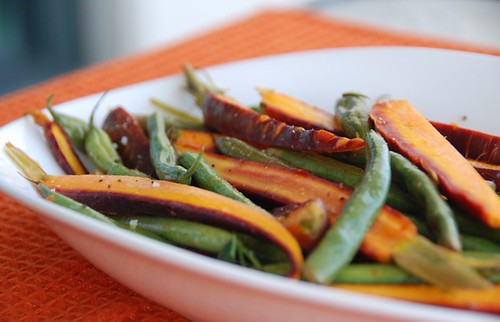
When I made these roasted carrots and string beans the other night, I immediately thought of my mom who adores them both. Like me, she often uses fresh mint on string beans, but since I had a bunch of velvety soft sage just waiting to be plucked, that's what I used. I was not disappointed.

rainbow carrots n beans

After I made the dish I called Mom to tell her. She and Dad had finished dinner, so, of course, I asked, "What did you eat?"

"I made a nice roast pork tenderloin marinated in balsamic vinegar and maple syrup, and I served it with carrots and string beans on the side," she said.

"Carrots and string beans, together?" I asked.

"Yeah, together, with some soy sauce, mint, and toasted sesame seeds. They were sooo good," she said.

"I called to tell you that I just made carrots and string beans with citrus and sage," I said.

"See that? You're in California and I'm in Rhode Island, and we made the same thing on the same day. How do you like that?" she said, with a warm laugh. (My mom just loves when things like this happen.)

If you haven't paired carrots and string beans yet, you're in for a vegetarian treat. Mini rainbow carrots have recently graced our farmers' markets, and the string beans get longer, plumper, and greener by the week.

"Mini" carrots, unlike orange “baby”carrots, are about 5-6 inches long and come in an array of fanciful colors. They're sweeter than regular carrots because they have a higher sugar content. That's why roasting them is so brilliant-- those sugars caramelize, creating a sweet, earthy, tangy flavor that is only enhanced by any variety of fresh herbs.

Carrots are highly nutritious as well. They are powerhouses of beta carotene, an antioxidant that lowers your risk of cancer, as well as lutein, which promotes ocular health. The Purple Haze carrots, like I used in my recipe, are high in the antioxidant lycopene, which has been linked to a reduced risk of macular degeneration as well as a reduced risk of many types of cancer including breast, colorectal, and esophageal.

String beans are high in vitamins A and C, important health-promoting antioxidants. So the combination of the two vegetables is a double whammy of cancer-fighting nutrients, which is why I'm sending this recipe to my friend Chris of Melecotte.

Chris is one of the first bloggers I met online. She's warm, funny, and generous. She's also a cancer survivor. April 29th marks her 7th year anniversary of being cancer-free, and to celebrate, she's hosting her Cooking to Combat Cancer event for the second year. Even if you don't know Chris, I'm sure you or someone you know has been affected by cancer. So why not send a cancer fighting recipe to Chris by April 29th?

Here's wishing Chris and all cancer survivors many more years of good health and good eating.

rainbow carrots n beans orange mat

Roasted Carrots and String Beans with Citrus-Sage Glaze
Makes 4 servings
Print recipe only here.

1/2 pound mini rainbow carrots, washed, trimmed, and thinly sliced lengthwise**
3/4 pound string beans, trimmed
2 teaspoons extra virgin olive oil
1/4 teaspoon orange zest
1/4 cup orange juice
1/4 teaspoon lemon zest
2 teaspoons Meyer lemon juice
coarse sea salt and 6-7 cranks of fresh black pepper
2 teaspoons honey
1 tablespoon chopped fresh sage

Preheat oven to 400 degrees F. Place carrots and string beans in a large rectangular baking dish.

In a small bowl, whisk olive oil, orange zest, orange juice, lemon zest, lemon juice, and salt & pepper. Pour over vegetables and toss until coated. Cover tightly with tinfoil and bake for 10 minutes. Remove the tinfoil. Add honey and fresh sage and toss to coat. Cook uncovered for 20 minutes, or until vegetables are tender yet crisp and a few brown spots appear.

Transfer vegetables to a platter or large bowl and drizzle with juices from the baking dish. Season with coarse sea salt and freshly ground black pepper, and garnish with additional sage, if desired.

**I used mini rainbow carrots, but any type of carrot is fine. I recommend slicing them to the approximate size of the string beans so they will cook evenly.

You might also like these nutritious cancer-fighting dishes:

Save This Page on Del.icio.us
Sunday, April 20, 2008

How to Clean, Cook, and Eat an Artichoke

It's peak artichoke season, and I don't want you to miss out. So if you've ever wondered how to select, clean, cook, or even eat an artichoke, then you've come to the right place.

artichoke with Meyer lemons

Virtually 100% of US artichokes are produced in California. The vast majority of artichokes for sale at supermarkets are Globe artichokes which are conical in shape with rather pointy leaves and weigh about one pound. The Big Heart artichoke is available at local farmers' markets and specialty markets such as Whole Foods. Though similar in taste to a Globe, the Big Heart weighs closer to two pounds, has rounder, thicker leaves (and a bigger heart, of course).

big heart and globe artichokes
Big Heart artichoke on left and Globe artichoke on right


Food Blogga Artichokes 101

How to select an artichoke:

  • Look for green or purple-tinged leaves that are as tight as a fist.
  • White or brown streaks indicate frost-bite or wind burn; they're edible, but not as pretty.
  • Place it in your hand; it should feel heavy for its size.
  • Squeeze it; the fresh leaves should squeak. If its spongy, put it back.
  • If the leaves or overly dry, splayed, or pitted, skip it.
How to clean an artichoke:
  • Lay the artichoke on its side on a sturdy cutting board.
cutting off the stem
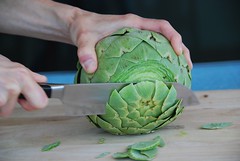
  • Using a sharp, heavy knife cut off the stem right to the bottom of the artichoke.
cutting off the top
  • Then cut of the top 1/4 of the artichoke.
  • Pluck off any discolored or damaged leaves.
trimming the leaves with scissors
  • Using kitchen shears, trim the tips of all of the leaves until they are straight.
separating the leaves
  • Using your thumbs, gently pull the leaves apart until the center is exposed.
cleaning the cavity
  • Using your hands pull out the prickly, purple tipped leaves and discard.
removing the fuzzy choke
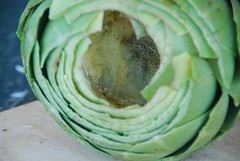
  • Using a small spoon, scoop out the fuzzy choke and discard.
clean artichoke cavity
  • The cavity should be smooth now.
a good lemon rub
  • Rub the entire artichoke with a lemon half to prevent it from oxidizing, or turning brown, and squeeze some juice into the cavity of the artichoke.
a good lemon squeeze

  • If using the stems (they're wonderful in stuffing), then remove the fibrous outer part.

trimming the stem
  • Slice into strips of equal length.
dicing the stem
  • Dice and then sprinkle with lemon juice to prevent them from turning brown.
How to cook an artichoke:
  • If stuffing, then fill the cavity half way with stuffing. Using your hands, fill each leaf with about 1/2-1 teaspoon stuffing, starting at the outermost leaves and working towards the center. Recipe: Mom's Italian Stuffed Artichokes
  • I prefer to steam artichokes in a large pot of water seasoned with lemon and olive oil for 45 - 75 minutes (stuffed) or 30 -45 minutes (unstuffed), or until leaves are tender. Steaming renders the artichoke moist and tender.
  • Artichokes can be roasted or grilled, though I have found them to be less tender and moist. It's a good idea to par-boil them first before roasting or grilling which helps them retain more moisture.
  • Artichokes are cooked when you can easily pull out a leaf (too much tugging means it needs more cooking). You can also get a long, think knife and insert it into the center of the artichoke; it should easily go through to the heart.
  • Remember that the larger the artichoke (like the Big Heart variety), the longer the cooking time.
How to eat an artichoke:


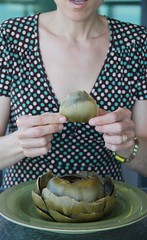
artichoke plucking
  • Pluck a leaf from the artichoke.
lifting the leaf
  • Grip it with two hands, and place it flesh side down against your bottom teeth.
Mmmmm...this is good
  • Scrape the artichoke "meat" off. If it doesn't come off easily, then it needs to be cooked more. No amount of chewing will help. Trust me.
Ahhh....
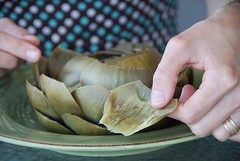
  • Place the eaten leaf in a bowl.
an eaten leaf


  • Work your way toward the tender inner leaves.
Slicing an artichoke heart
  • Thinly slice the artichoke heart, then eat it, patiently, savoring every buttery mouthful.

Save This Page on Del.icio.us

Monday, April 7, 2008

Habaneros Are Hot

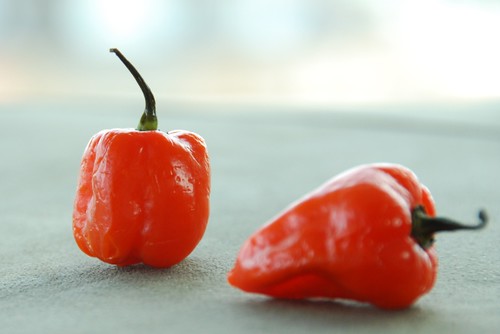
habaneros

In August 1997, and Jeff and I were at the Raleigh Farmers' Market in North Carolina. A farmer was selling a wide variety of chilies, including habaneros. I was instantly drawn to their shiny, reddish-orange skin and almost heart-like shape.

"What do habaneros taste like? I asked.

"They got kick in 'em," he said, as he chewed on a toothpick.

"Can they be eaten raw, or should I cook them?" I asked.

"You can eat 'em any way you like," he said, now twirling the toothpick between his thumb and forefinger.

"How 'bout the seeds? Should I take them out first?" I asked.

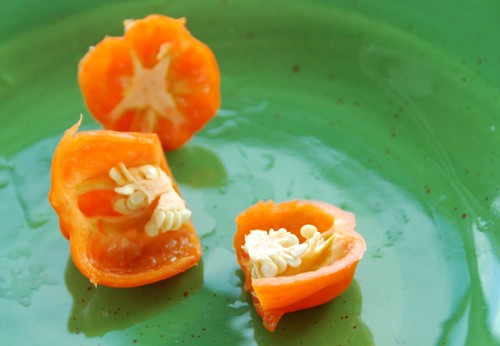
habanero seeds

"If you want to," he said.

Realizing I was just going to have to find out for myself, I quickly selected four or five brilliant habaneros, paid for them, and proudly announced to Jeff that I would make burritos with habanero salsa for dinner.

As I was preparing the salsa, Jeff sampled a tiny piece of the habanero; he coughed a couple of times and declared it "pretty hot." I decided to forgo the taste test and chopped up two habaneros, seeds and all.

We sat down to eat dinner, and I added a spoonful of my brilliant orange habanero salsa to my burrito. After the first bite, I felt a burning sensation on my lips, then my tongue started to prick with heat. Within seconds, actual flames of fire were leaping through the roof of my mouth into my nose. I tried to yelp but only gurgling sounds came out.

Jeff, realizing I was in trouble, handed me a glass of water. (This was before medical school; what did he know?) I waited for relief. Instead, like throwing water on hot oil, the fire in my mouth roared.

After a couple minutes of coughing and chest pounding, I said to Jeff, "My lipth feelths funny." I went into the bathroom and sure enough, my upper lip was swollen to twice its size. I'd always wanted fuller lips but this was ridiculous.

I've learned a few things about chilies since that memorable day. Turns out a chili's "heat" comes from a compound called capsaicin and can be measured on the Scoville Scale. Created by a chemist named Wilbur Scoville, this scale accurately measures the level of capsaicin in a chili. Scoville heat units (SHU) indicate the amount of capsaicin in a chili. For instance,
  • a red bell pepper registers a zero (you feel nothing)
  • a jalapeno = 2,500-8,000 (you feel a mild tingling sensation in your mouth)
  • a serrano = 10,000-25,000 (your lips and belly get warm and prick with heat)
  • a habanero = 100,000-350,000 (pain, not enjoyment, pain)
The Wall Street Journal not too long had a story on the world's hottest chili, the bhut jolokia, which registers over 1,000,000 SHU! At that heat, I would be afraid of dying.

Despite my initial adverse reaction, I still eat habaneros but without the seeds. And if my mouth starts to burn, I don't drink water. I eat bread or a banana; I've read that creamy foods like yogurt are supposed to work too.

habanero salsa bowl

So please try these quesadillas with a fruity habanero salsa. The sweet pineapple, mango, and kiwi contrast pleasingly with the spicy green onions and fiery habanero. Plus the acidic lime juice helps to temper the chili's heat. It's a quick mid-week meal or easy party dish. Feel free to play around with the ingredients to your liking; after all, quesadillas are meant to be fun.

When you make them, just be sure to have some bread, bananas, and yogurt nearby, just in case.

quesadilla close up

Goat Cheese and Poblano Quesadillas with Pineapple-Mango-Habanero Salsa

Make 4 quesadillas
Print recipe only here.

Salsa:
1 cup diced fresh pineapple
1 cup diced fresh mango
1 diced kiwi
1 habanero, minced, and seeds removed (unless you're a glutton for punishment)
2 green onions, thinly sliced
the juice of 1 lime
1 tablespoon minced fresh cilantro
salt, to taste

Quesadillas:
1 large or 2 small poblano peppers, de-seeded and thinly sliced
1 teaspoon canola oil
1 medium red onion, thinly sliced
1 teaspoon sugar
salt, to taste

8 (6-7- inch flour tortillas)
4 ounces goat cheese

To prepare the salsa, place all ingredients in a medium bowl and gently toss. Allow to rest for at least 30 minutes (or up to 2 hours) for the flavors to mingle.

Place poblano pepper over an open gas flame, turning occasionally, until thoroughly charred and blistered on all sides. Wrap tightly in aluminum foil and let rest for 15 to 20 minutes. Remove, and using some paper towel, gently scrape off the skin. Halve, stem and seed the pepper. Cut into strips, then dice, and place in a bowl. Set aside.

Heat a medium nonstick skillet over medium heat. Add canola oil and red onion, and saute for 3-5 minutes. Add sugar, reduce heat to low, and continue to cook until onions are caramelized, about 7-10 minutes. Add cooked poblano peppers to the skillet, season with salt, and toss to combine. Remove from heat.

Place 1 tortilla on a clean cutting board; spread with 1 ounce of goat cheese, then 1/4 of the poblano mixture. Top with another tortilla, and press lightly with your hand. Continue with remaining tortillas and filling until you complete 4 quesadillas.

Heat a large, nonstick, dry skillet over medium heat. Add 1 quesadilla. Cook until lightly browned, about 2 minutes per side. Transfer to a baking sheet and place in a warm oven (200-300 degrees F) until ready to serve. (Or eat 'em as you make 'em.) Repeat with remaining 3 quesadillas.

Cut each quesadilla into 3 or 4 wedges. Serve with salsa.

You might also like:

Note: The previous post for WEB, Weekend Eagle Blogging was a spoof. Please don't send me pictures of predatory birds with road-kill soup.


Save This Page on Del.icio.us

Thursday, March 6, 2008

How to Make a Frittata Like My 99-year-old Italian Grandmother

When I was a kid, Lent never seemed that hard to me. I had to give up something I really loved like Snickers (which I seriously needed to cut back on anyway) and avoid meat on Fridays (which meant eating my grandmother's fri--taaa-taas). Eating Nan's frittatas was not a sacrifice.

Frittata is nothing more than eggs with vegetables, cheeses, or meats cooked into it. Yet, my grandmother's frittatas were always something special -- delicious, healthy, and comforting.

Whether or not you recognize Lent or have an Italian grandmother, there are many reasons why you should know how to make a frittata:
  • They're ridiculously fast and easy to make.
  • They're the perfect meal for the end of the week when you've run out of food. You could put just about anything in a frittata, (though I'd avoid chocolate chips).
  • They're endlessly versatile. Make them with whole eggs, egg whites, or Egg Beaters; add meats, cheeses, or veggies; and eat 'em for breakfast, lunch, or dinner.
  • They make great leftovers for tomorrow's lunch. Try some in a sandwich.
  • They're so much fun to say. Come on, you know you want to say it like Nan used to. So in your best Italian grandmother accent and say, "fri--taaa-taa" as if it's the greatest word in the world. I know for Nan, it was right up there with "pizzelle" or her favorite word, "bingo."

Here's how to make a great frittata in 5 easy steps:

1. Saute fillings before adding them to the eggs. This will impart more flavor and ensure that the fillings are thoroughly cooked.
2. Lightly whisk eggs with herbs and seasonings before adding to the pan.
3. Cook frittata in a heavy, flat-bottomed skillet over medium heat.
4. This one is important: Using a fork, gently push the egg mixture from side to side, allowing it to seep to the bottom of the pan. This will ensure that the eggs cook thoroughly.
5. Place the frittata under a broiler to create a puffy, golden brown topping.

Nan hasn't made a frittata in a few years. She is 99 years old and lives in the Alzheimer's unit of a nursing home, but it's like she's here with me every time I make one. Today's frittata combines two of Nan's favorite vegetables: tender asparagus and earthy mushrooms.

When I served it to Jeff, I said in true Nan fashion: "Come on, have a nice piece of frit--aaa--taa with asparagus and mushroonz." For some reason, Nan could never pronounce the final "m" in mushrooms; it always came out as "mushroon," which would inevitably make me laugh, which would inevitably lead to Nan saying, "What? What's so funny?"

I'm sending my Italian asparagus, mushroon, and Parmesan frittata to Maryann of Finding La Dolce Vita and Marie of Proud Italian Cook who are hosting the fabulous Festa Italiana. They'd like you to share your favorite Italian dish with them. I couldn't possibly choose just one favorite Italian dish, but frittatas are right up there with homemade pizza and Sunday gravy and meatballs.

Now, it's time to mangia!

Italian Asparagus, Mushroom, and
Parmesan Frittata

Makes 2 servings.
Print recipe only here.

1-2 teaspoons olive oil
10 asparagus spears, cut into 1-inch slices
1 cup sliced white button mushrooms
6 large eggs (Egg Beaters or whites only are fine)
1/3 cup grated Parmesan cheese (divided)
1 1/2 tablespoons chopped fresh parsley
1/4 teaspoon crushed red pepper flakes
A few dashes of salt

Bring a small saucepan of water to a boil. Boil the asparagus for 2 minutes; drain, then place in a bowl of ice water. Shocking it will maintain its vivid green color. Drain and set aside.

Meanwhile, beat the eggs in a small bowl with half of the cheese, the fresh parsley, and salt and red pepper.

Add olive oil to an 8-inch non-stick skillet over medium-low heat. Add mushrooms and sauté for 5 minutes or until golden brown; add the asparagus and cook 1 more minute. Pour the egg mixture into the skillet. With a fork, gently move the egg mixture from side to side allowing the egg to seep to the bottom of the pan. Do this for 5-7 minutes, until the eggs start to solidify and a crust begins to form around the edges. Give the pan handle a jiggle, and when the eggs appear nearly set, evenly sprinkle the second half of the cheese over the top of the frittata.

Remove the pan from the stove top and place under the broiler for 4-5 minutes, or until the top begins to puff up and turn golden brown. Keep a close eye on it so it doesn’t burn. Let cool for a couple of minutes before slicing. Serve hot or at room temperature.

Other Nan dishes you might like:
Other vegetarian, Lent-friendly dishes you might like:
PS-Mansi just invited me to send my frittata to her for the 20th round of Weekend Breakfast Blogging created by Nandita. Why not send Mansi your well-balanced breakfasts by March 31st? Everybody knows that breakfast is the most important meal of the day. (My mother taught me well.)

Save This Page on Del.icio.us