Thursday, October 30, 2008

Dandelion, Persimmon, and Medjool Date Salad

dandelion, persimmon, and Medjool date salad

Do have any weeding to do? If so, you may want to keep the dandelion greens for your next salad. No kidding. Look at the definition of dandelion greens: edible leaves of the common dandelion collected from the wild; used in salads and in making wine.

People have eaten dandelions for centuries. The name comes from the French, who called them dent de lion, or "lion's teeth" because of their sharp, serrated leaves. In fact, all parts of the dandelion are edible, though most people prefer the leaves to the flower and the root. You can harvest dandelions in your yard, especially during the spring and fall when they're at their tastiest, but I buy mine at the supermarket.

dandelions

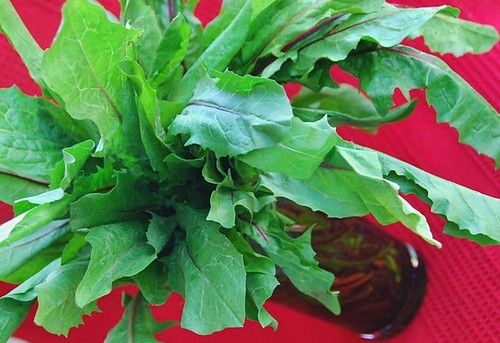
Dandelion greens have a bitter flavor similar to chicory, endive, and escarole and are best when paired with sweet or salty foods. Try them raw in salads or cooked; they can be boiled, steamed, or lightly sauteed. Also, season them generously with salt, which reduces the bitterness.

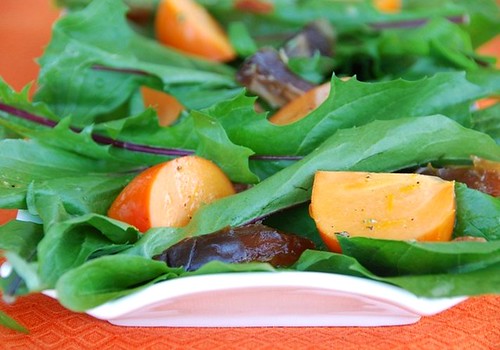
If, like me, you like a "bite" in your salad greens, then you won't be disappointed with this Dandelion, Persimmon, and Medjool date Salad. My inspiration came from a particularly productive trip to the farmers' market on Sunday morning where I purchased crisp Fuyu persimmons and succulent Medjool dates. The sweet fruit acts as a foil to the bitter salad greens which are drizzled with a deliciously tangy vinaigrette made of honey, Dijon mustard, orange juice, and fresh rosemary.

Now, just think of all the money you'll save by not having to purchase any more weed killer.

Dandelion, Persimmon, and Medjool Date Salad
Makes 4 servings
Print recipe only here.

Vinaigrette:
1 tablespoon plus 1 teaspoon extra virgin olive oil
1 tablespoon apple cider vinegar
1 teaspoon grainy Dijon mustard (or regular Dijon plus 1/2 teaspoon mustard seeds)
1 teaspoon honey
2 tablespoons orange juice
1/2 teaspoon orange zest
1/2 teaspoon minced fresh rosemary
salt and pepper, to taste

Salad:
2 bunches dandelion greens, washed, stems removed, and chopped**
2 small Fuyu persimmons, each cut into 6 wedges
4 Medjool dates, thinly sliced
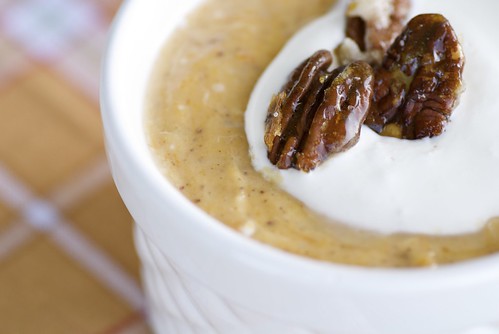
2 tablespoons lightly toasted pecans, sliced lengthwise

For the vinaigrette, whisk all ingredients in a small bowl and set aside.

In a large bowl, add the dandelions and persimmons. Pour half of the vinaigrette and toss until coated. Divide evenly among four plates. Add dates and pecans to each plate. Drizzle with the remaining vinaigrette.

**Dandelion greens are available at most supermarkets as well as organic specialty markets. Bitter greens such as chicory, frisee, and endive make good substitutes.

You might also like:

Watercress, Seckel Pear, and Brie Salad


Bulgur Salad with Chickpeas, Cranberries, and Toasted Almonds


Broccoli Rabe (Rapini) on Crispy Polenta with a
Rosemary-Goat Cheese Sauce


This week Kalyn of Kalyn's Kitchen is celebrating her third year anniversary of Weekend Herb Blogging. In fact, it will be Kalyn's last official hosting since she is passing the torch to Haalo of Cook (almost) Anything At Least Once. Thank you, Kalyn, for your time, dedication, and enthusiasm.

Save This Page on Del.icio.us

Tuesday, October 28, 2008

Thanksgiving Side Dish Recipe: Roasted Acorn Squash with Honey-Lime Glazed Pepitas

acorn squash with pepitas

American Thanksgiving. It's all about the big bird. Or is it?

Every year it's the same thing: Cooks everywhere spend countless hours debating the merits of free-range, organic, grass fed, wild, and frozen turkeys. Then when they finally decide on a turkey, they spend even more hours debating how to cook it: Will brining make the meat succulent? Should it be basted every hour? And what about the stuffing? Every family has that relative who insists on stuffing the turkey. So should you stuff the turkey and risk salmonella poisoning for your guests or incur your Aunt Edna's wrath? These are not easy questions.

That is why my favorite part of Thanksgiving has always been the side dishes. You know them-- the perennial favorites such as cranberry sauce, sweet potatoes, winter squash, string beans, and Brussels sprouts. Probably like most of you who celebrate Thanksgiving, I expect these dishes to grace the Thanksgiving table every year, but sometimes they need a little spicing up.

Starting today, and for the next four weeks, I will share a recipe for a favorite Thanksgiving side dish with a twist. Think of it as your old favorites going for a make-over; they'll still be your favorites but only better.

acorn squash with pepitas

Rather than traditional butter, brown sugar, and cinnamon, this acorn squash has some Latin flare. A tangy, spicy lime and honey glaze contrasts deliciously with naturally sweet acorn squash, while peanuts and pepitas add earthiness and crunch. This sauce also works wonderfully on butternut squash and sweet potatoes.

As for all those questions regarding turkeys, just call one of the dozen or so turkey hotlines that are there to help you with your bird. But really, how much turkey talk can one take?

Roasted Acorn Squash with Honey-Lime Glazed Pepitas

Makes 8 servings
Print recipe only here.

2 acorn squash, seeds removed, and cut into 8 equal wedges
2-3 teaspoons olive oil for brushing squash
1/4 cup unsalted peanuts
1/4 cup unsalted pepitas**
juice of 1/2 lime
1/4 teaspoon lime zest
3 tablespoons quality honey
1 tablespoon water
1/4 teaspoon cider vinegar
1/4 teaspoon cayenne pepper
1/4 teaspoon ground cumin
salt, to taste


Preheat oven to 400 degrees F. Line a baking pan with tinfoil (for easy clean up). Brush the flesh of the squash with olive oil and roast flesh side down for 40-45 minutes, or until tender.

In a small skillet over medium heat, add peanuts and pepitas. Heat until golden brown and they begin to pop. Remove from heat.

In a small bowl, combine lime juice, lime zest, honey, water, vinegar, cayenne pepper, cumin, and salt. Whisk until smooth. Just before you're ready to serve the squash, add the sauce to the pan of toasted peanuts and pepitas. Heat on medium until the sauce begins to bubble and becomes syrupy, about 2 minutes. Remove from heat and drizzle over the cooked squash. Serve immediately.

**Pepitas is the Spanish name for pumpkin seeds and are used often if Mexican food. They're available at Mexican markets, specialty markets such as Whole Foods, and many supermarkets. Pumpkin or sunflower seeds make good substitutes.

You might also like:

Roasted Root Vegetables with Maple Sage Glaze


Roasted Acorn Squash with Medjool Dates and Toasted Almonds


Butternut Squash Risotto with Rosemary, Walnuts, and Blue Cheese


I'm sending my acorn squash to Jeanne of Cook Sister who has chosen for the love of gourd for this month's WTSIM.

Save This Page on Del.icio.us

Sunday, October 26, 2008

Making Italian Pizzelle Cookies with Dad

pizzelles

Last year when I originally posted on my Dad's pizzelle cookies, I stumbled upon this pizzelle recipe at Maryann's delicious blog, Finding La Dolce Vita.

I was smitten with Maryann's pizzelle iron which had a unique pattern. I decided instantly to surprise my dad with one (after all, he is the official pizzelle maker in our family). Thinking she bought her's in Italy, I was shocked when she told me it was a Toastmaster pizzelle iron from Walmart! Unfortunately, Walmart no longer carried it, nor did any of the dozen other places I tried. Maryann said she would keep an eye out for me and let me know if she found one.

Toastmaster pizzelle iron

A few weeks later, a box arrived in my mail. It was Maryann's pizzelle iron. She said she knew that "it would be in good hands" with me. I couldn't have been more touched. Here is a woman who lives over 2,500 miles away, whom I never met, and who had sent me her beloved pizzelle iron.

I promised Maryann I wouldn't be posting on the pizzelle iron until it could be christened with my Dad. So when he came to visit in September, we (well, mostly he, as I was busy snapping pictures and eating cookies), made a batch of pizzelles with it. They were better than I ever remember. Grazie, Maryann. You are a special person.

pizzelle ice cream sandwiches

For a truly splendid treat, make pizzelle ice cream sandwiches! My favorite is rich chocolate ice cream (shown above) or pistachio gelato. It's heaven I tell you, heaven.


Please click here for the interesting history of the pizzelle, my Dad's recipe for making them and for a step-by-step guide
(with special celebrity chef, my dad)


Pizzelles are always a big hit at parties, so I'm bringing some to Aparna of My Diverse Kitchen for her blog party. And since they're baked with licorice-scented anise seed, I'm sharing them with Anita of Dessert First, who has chosen spices for this month's SHF. Since I'm thankful for my friendship with Maryann and for being able to bake with my dad, I'm sending my pizzelles to Val of More Than Burnt Toast and Ivy of Kopiaste who would like to know what we're thankful for this November.

Save This Page on Del.icio.us

How to Make Italian Pizzelle Cookies in 5 Easy Steps

pizzelle stacks

Pizzelles are Italian waffle-like cookies made from flour, sugar, eggs, and butter and typically flavored with anise or vanilla. The name pizzelle comes from the Italian pizze, meaning "flat" or "round."

Believed to be the oldest cookie in Italy, pizzelles have a unique history. According to legend, in 700 BCE, snakes had infested Abruzzo, in south central Italy, and after they were banished, the townspeople celebrated by eating pizzelle. To this day, pizzelles are eaten to celebrate the Festival of the Snakes, now known as the Feast Day of San Domenico.

Pizzelles were originally baked over open fire using irons that were embossed with a family or village crest. Today they are made using a pizzelle iron, which is similar to a waffle iron, but has an attractive floral pattern rather than a grid. Need a pizzelle iron? Click here for some resources or here for specific models. Don't forget to read the story about how I received my new pizzelle iron.

Pizzelles
Makes 60 pizzelles.

This recipe makes a thicker, firmer pizzelle--my family's favorite.
Print recipe only here.

6 eggs
2 cups granulated sugar
1/2 pound butter (2 sticks), melted
2 teaspoons vanilla extract
1 (or 2) teaspoons anise seed**
1 tablespoon anise extract
4 tablespoons baking powder
7 cups all-purpose flour

Preheat pizzelle iron. Coat with cooking spray and wipe off excess with a paper towel. You do not have to re-apply.

Beat eggs and sugar. Add cooled melted butter, vanilla extract, anise seeds, and anise extract. Sift flour and baking powder in a bowl and add to the egg mixture. Beat for a few minutes, or until the batter becomes thick. It will have a dough-like consistency. Knead with your hands for a couple of minutes until dough is smooth and has a sheen. With your hands, roll into one-inch round balls and place in the center of the pizzelle iron grids. Close the cover of the iron and bake for about 45 seconds, or until golden brown. Remove from iron and place on a cookie rack to cool.

Dust with confectioner's before serving, if desired.

Pizzelles will last for a couple of weeks if stored in an air-tight container and kept in a cool area.

**The original recipe calls for 1 teaspoon anise seed. However, I like a stronger anise flavor, so my dad put 2 teaspoons of anise seed and 1 tablespoon of anise flavoring. With all the flour in the recipe, it's not overwhelming, but put as much or little as you'd like.


Here's a step-by-step guide showing you how to make pizzelles.

adding anise extract to the mix

1. Mixing the ingredients. Here Dad is adding anise extract to the cooled melted butter, vanilla extract, and anise seed mixture.

Dad's mixing the pizzelle dough

2. After mixing the batter with an electric beater, knead the dough by hand until smooth.

rolling the pizzelle dough into a ball

3. Roll the dough into 1-inch balls.

Dad's placing the pizzelle dough on the iron

4. Place the dough balls on the center of each grid. Close the cover and bake for 45 seconds, or until golden brown. Note that every pizzelle iron is different and baking time can range from 35-70 seconds, so experiment with yours.

baked pizzelles on the iron

5. The finished pizzelles with be lightly golden brown. Remove from the grid immediately and allow to cool on a wire rack. Pizzelles will harden as they cool and will have a crisp, biscuit-like texture.

Dad's finished pizzelle

Pizzelle irons come in different beautiful designs though this simple flower pattern is most typical.

They will last for a couple of weeks if stored in an air-tight container and kept in a cool area.


Save This Page on Del.icio.us

Wednesday, October 22, 2008

Creamy Corn, Potato and Sausage Chowder with Corn Relish

corn chowder single bowl

Maybe it's because I grew up in New England, home of New England Clam Chowdah. Or maybe it's because it was my mom's favorite soup. All I know is that every autumn, as sure as the leaves fall from the trees, I crave a bowl of steaming hot corn chowder.

When I called my mom to tell her I was posting on corn chowder and would like her recipe, she said, "Ooh, corn chowder! That's my favorite soup." I smiled.

"I'm sorry, honey, I don't have a recipe. But, it's chowder. Everyone knows how to make chowder." Or so every New England mother who makes chowder firmly believes.

So I conjured up images and smells of mom's corn chowder and started chopping and sauteing and pureeing. I added sausage for depth of flavor and cheddar cheese for richness. Then I adorned each serving with a simple corn relish that added just the right amount of texture to keep things interesting. The chowder turned out just like I wanted it to: it was wonderfully thick and creamy and had a deep corn flavor.

After I was finished, I called my mom and told her all about it. Her response: "Ooh, that sounds wonderful, honey! Can I have the recipe?"

Last month I wrote an article, "How to Freeze Corn for the Winter." So if you froze summer sweet corn, now is the time to whip it out. Of course, either frozen or canned corn from the supermarket works just as well.

Creamy Corn, Potato and Sausage Chowder with Corn Relish
Makes 4 servings.
Print recipe only here.

Corn Relish:
1 teaspoon olive oil
1 cup fresh corn kernels (or canned)
2 green onions, sliced
1 teaspoon finely chopped fresh parsley
salt, to taste

Chowder:
1 tablespoon butter
1 cup yellow onion, chopped
2 cups Yukon Gold potatoes, chopped
2 cups vegetable broth
2 cups fresh corn kernels from 2 ears (or canned)
1/4 teaspoon cayenne pepper
1/2 teaspoon salt
6-7 cranks of freshly ground black pepper
2 cups milk (whole or low-fat)
1/4 cup sharp white cheddar cheese, shredded
3 tablespoons finely chopped fresh parsley, plus extra for garnish
1 teaspoon olive oil
1/3 pound of sausage, removed from the casing


To make the relish, heat 1 teaspoon olive oil in a medium skillet over medium-high heat. Add the corn kernels and green onions, cooking until slightly browned, about 5 minutes. Turn off heat, and add fresh parsley and salt, to taste. Set aside.

In a deep pot over medium-high heat, melt butter. Saute onions for 5 minutes, or until lightly browned. Add potatoes and broth, and bring to a boil. Reduce heat to medium-low; add corn kernels, cayenne, salt, and black pepper, and stir well. Cook until potatoes are tender, about 15 minutes. Add the milk, cheddar cheese, and parsley. Turn off heat and allow chowder to cool for 5-10 minutes.

Meanwhile, heat 1 teaspoon olive oil in a large skillet over medium-high heat. Add loose sausage, and cook until browned and crispy, about 7 minutes. Set aside.

Puree soup in two batches until smooth, and return to the pot over medium-low heat. Stir in cooked sausage and warm until thoroughly heated. Season with salt and freshly ground black pepper, to taste.

Garnish eat serving with a spoonful of corn relish and some extra finely chopped parsley.

Note: This soup tastes even better the next day. So it's a good meal to make over the weekend for a quick and easy mid-week dinner.


You might also like:


Italian Escarole and Bean Soup


Red Lentil Mulligatawny with Apple-Celery Salsa

Tuesday, October 21, 2008

Making Cranberry, Banana, and Honey Smoothies In My New Blender

cranberry smoothie

My blender broke the other morning as I was making a smoothie, and I couldn't be happier.

I bought the Black and Decker model last fall for $60 in part because it had an "ice crusher" button, which, in reality, merely "chipped" the ice. So for the last year, I have been drinking rather clumpy smoothies.

As my eyes glazed over the 20 or so blenders available at a local Walmart, I resisted my usual decision making process of reading every word on every single box and simple went with a GE model since I currently like my GE stove. And whadda ya know -- it's wonderful!

Here's what I like about this GE Digital Blender:
  1. It's lightweight and easy to clean.
  2. It has a button just for drinks. You hit it, and the blender does its thing for 50 seconds, slowing down and speeding up, until it creates the most frothy, luscious smoothie you've ever seen. And it positively disintegrates the ice, even though it doesn't have an ice crusher feature.
  3. It has a 600 power motor, which means it should be more durable.
Since I drink smoothies year round, I like to experiment with seasonal flavors. My current favorite is a Cranberry, Banana, and Honey Smoothie. Cranberries are a true super food. 1/4 cup of fresh cranberries contains only about 12 calories. Yet, they're high in vitamin C and fiber and contain health-promoting antioxidants and other phytonutrients that may help protect against heart disease and cancer.

This Cranberry, Banana, and Honey Smoothie strikes just the right balance between tart and sweet and is the pick-me-up you need on a sluggish morning. Made with soy milk or skim milk, it's also a great way to boost your calcium intake without adding lots of fat and calories.

I loved my new blender so much that I bought one for my mom who bought one for my brother. Then my mom's next door neighbor find out about it and bought one. Now, that I think of it, you'd better hurry up and buy one yourself before they're all gone.

Cranberry, Banana, and Honey Smoothie
Makes 1 smoothie
Print recipe only here.

1 cup vanilla soy milk or skim milk
1/4 cup fresh or frozen cranberries
1/2 banana
1-2 teaspoons honey
3 tablespoons soy protein powder, optional
1/4 cup ice cubes, optional

Place all ingredients in a blender; blend on high for 15 seconds, or until thick and frothy. If you like it thinner, then simply add a little bit of water.

You might also like these healthy breakfasts:

Creamsicle Power Smoothie


Ginger-y Cranberry Walnut Scones (Heart Healthy & Low Fat!)


Breakfast Quinoa with Dried Cherries, Raisins, and Pecans


I'm sending my pretty pink antioxidant-rich smoothie to Beantown Baker for her event, The Power of Pink, which is designed to promote awareness of breast cancer and to highlight October as National Breast Cancer Awareness Month. Sadly, it seems most of us, know someone who has breast cancer or have lost someone to the disease. This event is just one more way to remind us all of the importance of regular exams and early detection.

Save This Page on Del.icio.us

Sunday, October 19, 2008

Pumpkin Pie Pudding with Candied Pecans and Freshly Whipped Cream

pumpkin pie pudding with candied pecans and freshly whipped cream

Pumpkin pie has been typecast. It always plays the same role: The Thanksgiving Day Dessert.

This is unfortunate because pumpkin pie has great range and versatility. In addition to being a great lead, it's a talented supporting player too. Think of the possibilities: pumpkin pie muffins, pumpkin pie cheesecake, and my favorite, pumpkin pie pudding.

Every year, weeks before Thanksgiving, I would anticipate my mom's pumpkin pie: a light, flaky crust filled with sweet, custardy, walnut studded, spiced pumpkin. The only thing better than a slice of her pie on Thanksgiving Day with a dollop of whipped cream was a slice of her pie the next morning for breakfast. To me, nothing beats chilled pumpkin pie.

So it wasn't unusual when one fall day a couple of years ago, I had a serious hankering for my mom's pumpkin pie that couldn't be satisfied. Sure, I could have called her for the recipe, but it never would have tasted as good, and buying one was out of the question. I reluctantly decided to make vanilla pudding with pumpkin pie spice instead. It was so good that the next time I made it, I added canned pumpkin and nuts. After several more experiments and many happy mouthfuls later, I present Pumpkin Pie Pudding with Candied Pecans and Whipped Cream.

This pumpkin pie pudding is ideal for those of you who don't have the time or the desire to make pumpkin pie from scratch. It's a deliciously fast, easy, and satisfying fall and winter dessert that can be whipped up in no time. I find pumpkin pie spice (a mixture of allspice, cinnamon, ginger, and nutmeg) is the easiest and surest way to season the pudding, but feel free to experiment with any spices that suit your taste. If you really need something crust-like, then make a quick mixture of spice-laced toasted oats, nuts, and brown sugar to sprinkle on top.

Of course, you could still have traditional pumpkin pie on Thanksgiving Day. But if you can't wait until then, make yourself a batch of this rich and creamy pumpkin pie pudding. You won't be disappointed.

Pumpkin Pie Pudding with Candied Pecans and Freshly Whipped Cream
Makes 4 small or 2 large servings
Print recipe only here.

Pudding:
2 cups whole or low fat milk
6 tablespoons granulated sugar
2 tablespoons corn starch
a pinch of salt
1 large egg, lightly beaten
1 teaspoon pure vanilla extract
1/2 cup canned pure pumpkin
1/2 teaspoon pumpkin pie spice

Candied Pecans:
2 tablespoons unsalted pecan halves
1 tablespoon granulated sugar
pinch of salt

Whipped Cream:
1/2 cup heavy whipping cream
1 tablespoon sugar

Combine sugar and cornstarch in a medium pot over medium heat. Add 1 cup of milk, whisking until the sugar and cornstarch are dissolved. Add the second cup of milk and salt, and bring to a simmer, stirring frequently. Lower the heat, cooking pudding for 10 minutes, stirring frequently. Remove pudding from heat for 2-3 minutes. Lightly whisk one egg with vanilla extract; slowly add to the pudding, whisking constantly. (Removing it from the heat will prevent the egg from cooking). Stir in the pumpkin and pumpkin spice. Simmer for 2-3 minutes, or until thick, stirring several times. Remove from heat and place in serving dishes.

Before you make the candied pecans, lay a piece of tin foil coated with cooking spray on the counter. Also coat your utensil with cooking spray so the sugar won't stick to it. In a medium non-stick skillet over medium heat, add the pecan halves. Sprinkle sugar and salt evenly over them. As the sugar begins to melt and coat the pecans, quickly stir them until evenly coated and lightly toasted, about 1-2 minutes. Remove from heat and slide nuts onto the tin foil, including any sugar drippings. (Avoid browning the nuts as the sugar will taste burnt.) Let cool and harden, then chop into small pieces.

Before you begin to make the whipped cream, consider these helpful tips: Start with a deep stainless steel bowl that has been chilled in the freezer for about 15-20 minutes. Chill the beaters of the electric mixer as well. Both will help to create more volume in the cream. Once ready beat ½ cup heavy whipping cream on medium-high speed until soft peaks form. Sprinkle sugar evenly over the whipped cream and beat until peaks re-form. Whipped cream can be covered with Saran Wrap and refrigerated for 1-2 hours.

You might also like:

Mom's Chocolate Pudding with Bananas and Graham Crackers


Date, Fennel, and Pistachio Scones (Heart Healthy & Low Fat!)


Dessert Risotto with Wine-Poached Figs


Tuscan Torte di Mele (Apple Cake)


Save This Page on Del.icio.us

Wednesday, October 15, 2008

"This Mac n' Cheese Tastes Like Doritos." (A Healthier Recipe for Mac n' Cheese)

mac n cheese 0329

When I was growing up, my mother cooked everything from scratch, including macaroni n' cheese, which, coincidentally, was the one dish that my brothers and I didn't like. Despite her most valiant efforts, we would always complain, "It's not as good as the one in the box." Blasphemy, pure and simple.

To this day, I blame Kraft. Perhaps it was the kid-appealing, artificial orange color of the cheese. Or maybe it was a secret ingredient in that magical powder in the unmarked white envelope. Whatever it was, it was one of few prepared meals we ever ate (and preferred to homemade).

Well, just like my mom, I decided to make mac n' cheese. I made it from scratch and didn't tell Jeff what was in it. After a couple of bites, he said, "Wow! This is good! It may sound weird, but this mac n' cheese tastes like Doritos!" (Hah! I thought. The fajita spice worked.) Considering he finished his plate, then stood at the stove eating the mac n' cheese right out of the casserole dish, it's safe to say he liked it.

I really liked the way this Orange Cauliflower Mac n' Cheese turned out because the cheesy topping got all bubbly and crunchy, while the pasta underneath remained comfortingly soft and creamy. I'm also pleased that the melted cheese isn't a plastic-y, neon orange (sorry, Kraft), but a soft, natural, golden orange.

orange cauliflower

This healthier mac n' cheese recipe loses most of the fat and cholesterol of traditional mac 'n cheese but holds onto the creaminess and flavor that make it an American favorite. Plus, it's an easy way to get your kids to eat their cauliflower. According to Wiki, orange cauliflower contains 25 times the level of vitamin A as white varieties, so it may even help give them bionic vision.

If you really want to get your kids to eat their cauliflower, then add 1 tablespoon fajita or Mexican spices to the sauce and call it "Doritos Mac n' Cheese." I swear, the spices make it taste just like Doritos. Now, what kid wouldn't love that? Come to think of it, what adult wouldn't love that?

mac n cheese 0327

Orange Cauliflower Mac n' Cheese

Makes 4 servings
Print recipe only here.

1 head orange cauliflower (white can be substituted)
1/2 pound small pasta such as gemelli, elbows, or shells
2 tablespoons Smart Balance butter substitute
1/4 cup all-purpose flour
2 cups skim milk, plus 1/2 cup for pureeing cauliflower
1 cup grated sharp white cheddar cheese, plus 1/2 cup for sprinkling on top
a generous amount salt and several cranks of freshly ground black pepper
1 tablespoon fajita or Mexican spices, optional
1/4 cup plain dry bread crumbs
1 tablespoon Smart Balance butter substitute

Preheat oven to 350 degrees F. Coat a 9-inch glass or ceramic baking dish with cooking spray.

Bring a large saucepan of water to a boil. Trim cauliflower and break into small florets. Boil until tender, 10-15 minutes. Drain. Place in a blender or processor with 1/2 cup milk and puree until thick and smooth. Set aside.

Cook pasta according to directions until al dente.

For the sauce, melt 2 tablespoons Smart Balance in a medium saucepan over medium heat. Add flour and whisk briskly. Gradually add 2 cups milk, whisking continuously, until it reaches a boil. Reduce heat and simmer for 3 minutes, or until thick and bubbly. Add the pureed cauliflower, 1 cup cheddar cheese, and a generous amount of salt and black pepper. Whisk until smooth and remove from heat. Add cooked pasta to the cheese sauce and toss until well coated. Pour into the prepared baking dish and sprinkle remaining 1/2 cup cheddar evenly over the top.

For the buttered breadcrumbs, melt 1 tablespoon Smart Balance butter substitute in a small skillet over medium heat. Add bread crumbs and toss until coated with butter. Sprinkle even over the top of the cheddar. Or, if you prefer, set crumbs aside, and use as a garnish just before serving.

Bake for 40-45 minutes or until golden brown on top and the cheese sauce is bubbling around the edges.

You might also like these comfort foods:

Mediterranean Jacket Potatoes


Butternut Squash Risotto with Rosemary, Walnuts, and Blue Cheese


Doughboys


Penne with Italian-American "Gravy," Meatballs, and Sausage


More healthy mac 'n cheese recipes:

Macaroni and Cheese with Vegetables at My Diverse Kitchen
Macaroni and Cheese with Peas and Roasted Corn at Coffee et Vanilla
The Best Vegan Baked Mac 'n Cheese at Karina's Kitchen

I'm sending my Orange Cauliflower Mac n' Cheese to two lovely ladies, Val of More Than Burnt Toast and Ivy of Kopiaste, who are co-hosting World Food Day, an event that highlights foods from your country.


Save This Page on Del.icio.us

Sunday, October 12, 2008

A Plantain is Not a Banana

a very ripe plantain

The above picture is not a super ripe banana. (Though I have a couple of those on my counter begging to be baked into a banana bread.) It's actually a perfectly ripe plantain.

Though used primarily as a vegetable, a plantain, like a banana, is a fruit that can be used in both savory and sweet dishes depending on its level of ripeness. When still green, a plantain is hard and starchy, like a potato. As it ripens, the peel turns nearly black, while the flesh becomes yellow and sweet. Fully ripe plantains are soft and creamy in texture, emit a mild banana fragrance, and are supremely sweet. Plantains take several days to ripen, so if you want to cook some soon then buy ones that are already blackened in the supermarket.

plantains

How is a plantain different from a banana?

1. Plantains are much firmer and heavier than bananas.
2. Plantains have a lower sugar content than bananas, making them less sweet.
3. Plantains should be cooked, whereas bananas can be eaten raw. Note: My friend Aparna who lives in India, noted that certain sweet plantains can be eaten raw. Thanks, Aparna!
4. Plantains can be cooked when still green and not fully ripe, for a starchier consistency and less sweet flavor, or when blackened and fully ripe, for a softer consistency and sweeter flavor. Bananas, however, cannot be eaten when green or unripe, unless you want to experience a distinctly unpleasant chalky aftertaste.

Plantains are a staple in many South American, African, and Asian countries; fortunately, they're gaining status in the US as well. That's a good thing since they're so versatile: they can be boiled, baked, sauteed, and fried and work in dishes ranging from appetizers to desserts.

In the States, many plantain recipes are Cuban or Mexican in origin and feature ingredients such as chiles, honey, lime, and brown sugar. Plantains make an easy and delicious side dish especially with Baja style fish tacos.

peeling a plantain

Here's how to peel a plantain:

1. Cut off the top of the plantain.
2. Using a sharp knife, gently cut lengthwise along the plantain, being careful not to cut into the fruit (as shown above).
3. Using your hands, open the skin, remove from the plantain and discard.
4. Slice plantain into equal sized pieces (as shown below).

plantain slices

You'll notice when you slice a plantain, that the fruit is a pinkish-yellow. As it cooks, however, it will magically turn a deep, rich gold color, while the flesh becomes creamy.

I usually saute plantain slices in a little olive oil or butter until lightly caramelized and douse them with some Tabasco sauce and lime juice. Today, however, I opted for a slightly sweeter take. Caramelized plantain slices are drizzled with warm, rich honey, and sprinkled with cayenne pepper and lime juice, for a singular sweet and tangy flavor.

plantains with honey and lime

Caramelized Plantains with Honey and Lime

Serves 4
Print recipe only here.

2 fully ripe plantains
2 teaspoons olive oil
2-3 teaspoons quality honey
1 lime, cut in half
salt and cayenne pepper, to taste

Pour olive oil in a large non-stick skillet until evenly coated and place over medium-high heat. Add plantain slices in a single layer (do two batches, if necessary). Cook plantains for 1 minute, flip over, and cook 30-60 seconds, or until browned. Keep your eye on the plantains as they'll brown very quickly. Remove from the pan, and place on a paper-towel lined plate. Cover with foil until all plantains are cooked.

Place plantains on a serving platter. Drizzle with quality honey, then sprinkle with lime juice, salt and cayenne pepper, to taste. Serve immediately.


You might also like:

Fresh Pineapple Chutney


Roasted Root Vegetables with Maple Sage Glaze


Elote, or Mexican Grilled Corn


Fresh Fig and Fennel Pizza


Anna's Bajan Plantain Pikelets (they're like pancakes) with Rum-Butter Sauce at Morsels and Musings
Suganya's Plantain Rice Mix at Tasty Palettes
Gretchen Noelle's Baked Plantains in Orange Sauce at Canela & Camino

I'm sending my plantains to Amy and Jonny of We Are Never Full, this week's hosts of Weekend Herb Blogging, created by Kalyn of Kalyn's Kitchen.

Save This Page on Del.icio.us