Wednesday, April 30, 2008

Feelin' the Love

They say love makes the world go 'round. Well, we food bloggers are doing our part to keep the world spinning. Today I'm accepting some tags and awards from lovely bloggers and passing them on to more lovely bloggers.

Wendy of A Wee Bit of Cooking (an old blogger friend) and Sarah of Homemade (a new blogger friend) have tagged me for the 6 Word Memoir Meme. Like the title implies, you sum up your life in 6 words, then tag 6 more bloggers to do the same. Here's mine:

Thirteen years.
Seven homes.

One husband.

Here are 6 more people I'd like to hear from:
  1. Ivy of Kopiaste
  2. The Zen Chef of Chefs Gone Wild
  3. Emily of Superspark
  4. Linda of Make Life Sweeter
  5. Peter of Kalofagas
  6. Susan of Sticky, Gooey, Creamy, Chewy
One of dearest food bloggers I know, Deeba of Passionate About Baking, has flattered me with a nomination for a Blog of Distinction. Here's how it works: You nominate 5 blogs that make you laugh, cry, think, or sigh. Thank you, Deeba, for making me laugh with your cartoons, think with your quotes, and sigh with your creations that are always baked with love. You brighten my day.
  1. Marie of Proud Italian Cook makes me sigh. When I read her posts about her family and see her recipes for Italian dishes like her amazing sausage bread, I am instantly transported back home to Rhode Island. Thanks, Marie, for making 3,000 miles not seem so far.
  2. Anne-Marie of Ambrosia and Nectar has a knack for teaching, not preaching about cuisine. I also admire the way she takes a humble ingredient like a prune and transforms it into something extraordinary.
  3. Emiline of Sugarplum makes me laugh. I like the way she embraces life in all its quirky wonderfulness and that she doesn't take herself too seriously. Plus, have you seen this girl's brownies? Dang.
  4. Susan of Farmgirl Fare takes photos of her farm animals that make me go "Aaawwww." (And I'm not even an animal lover. ) Look at this photo, then tell me you didn't do the same thing. Susan, thanks for making me sigh and laugh.
  5. I "met" Dhanggit of Dhanggit's Kitchen when she submitted her festive Tropical Santa Cookies to my Eat Christmas Cookies event last December, and we've been regular visitors ever since. Dhanggit's innovative recipes and lovely photographs are a pleasure to see. So I was truly saddened to learn in this post that her beloved father recently passed away. My heart is with Dhanggit and her family. That's why her blog made me cry.
Amy from FamiliaBencomo has nominated me for the Arte y Pico Award. Here's how it works: You select 5 blogs that you feel excel in creativity, design, interesting material, and also contribute to the blogging community, no matter what language. Thank you, Amy, for your generosity; I am humbled that you consider me your "culinary muse."

Here are my 5 nominations:
  1. Suganya of Tasty Palettes inspires me with her exceptional recipes and artfully composed photographs. What's even more impressive is that Suganya recently celebrated her blog's first anniversary, so it can only get better and better.
  2. Helen of Tartlette. Extraordinary desserts. Extraordinary photography. Extraordinary blog. Thank you, Helen, for your endless creativity and flair.
  3. Jess's blog, Cakespy, has a touch of whimsy that I find enchanting. From her fantastic artwork to her humorous posts, Jess just seems like she's always having a good time. How could you not like that?
  4. Anh of Food Lover's Journey inspires me with her elegant culinary creations and evocative photography. I admire Anh: In addition to blogging, she has just completed the first round of her PhD program! Not too shabby.
  5. T.W.'s passions for food history and baking come together in his spectacular historical cakes. T.W. bakes cakes from vintage cookbooks and children's books then writes engagingly about their origins. I'm thinking maybe he should change his blog's name from "Culinary Types" to "Let Them Eat Cake." Hey, it's historical.
A while back I nominated Deeba of Passionate About Baking for an Excellence Award, and she simultaneously nominated me for a Nice Matters Award. Pretty cool, huh? I am especially touched since Deeba is one of the sweetest bloggers I know. Here are more 5 more exceptionally nice bloggers:
  1. Shn of Mishmash!
  2. Anali of Anali's First Amendment
  3. Elle of Feeding My Enthusiasms
  4. Bal of KaRaFaKiDeN TaTLaR and Be Foodie! (her English language blog)
  5. OK, this one is actually for you, dear readers. Thank you for taking the time to read my posts and for leaving thoughtful comments. You're the reason I love blogging.

Tomorrow is the first day of my Beautiful Bones event. Hope to see you there!

Sunday, April 27, 2008

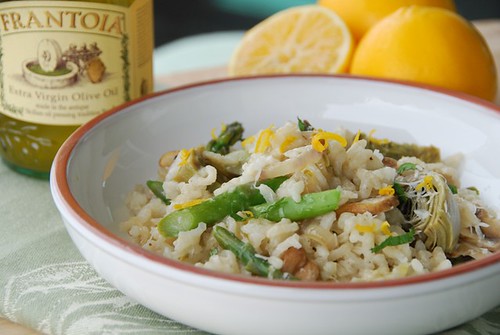
Baby Artichoke and Asparagus Risotto

raw baby artichokes

I've always been a big Globe artichoke kind of girl. That was until a couple of years ago when I tried baby artichokes. Now, I have learned to divide my love between them both.

Baby artichokes are fully mature artichokes, as their rich, earthy flavor attests to, but they're picked from the lower part of the plant, where they simply don't develop as much. As a result, the artichoke's characteristic fuzzy choke isn't all that fuzzy and can be eaten. In fact, other than a few tough outer loves, the entire artichoke is edible. So baby artichokes have all the flavor of their larger counterparts but without all the work. That's why they're ideal for a mid-week meal.

Select baby artichokes that are heavy for their size and have tight, firm, green or purple tinged leaves. White or brown streaks indicate frost bite or wind-burn; they are still edible, just unattractive. Do not, however, buy them if they're spongy or appear overly dry, brittle, or pitted. Baby artichokes can be refrigerated for up to 4-5 days, though the sooner you use them the better they'll taste.

cleaning baby artichokes

Compared to large Globe artichokes, baby artichokes are a breeze to clean. Just cut off the pointy top and the stem. Remove any tough or damaged outer leaves. Cut each artichoke in half or in quarters, and submerge in a bowl of water with lemon juice (this keeps them from oxidizing, or turning brown).

Baby artichokes can be boiled, steamed, braised, roasted, and even grilled. It's a good idea to par-boil them for 2-3 minutes before roasting or grilling which helps them retain more moisture.

Baby artichokes are delicious in everything from antipasto and salads to pastas and pizzas. They seem divined, however, for creamy risotto. This risotto celebrates the flavors of spring with nutty baby artichokes, tender asparagus, and fragrant fresh mint. It is an intoxicating combination of flavors and textures.

I have made it twice already, and now that I'm posting this, Jeff just asked, "Hey, when are you gonna make that risotto again?" Addictive, I tell you. That's why I'm sending it to Anh of the beautiful Food Lover's Journey, this week's host of Weekend Herb Blogging, created by Kalyn of Kalyn's Kitchen.

baby artichoke and asparagus risotto

Baby Artichoke and Asparagus Risotto

Makes 2 main or 4 side servings.
Print recipe only here.

1 teaspoon butter
1 teaspoon olive oil
1 large shallot, diced (about 1/4 cup)
1/2 cup uncooked Arborio rice
2 1/2 cups low-sodium broth, or as much as needed
1/4 cup dry white wine


8 asparagus stalks, cut into 1-inch slices
4 baby artichokes, trimmed and quartered
the juice of 1 lemon (for lemon water)
1 teaspoon olive oil
1 cup cremini mushrooms, sliced
7-8 cranks of freshly ground black pepper
1 tablespoon Meyer lemon juice
1/2 teaspoon lemon zest
5-6 mint leaves, thinly sliced
1/4 cup Parmesan cheese
1 tablespoon butter, optional

In a medium sauce pan over medium heat, add 5 cups of vegetable broth. Heat through for about 10 minutes, then lower to a simmer while cooking the risotto.

Meanwhile, fill a medium sized deep pot with water and the juice of 1 lemon (which prevents the artichokes from oxidizing, or turning brown) and bring to a boil. Trim the thick bottoms of the asparagus, and cut into 1-inch slices. Remove any tough or damaged outer leaves of the artichokes; trim off the tops and the stems, and cut into quarters. Place in a bowl of lemon water (which keeps them from oxidizing, or turning brown). Boil in lemon water for 3 minutes, then add the asparagus, and cook 3 minutes more, or until vegetables are just tender. Drain, and plunge in a bowl of ice water to stop the cooking process.

For the risotto, heat 1 teaspoon of olive oil and 1 teaspoon of butter in a large skillet over medium heat. Add diced shallots and saute 3-5 minutes, or until tender. Add the Arborio rice; toast for about 1 minute. Cook the risotto at a slow simmer, adding heated broth ½ cupful at a time. Most cookbooks will tell to stir continuously; I don’t, and you don't have to either. You can stir occasionally; just make sure the risotto absorbs the liquid before adding more. It will become tender and creamy as it cooks. Season with some salt about halfway through so it blends well, and add the white wine. 5 cups of broth usually works for this recipe, but use more or less as needed. It takes about 20 minutes for the risotto to become completely cooked. Taste it -- it should be wonderfully creamy and thick. It’s best al dente, which means it should still retain some firmness when you chew it.

After about 10 minutes of cooking the risotto, place a large skillet over medium heat. Heat 1 teaspoon of olive oil, then add mushrooms. Saute 5 minutes, or until golden brown; add the drained artichokes and asparagus; cook another 3-5 minutes until vegetables are tender but not mushy. Season with salt and black pepper.

At this point, the risotto should be cooked. Add the sautéed vegetables and stir. Add the lemon juice, lemon zest, and mint; stir until well combined and heated, about 1 minute. Turn off heat; then add the Parmesan cheese so it will melt more slowly. Add some additional salt and pepper, to taste. Adding 1 tablespoon of butter at this point adds a touch more creaminess, but it's optional.

Plate your risotto, topping it with extra mint leaves and grated Parmesan cheese. Drizzle it with extra virgin olive oil for an extra Mmmmmm and serve immediately.

You might also like these spring time dishes:
Save This Page on Del.icio.us

Thursday, April 24, 2008

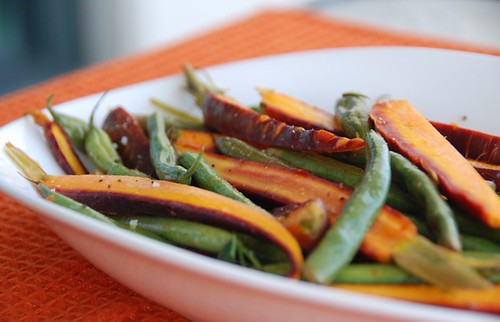
Roasted Rainbow Carrots and String Beans with Citrus-Sage Glaze

When I made these roasted carrots and string beans the other night, I immediately thought of my mom who adores them both. Like me, she often uses fresh mint on string beans, but since I had a bunch of velvety soft sage just waiting to be plucked, that's what I used. I was not disappointed.

rainbow carrots n beans

After I made the dish I called Mom to tell her. She and Dad had finished dinner, so, of course, I asked, "What did you eat?"

"I made a nice roast pork tenderloin marinated in balsamic vinegar and maple syrup, and I served it with carrots and string beans on the side," she said.

"Carrots and string beans, together?" I asked.

"Yeah, together, with some soy sauce, mint, and toasted sesame seeds. They were sooo good," she said.

"I called to tell you that I just made carrots and string beans with citrus and sage," I said.

"See that? You're in California and I'm in Rhode Island, and we made the same thing on the same day. How do you like that?" she said, with a warm laugh. (My mom just loves when things like this happen.)

If you haven't paired carrots and string beans yet, you're in for a vegetarian treat. Mini rainbow carrots have recently graced our farmers' markets, and the string beans get longer, plumper, and greener by the week.

"Mini" carrots, unlike orange “baby”carrots, are about 5-6 inches long and come in an array of fanciful colors. They're sweeter than regular carrots because they have a higher sugar content. That's why roasting them is so brilliant-- those sugars caramelize, creating a sweet, earthy, tangy flavor that is only enhanced by any variety of fresh herbs.

Carrots are highly nutritious as well. They are powerhouses of beta carotene, an antioxidant that lowers your risk of cancer, as well as lutein, which promotes ocular health. The Purple Haze carrots, like I used in my recipe, are high in the antioxidant lycopene, which has been linked to a reduced risk of macular degeneration as well as a reduced risk of many types of cancer including breast, colorectal, and esophageal.

String beans are high in vitamins A and C, important health-promoting antioxidants. So the combination of the two vegetables is a double whammy of cancer-fighting nutrients, which is why I'm sending this recipe to my friend Chris of Melecotte.

Chris is one of the first bloggers I met online. She's warm, funny, and generous. She's also a cancer survivor. April 29th marks her 7th year anniversary of being cancer-free, and to celebrate, she's hosting her Cooking to Combat Cancer event for the second year. Even if you don't know Chris, I'm sure you or someone you know has been affected by cancer. So why not send a cancer fighting recipe to Chris by April 29th?

Here's wishing Chris and all cancer survivors many more years of good health and good eating.

rainbow carrots n beans orange mat

Roasted Carrots and String Beans with Citrus-Sage Glaze
Makes 4 servings
Print recipe only here.

1/2 pound mini rainbow carrots, washed, trimmed, and thinly sliced lengthwise**
3/4 pound string beans, trimmed
2 teaspoons extra virgin olive oil
1/4 teaspoon orange zest
1/4 cup orange juice
1/4 teaspoon lemon zest
2 teaspoons Meyer lemon juice
coarse sea salt and 6-7 cranks of fresh black pepper
2 teaspoons honey
1 tablespoon chopped fresh sage

Preheat oven to 400 degrees F. Place carrots and string beans in a large rectangular baking dish.

In a small bowl, whisk olive oil, orange zest, orange juice, lemon zest, lemon juice, and salt & pepper. Pour over vegetables and toss until coated. Cover tightly with tinfoil and bake for 10 minutes. Remove the tinfoil. Add honey and fresh sage and toss to coat. Cook uncovered for 20 minutes, or until vegetables are tender yet crisp and a few brown spots appear.

Transfer vegetables to a platter or large bowl and drizzle with juices from the baking dish. Season with coarse sea salt and freshly ground black pepper, and garnish with additional sage, if desired.

**I used mini rainbow carrots, but any type of carrot is fine. I recommend slicing them to the approximate size of the string beans so they will cook evenly.

You might also like these nutritious cancer-fighting dishes:

Save This Page on Del.icio.us

Sunday, April 20, 2008

How to Clean, Cook, and Eat an Artichoke

It's peak artichoke season, and I don't want you to miss out. So if you've ever wondered how to select, clean, cook, or even eat an artichoke, then you've come to the right place.

artichoke with Meyer lemons

Virtually 100% of US artichokes are produced in California. The vast majority of artichokes for sale at supermarkets are Globe artichokes which are conical in shape with rather pointy leaves and weigh about one pound. The Big Heart artichoke is available at local farmers' markets and specialty markets such as Whole Foods. Though similar in taste to a Globe, the Big Heart weighs closer to two pounds, has rounder, thicker leaves (and a bigger heart, of course).

big heart and globe artichokes
Big Heart artichoke on left and Globe artichoke on right


Food Blogga Artichokes 101

How to select an artichoke:

  • Look for green or purple-tinged leaves that are as tight as a fist.
  • White or brown streaks indicate frost-bite or wind burn; they're edible, but not as pretty.
  • Place it in your hand; it should feel heavy for its size.
  • Squeeze it; the fresh leaves should squeak. If its spongy, put it back.
  • If the leaves or overly dry, splayed, or pitted, skip it.
How to clean an artichoke:
  • Lay the artichoke on its side on a sturdy cutting board.
cutting off the stem
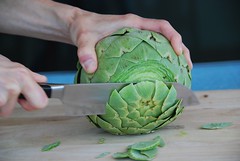
  • Using a sharp, heavy knife cut off the stem right to the bottom of the artichoke.
cutting off the top
  • Then cut of the top 1/4 of the artichoke.
  • Pluck off any discolored or damaged leaves.
trimming the leaves with scissors
  • Using kitchen shears, trim the tips of all of the leaves until they are straight.
separating the leaves
  • Using your thumbs, gently pull the leaves apart until the center is exposed.
cleaning the cavity
  • Using your hands pull out the prickly, purple tipped leaves and discard.
removing the fuzzy choke
  • Using a small spoon, scoop out the fuzzy choke and discard.
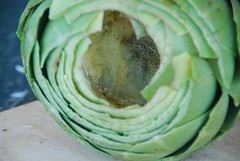
clean artichoke cavity
  • The cavity should be smooth now.
a good lemon rub
  • Rub the entire artichoke with a lemon half to prevent it from oxidizing, or turning brown, and squeeze some juice into the cavity of the artichoke.
a good lemon squeeze

  • If using the stems (they're wonderful in stuffing), then remove the fibrous outer part.

trimming the stem
  • Slice into strips of equal length.
dicing the stem
  • Dice and then sprinkle with lemon juice to prevent them from turning brown.
How to cook an artichoke:
  • If stuffing, then fill the cavity half way with stuffing. Using your hands, fill each leaf with about 1/2-1 teaspoon stuffing, starting at the outermost leaves and working towards the center. Recipe: Mom's Italian Stuffed Artichokes
  • I prefer to steam artichokes in a large pot of water seasoned with lemon and olive oil for 45 - 75 minutes (stuffed) or 30 -45 minutes (unstuffed), or until leaves are tender. Steaming renders the artichoke moist and tender.
  • Artichokes can be roasted or grilled, though I have found them to be less tender and moist. It's a good idea to par-boil them first before roasting or grilling which helps them retain more moisture.
  • Artichokes are cooked when you can easily pull out a leaf (too much tugging means it needs more cooking). You can also get a long, think knife and insert it into the center of the artichoke; it should easily go through to the heart.
  • Remember that the larger the artichoke (like the Big Heart variety), the longer the cooking time.
How to eat an artichoke:


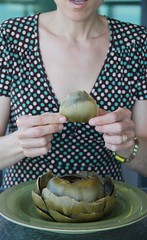
artichoke plucking
  • Pluck a leaf from the artichoke.
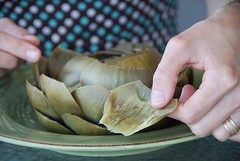
lifting the leaf
  • Grip it with two hands, and place it flesh side down against your bottom teeth.
Mmmmm...this is good
  • Scrape the artichoke "meat" off. If it doesn't come off easily, then it needs to be cooked more. No amount of chewing will help. Trust me.
Ahhh....
  • Place the eaten leaf in a bowl.
an eaten leaf


  • Work your way toward the tender inner leaves.
Slicing an artichoke heart
  • Thinly slice the artichoke heart, then eat it, patiently, savoring every buttery mouthful.

Save This Page on Del.icio.us

Thursday, April 17, 2008

Mizuna and Broccoli Flower Salad: The Plasma HDTV of Salads

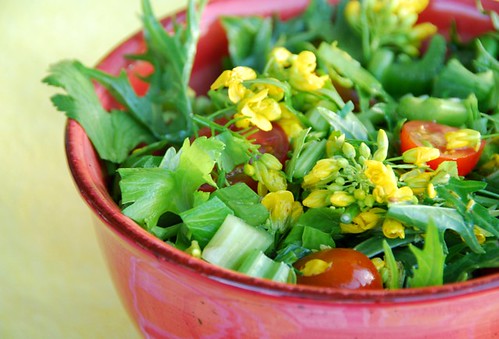
spicy mizuna and broccoli flower salad

Growing up "salad" meant a plate with iceberg lettuce, cucumber, carrot, and tomato slices, and bottled Catalina dressing.

Like TV's, salads have come a long way since then.

I remember in the 80's everyone started eating Caesar salad, and romaine bumped iceberg as the lettuce of choice. Then sometime in the '90s peppery salad leaves like arugula and radicchio were clandestinely added to salad plates. Back then people would disparagingly call them "the lettuce that bites you back." Ah, how things have changed.

Then came mesclun, and salad was never the same. Mesculn is a mix of tender, young salad leaves. Its name comes from the French mescla meaning "to mix." Mesclun varies depending on the source but may include arugula, mustard greens, oak leaf, radicchio, red beet greens, and sorrel.

The first time Jeff and I ate fresh mesclun from the farmers' market here in California we were taken aback:

"Wow! This salad has lots of flavor. You can really taste the greens," Jeff said.

Talking right over him, I exclaimed, "Is that a baby beet green?"

"Do you have these green pointy things in yours?" he replied, ignoring my question, "They're fantastic!" (Yes, we do get this excited over salad at my house.)

Turns out those green pointy things were mizuna. Mizuna is a Japanese mustard green with dark green, thin, serrated leaves, and a pleasantly spicy, peppery flavor. Though it has been cultivated in Japan since ancient times, it is believed to have originated in China. Most recipes for mizuna are Asian, and it features prominently in salads, soups, and stir-fries. It can be eaten raw or cooked, and it is packed with nutrients such as carotenes, folic acid, and vitamin C.

Mizuna is available at markets such as Whole Foods, and if you buy Trader Joe's herb salad mix, it's in there too. So you may have been eating mizuna without even realizing it.

Just when you thought you couldn't take any more salad excitement, I have to mention broccoli flowers. These tiny, yellow edible flowers have a robust flavor and beautify any salad. If you find them, don't hesitate to get them. They are sooo 2008.

I'm sending my mizuna salad to the always Well-Seasoned Cook, Susan, the host of this week's Weekend Werb Blogging created by Kalyn of Kalyn's Kitchen.

fresh mizuna

Mizuna and Broccoli Flower Salad
Serves 4
Print recipe only here.

Salad:
6-8 cups mizuna**
3-4 inner white stalks of celery with the leaves, thinly sliced on the diagonal
10-12 cherry or grape tomatoes, sliced in half
a handful of broccoli flowers, optional

Dressing:
1 tablespoon extra virgin olive oil
1 tablespoon rice wine vinegar
1 tablespoon fresh lime juice
1 tablespoon honey
the zest of 1/2 lime
6-8 cranks freshly ground black pepper
salt, to taste

Wash and pat dry the mizuna and place in a large bowl; add celery and tomatoes.

To make the dressing, whisk all ingredients in a small bowl. Add to salad; toss well to coat, then sprinkle with broccoli flowers, if using.

**Mizuna substitutions to consider: watercress, wild arugula, tender baby kale or mustard greens, tatsoi (another spicy Asian green that is usually available in markets such as Whole Foods.)

Other spicy green dishes you might like:


spring time daffodils

Speaking of Trader Joe's and yellow flowers, here is a bouquet of TJ's cheerful daffodils (unlike the broccoli flowers, I wouldn't eat them). After about 6 weeks, it's time to say good-bye to daffodils until next year. I hope Sandi likes daffodils since this is my entry for her Centerpiece of the Month.


Save This Page on Del.icio.us

Sunday, April 13, 2008

Beautiful Bones: An Osteoporosis Food Event

Since I started this blog in January 2007, I have shared a lot of things about myself. One thing I haven’t shared is that I have osteoporosis. According to the National Osteoporosis Foundation (NOF) osteoporosis is "a disease in which bones become fragile and more likely to break."

I’m not a senior citizen; that really is me in pictured to the right. But as I discovered last summer, you can be an otherwise totally healthy woman in her (let's say 30's) and still have osteoporosis.

Of the estimated 10 million Americans with osteoporosis, 8 million are women. In fact, osteoporosis is actually believed to be under-diagnosed which means there are likely many more women who are unknowingly afflicted with it. It is sometimes discovered by an astute internist (which is what happened to me) but unfortunately is often discovered after fracturing a bone (which happens to many women).

According to the NOF, there are many risk factors for osteoporosis in women, including:

  • Just being female
  • Missed periods (amenorrhea)
  • Low estrogen levels (especially during menopause)
  • Family history (especially mother and grandmother)
  • Being of a particular race/ethnicity such as Caucasian, Asian, or Latino, although African-Americans are also at risk
  • Low Body Mass Index (BMI) (being thin and small)
  • Lack of calcium and vitamin D, especially in childhood (this can be a real problem for lactose intolerant people)**
  • Lack of exercise
  • Smoking
  • Alcohol abuse
  • Certain conditions such as anorexia nervosa and asthma
** Amazingly, 90% of adult bone mass is acquired in girls by the age of 18! That means that after 18, you have only 10% of your bone mass that you can still build.

I have decided to host a food blogging event to alert women to the potential risks of osteoporosis and encourage them to take steps to protect their bones at every age. I am sure that I am not the only food blogga who has osteoporosis and was not aware of it.

Here’s the plan: May is National Osteoporosis Awareness Month which is the perfect time to hold an event. If you’d like to participate, then kindly follow these steps:

  1. Post one calcium-rich recipe on your blog any time between May 1st and May 31st. (Please no back dating or late entries.) And of course boy bloggas are welcome to participate.
  2. Include a link to this announcement.
  3. Email the following information to foodblogga [at] yahoo [dot] com, and mention beautiful bones in the subject line.
    • Your preferred name
    • Blog name
    • General geographic location
    • Your post URL and recipe name
  4. Please attach a 200 pixel image if you'd like an image to appear in the round-up.
  5. I would, of course, also appreciate your placing the event logo in your post.
No blog? No problem. Just email your preferred name, location, name of the recipe, and a 200 pixel image to foodblogga [at] yahoo [dot] com, and mention beautiful bones in the subject line.

The recipe can be for any type of dish you like as long as it contains at least one calcium-rich food as a main ingredient.

Calcium-rich foods:

  • Dairy products: all types of cheese, especially mozzarella and Parmesan, milk, soy milk, yogurt, soy protein or whey protein (for smoothies)
  • Soy: edamame, soy milk, tofu, tempeh, and other soy products
  • Nuts and seeds: all kinds, especially almonds and sesame seeds
  • Legumes: all kinds, especially black beans, black-eyed peas, and navy beans
  • Seafood: oysters, salmon, sardines, and shrimp
  • Green leafy vegetables: beet greens, collards, dandelion greens, kale, mustard greens, spinach, Swiss chard, turnip greens
  • Other vegetables: artichokes, asparagus, avocado, bok choy, broccoli, cabbage, carrots, celery, cremini mushrooms, fennel bulb, garlic, green beans, okra, potatoes, radishes, rhubarb, romaine lettuce, summer squash, tomatoes (yes, it's a fruit, but come on)
  • Fruits: bananas, blackberries, cantaloupe, grapes, kiwi, lemons, limes, oranges, strawberries, watermelon
  • Whole grains: (grains that are not milled) such as barley, cornmeal, oats, popcorn (no kidding!) quinoa, rice, rye, spelt, and whole wheat flour
  • Spices and herbs: black pepper, caraway seeds, cinnamon, coriander seeds, dill seed, parsley, oregano, poppy seeds, rosemary
  • Others: leavening agents, such as baking powder; corn tortillas; calcium fortified juices, breads, and dairy products
Meal ideas:

  • Breakfast: frittatas, granola, muffins, oatmeal, quick breads, scones
  • Lunch: burritos, salads, sandwiches, soups, stuffed potatoes, wraps
  • Dinner: pasta, pizza, grain dishes, seafood, stir-fries, tofu, vegetarian entrees
  • Appetizers/Snacks: bruschetta, crostini, cheese, dips, nuts, popcorn
  • Desserts: cakes, cookies, fresh fruits, ice cream, pies, puddings
  • Drinks: milkshakes, smoothies, yogurt drinks

During the month of May, I’ll write several posts for this event, sharing information about osteoporosis with you and providing a recipe with each post.

Please feel free to leave any questions or comments you may have in the comment box or email me directly at foodblogga [at] yahoo [dot] com. I'm looking forward to your bone-building, delicious submissions!

Logo was adapted from an image from the National Museum of Health and Medicine.

Thursday, April 10, 2008

A Fava Bean by Any Other Name Would Taste as Good

fava beans at the farmers' market

Finally, the wait is over! Fava beans are in season. They appeared for the first time last Sunday, and I couldn't be happier. I know how hard the wait has been on you too, but you can rest easy now. Well don't rest too easily. Fava beans have a depressingly short season--usually just 4-5 weeks in April-May.

Fava (FAH vah) beans, like artichokes, asparagus, and English peas are a hallmark of spring time produce. These meaty, chewy legumes are exceptionally flavorful; they're similar in taste to edamame and have the firm texture of lima/butter beans. In general, the larger the pod, the better the bean. So when you see them, buy them, even if they're $3.00-4.00/pound. You won't be disappointed.

And don't worry about what to call them. According to Wiki and Cook's Thesaurus, you're correct if you say Vicia faba, broad bean, butter bean, faba bean, English bean, field bean, horse bean, tic bean, or Winsdor bean. I'm not making this up. I think someone actually wrote a dissertation entitled "The Many Appellations of the Bean, Fava."

So call 'em whatever you want, just don't miss them. And follow these instructions for shelling. They take a little effort because you have to shell them twice, but trust me, they're worth it.
  1. Snap the top off of the pod. Sometimes the pod will split easily down the seam, but sometimes you have to squeeze and twist the pod with your fingers till it pops and the beans are exposed.
  2. Remove the beans and discard the shells.
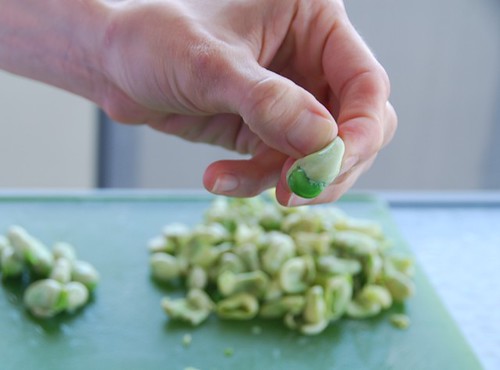
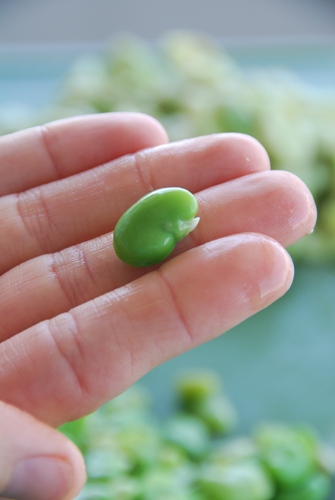
  3. Now you need to remove the waxy casing that encloses the fava bean. The easiest way is to boil the beans for 2 minutes, then drain them, and plunge in a bowl of ice water. Now for the fun part-- squeeze the casing gently between your thumb and forefinger and watch the fava bean pop out! Discard the waxy shell.

fava bean being shelled

Now it's time to eat them, and you can eat a lot of them. A 1/2 cup of boiled fava beans is just over 90 calories and contains nearly 7 grams of protein and 5 grams of dietary fiber. They're high in calcium, iron, and folate. So enjoy them in salads, soups, pastas, and risottos. Or mash 'em up in spreads and dips.

fava bean in my hand

I'm sending this recipe to Jai and Bee of Jugalbandi, the hosts of this week's Weekend Herb Blogging created by Kalyn of Kalyn's Kitchen.

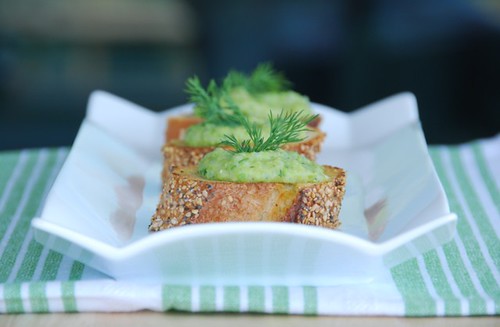
fava bean and dill crostini

Fava Bean and Dill Crostini
Yields 3/4-1 cup
Print recipe only here.

3/4 cup shelled fava beans (about 1-1 1/4 pounds fresh fava beans in the shell)
1/2 cup red potato, diced
1 tablespoon plus 1 teaspoon Meyer lemon juice
1 tablespoon extra virgin olive oil
7-8 cranks black pepper
3 tablespoons fresh minced dill
2 tablespoons grated Reggiano-Parmigiano cheese
4 tablespoons water, or as needed
salt, to taste

1 baguette

Boil the fava beans in a small pot for 2-3 minutes; drain, and plunge into a bowl of ice water.

Meanwhile in a small pot, boil potatoes for 10 minutes, or until tender when pierced with a fork. Drain and let cool. Squeeze the casing gently between your thumb and forefinger and watch the fava bean pop out! Discard the waxy shells.

Place fava beans, potatoes, and remaining ingredients in a food processor and process until smooth. Use less water for a chunkier spread and more water for a smoother spread.

Toast bread slices. Spread bean mixture on toasts. Sprinkle with some sea salt, drizzle with some extra virgin oil oil, and top each with a sprig of fresh dill.

Note: If you can't find fava beans, then I suggest substituting lima/butter beans or edamame. I have also made this spread with fresh shelled English peas and fresh shelled sugar snap peas which are equally delicious.

You might also like:

Save This Page on Del.icio.us

Monday, April 7, 2008

Habaneros Are Hot

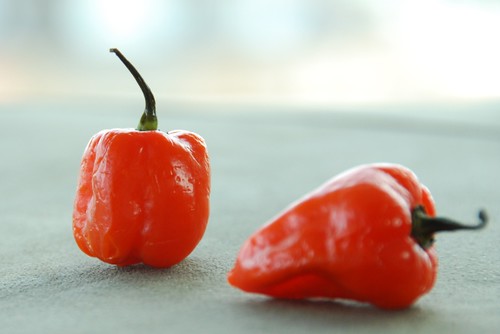
habaneros

In August 1997, and Jeff and I were at the Raleigh Farmers' Market in North Carolina. A farmer was selling a wide variety of chilies, including habaneros. I was instantly drawn to their shiny, reddish-orange skin and almost heart-like shape.

"What do habaneros taste like? I asked.

"They got kick in 'em," he said, as he chewed on a toothpick.

"Can they be eaten raw, or should I cook them?" I asked.

"You can eat 'em any way you like," he said, now twirling the toothpick between his thumb and forefinger.

"How 'bout the seeds? Should I take them out first?" I asked.

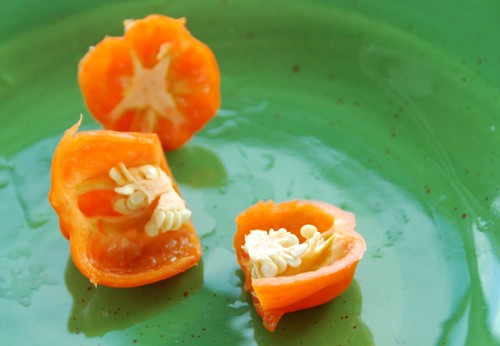
habanero seeds

"If you want to," he said.

Realizing I was just going to have to find out for myself, I quickly selected four or five brilliant habaneros, paid for them, and proudly announced to Jeff that I would make burritos with habanero salsa for dinner.

As I was preparing the salsa, Jeff sampled a tiny piece of the habanero; he coughed a couple of times and declared it "pretty hot." I decided to forgo the taste test and chopped up two habaneros, seeds and all.

We sat down to eat dinner, and I added a spoonful of my brilliant orange habanero salsa to my burrito. After the first bite, I felt a burning sensation on my lips, then my tongue started to prick with heat. Within seconds, actual flames of fire were leaping through the roof of my mouth into my nose. I tried to yelp but only gurgling sounds came out.

Jeff, realizing I was in trouble, handed me a glass of water. (This was before medical school; what did he know?) I waited for relief. Instead, like throwing water on hot oil, the fire in my mouth roared.

After a couple minutes of coughing and chest pounding, I said to Jeff, "My lipth feelths funny." I went into the bathroom and sure enough, my upper lip was swollen to twice its size. I'd always wanted fuller lips but this was ridiculous.

I've learned a few things about chilies since that memorable day. Turns out a chili's "heat" comes from a compound called capsaicin and can be measured on the Scoville Scale. Created by a chemist named Wilbur Scoville, this scale accurately measures the level of capsaicin in a chili. Scoville heat units (SHU) indicate the amount of capsaicin in a chili. For instance,
  • a red bell pepper registers a zero (you feel nothing)
  • a jalapeno = 2,500-8,000 (you feel a mild tingling sensation in your mouth)
  • a serrano = 10,000-25,000 (your lips and belly get warm and prick with heat)
  • a habanero = 100,000-350,000 (pain, not enjoyment, pain)
The Wall Street Journal not too long had a story on the world's hottest chili, the bhut jolokia, which registers over 1,000,000 SHU! At that heat, I would be afraid of dying.

Despite my initial adverse reaction, I still eat habaneros but without the seeds. And if my mouth starts to burn, I don't drink water. I eat bread or a banana; I've read that creamy foods like yogurt are supposed to work too.

habanero salsa bowl

So please try these quesadillas with a fruity habanero salsa. The sweet pineapple, mango, and kiwi contrast pleasingly with the spicy green onions and fiery habanero. Plus the acidic lime juice helps to temper the chili's heat. It's a quick mid-week meal or easy party dish. Feel free to play around with the ingredients to your liking; after all, quesadillas are meant to be fun.

When you make them, just be sure to have some bread, bananas, and yogurt nearby, just in case.

quesadilla close up

Goat Cheese and Poblano Quesadillas with Pineapple-Mango-Habanero Salsa

Make 4 quesadillas
Print recipe only here.

Salsa:
1 cup diced fresh pineapple
1 cup diced fresh mango
1 diced kiwi
1 habanero, minced, and seeds removed (unless you're a glutton for punishment)
2 green onions, thinly sliced
the juice of 1 lime
1 tablespoon minced fresh cilantro
salt, to taste

Quesadillas:
1 large or 2 small poblano peppers, de-seeded and thinly sliced
1 teaspoon canola oil
1 medium red onion, thinly sliced
1 teaspoon sugar
salt, to taste

8 (6-7- inch flour tortillas)
4 ounces goat cheese

To prepare the salsa, place all ingredients in a medium bowl and gently toss. Allow to rest for at least 30 minutes (or up to 2 hours) for the flavors to mingle.

Place poblano pepper over an open gas flame, turning occasionally, until thoroughly charred and blistered on all sides. Wrap tightly in aluminum foil and let rest for 15 to 20 minutes. Remove, and using some paper towel, gently scrape off the skin. Halve, stem and seed the pepper. Cut into strips, then dice, and place in a bowl. Set aside.

Heat a medium nonstick skillet over medium heat. Add canola oil and red onion, and saute for 3-5 minutes. Add sugar, reduce heat to low, and continue to cook until onions are caramelized, about 7-10 minutes. Add cooked poblano peppers to the skillet, season with salt, and toss to combine. Remove from heat.

Place 1 tortilla on a clean cutting board; spread with 1 ounce of goat cheese, then 1/4 of the poblano mixture. Top with another tortilla, and press lightly with your hand. Continue with remaining tortillas and filling until you complete 4 quesadillas.

Heat a large, nonstick, dry skillet over medium heat. Add 1 quesadilla. Cook until lightly browned, about 2 minutes per side. Transfer to a baking sheet and place in a warm oven (200-300 degrees F) until ready to serve. (Or eat 'em as you make 'em.) Repeat with remaining 3 quesadillas.

Cut each quesadilla into 3 or 4 wedges. Serve with salsa.

You might also like:

Note: The previous post for WEB, Weekend Eagle Blogging was a spoof. Please don't send me pictures of predatory birds with road-kill soup.


Save This Page on Del.icio.us

Friday, April 4, 2008

Weekend Eagle Blogging Week 1: Apple, Fennel, and Celery Salad

The story of how W.E.B. began:

A couple of weekends ago while I was making lunch, Jeff suddenly froze at the computer. In an intense whisper, he said: "Sue, there's an eagle on our windowsill." "Yeah, right," I responded, and continued slicing my fennel.

The next thing I knew, Jeff s-l-o-w-l-y slithered out of his chair and grabbed the camera. So I dropped my chef's knife and walked to the window. "OH MY GOD! There's an eagle on our windowsill!" I exclaimed. "I know, that's what I tried to tell you!" he said.

Jeff made it to our deck and started snapping pictures of this fiercely beautiful creature. We were mesmerized; it's not too often you see an eagle on your windowsill. After several minutes, he took off, and we went inside to eat our lunch, which included this apple, fennel, and celery salad. Which is when this brilliant idea hit me.

For months now, I have been holding back. Well, no more. I am frankly quite tired of the whole weekend cat blogging scene. Having never had a cat nor met a cat I particularly liked (or that liked me), I have always felt left out on Saturdays. I think I might have been a dog in a former life or something, because every time I encounter a cat, it stops in its tracks and stares me right in the eyes -- like it knows my secret or something. Even in pictures on the web, they are staring at me.

Every Saturday as I troll through my reader, I jump when a cat picture pops up. I have found myself now avoiding the whole Saturday scene. So here's my idea. For all you non-cat girls (and guys) like me who slump on the sofa on Saturdays, ostracized by the cat community, I'm starting W.E.B. (Weekend Eagle Blogging). Send me your most adorable shots of Tabby or Fluffy the eagle eating a rodent or picking road kill out its talons, and I'll post it. Oh yeah, this is gonna be big.

eagle turning

eagle stare
"I likes to eats weekend catz."

eagle down
"I seez raisins on that apple fennel salad."

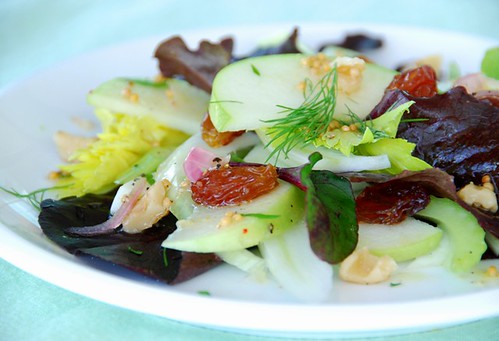
apple, fennel, and celery salad

This salad is like a farewell to winter and a hello to spring: winter's tart Granny Smith apples get a lift from the season's new crop of licorice-laced fennel and fresh dill. Topping it off with plump, chewy raisins makes it even sweeter. It's a satisfying salad of complex textures and flavors that is sure to please (even if you don't have any eagles to admire while you eat it).

fennel bulb

Since I never feel left out of Weekend Herb Blogging, I'm sending my salad to this week's host and creator of WHB, the always kind Kalyn of Kalyn's Kitchen.

In addition to being an aphrodisiac, mildly licorice-flavored fennel is low in calories and nutritious. One cup of sliced fennel is only 27 calories and has a mere 6 grams of carbohydrates. Yet it provides 17% of your daily recommended allowance of vitamin C. It's currently in season and is exceptionally flavorful, so it's the perfect time to try it.

Apple, Fennel, and Celery Salad

Makes 4 servings
Print recipe only here.

Vinaigrette:
1 teaspoon yellow mustard seeds
1 shallot, sliced
1 tablespoon, plus 1 teaspoon extra virgin olive oil
2 teaspoons rice vinegar
2 teaspoons Dijon mustard
1 tablespoon, plus 1 teaspoon honey
2 tablespoons fresh Meyer lemon juice**
3-4 tablespoons water
2 teaspoons fresh parsley, chopped
2 teaspoons fresh dill, chopped
Salt and black pepper, to taste

Salad:
8 cups spicy mesclun greens
1 large Granny Smith apple, thinly sliced
2 tablespoons Meyer lemon juice**
1 medium fennel bulb, thinly sliced
2 inner celery stalks, sliced on the diagonal, with some leaves
2 tablespoons crimson or golden raisins
2 tablespoons toasted walnuts

Optional garnishes:
fennel fronds, fresh dill, toasted nuts, such as almonds, chestnuts, pecans, or pistachios

To toast the walnuts, place in a small, dry skillet over medium heat for 1-2 minutes, until golden brown and aromatic. Set aside.

To make the vinaigrette, place mustard seeds in a small, dry skillet over medium heat; toast for 1-2 minutes until they begin to pop; set aside. In the same skillet, sauté shallots in olive oil; whisk in remaining vinaigrette ingredients. Turn off heat.

For the salad, place apple and fennel slices in a bowl with fresh lemon juice and toss to prevent them from turning brown. Pour out lemon juice before adding to salad.

In a large bowl, add mesclun, apple and fennel slices, and celery; add vinaigrette, and toss until well coated. Divide among 4 plates. Garnish with raisins and walnuts.

**If you can't find Meyer lemons, then regular lemons are fine.

You might like these other recipes featuring fennel:

**Update: OK, OK, so it's not an eagle; it's a hawk. But WHB was already taken.

Save This Page on Del.icio.us