Thursday, May 29, 2008
Coconut-Lime Rice Pudding with Mangoes and Cashews
Do you ever get the Sunday night blues? You know, that feeling of disappointment that the weekend is over and Monday morning looms like a dark cloud?
It happens to me sometimes. And when I feel this way, I usually crave something comforting. This past Sunday it was rice pudding--the quintessential comfort food. That's because it's warm, creamy, and unabashedly carb-y. These are the good carbs though, the ones that make you feel like you're receiving a hug from your mom.
Even if you don't get the Sunday night blues, everyone needs a little comfort now and again. And rice pudding leaves you feeling good every time.
Though I typically use traditional flavorings like cinnamon and vanilla, I went a little tropical with this one by using coconut milk, grated lime zest, and toasted shredded coconut. It still has all the benefits of classic rice pudding but with a little sass. Top it with diced, ripe mango, crunchy cashew nuts, and toasted coconut, and you'll be laughing before you know it. And all of a sudden, Monday morning won't seem so bad.
Coconut-Lime Rice Pudding with Mangoes and Cashews
Serves 4
Print recipe only here.
1/2 cup Arborio rice
2 cups water
2 cups coconut milk (regular or light)
1/3 cup sugar
zest of 1/2 lime
4 tablespoons sweetened shredded coconut, toasted
Garnishes:
1 small, ripe mango, diced
2 tablespoons sweetened coconut shreds, toasted
2 tablespoons unsalted cashew nuts, chopped
a pinch of lime zest
Place 4 tablespoons shredded coconut in a large non-stick skillet over medium heat. Shake the pan handle gently in a back-and-forth motion for 2-3 minutes to ensure even toasting, or until coconut is golden and aromatic. Set aside.
Add rice, water, coconut milk, and sugar to a medium heavy-bottomed saucepan, stir well, and bring to a boil. Lower heat to a simmer, letting the rice bubble gently for 35-45 minutes, stirring occasionally. When done, the rice will be plump, and the pudding will be thick and creamy. Give it a taste--the rice should be fully cooked yet maintain a slight firmness.
Remove from heat, and stir in the lime zest and toasted coconut. Allow to cool slightly before placing in individual serving dishes. Garnish each dish with fresh diced mango, toasted coconut, chopped cashews, and finely grated lime zest.
You might also like these coconut-y desserts:
Chocolate Dipped Coconut Macaroons
Hello Dolly Cookie Bars
Coconut Lemonquat Tea Cake
Banana Coconut Almond Bread
Here are more delicious rice pudding recipes with coconut milk:
Arfi's Bubur Ketan Hitam (Black Rice Pudding with Cooked Coconut Milk)
Bea's Coconut Rice Pudding with Stewed Rhubarb and Strawberries
Kevin's Mango Coconut Rice Pudding
Peter G's Vanilla and Cardamom Rice Pudding
Save This Page on Del.icio.us
Tuesday, May 27, 2008
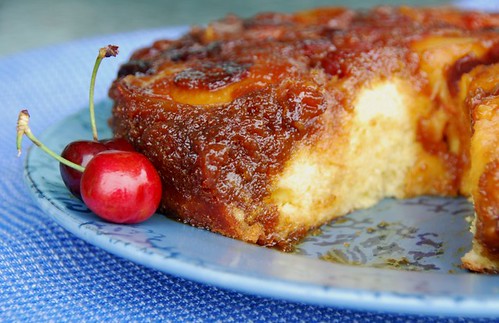
Baking Fresh Cherry and Peach Upside-Down Cake on a Rainy Day
Last Thursday I was driving home on the freeway at 3:45 pm when the local traffic report came on:
Well, the 163 in both directions is heavy. So is the 5 North and South and the 805. Looks like everybody is leaving work early to avoid the rain that San Diegans are expecting tonight.
Yup. It's true. Southern Californians leave work early when rain is expected. OK bloggers from Seattle, go ahead and laugh. We deserve it.
For the record, I have never left early because of rain. I mean what kind of a New Englander would I be? And what would my dad think of me?
I guess Southern Californians don't really know any better. Why should they? It hardly ever rains here, and when it does, it wreaks havoc. No, I'm not talking about flooding and mudslides. I'm talking about traffic. You can see a half dozen accidents on one commute and get stuck in a traffic jam that lasts hours. Seriously, it was easier to get home after the blizzard of '78 than it is to get home after a "heavy rain shower" here in SoCal.
So I avoided the madness by doing what any good blogger would do: I went home and baked a cake. Isn't there something so comforting about the aroma of baking wafting through the house as the rain patters gently against the windows?
One of my favorites is my mom's Upside-Down Pineapple Cake, which was her mother's original recipe that is close to 70 years old! I will post the original in the fall, but today I wanted something that celebrated spring. With a gorgeous bowl of tart cherries and some sweet fresh peaches smiling at me, I found my inspiration. I added some freshly squeezed orange juice and zest which compliments the fruit and adds another dimension of flavor.
This is an amazingly light, moist cake that is only made more irresistible by a thick, sugary crust that holds the plump cherries and peaches firmly in place. After one mouthful, you'll wish it rained every day.
Fresh Cherry and Peach Upside-Down Cake
Makes 8 servings
Print recipe only here.
1/2 cup butter (8 tablespoons)
1 cup brown sugar
3/4 cup fresh cherries, pitted and halved
3-4 small, ripe peaches, pitted and halved
1 cup flour, sifted
1 teaspoon baking powder
1/8 teaspoon salt
3 eggs, separated
1 cup granulated sugar
5 tablespoons orange juice
2 teaspoons orange zest
1 teaspoon pure vanilla extract
Place a rack in the center of the oven, and preheat to 350 degrees F.
Place butter in a 9-inch-round baking pan, and place inside of a warm oven until melted, about 5 minutes. Remove from oven, and sprinkle brown sugar evenly over the butter. Add the peach halves, cut side down, then add the cherry halves, filling in all of the nooks and crannies.
In a medium bowl, combine sifted flour, baking powder and salt, and stir.
Using a hand mixer, in a metal or glass bowl, beat egg whites at high speed until fluffy. Set aside.
In a separate bowl beat egg yolks with sugar at medium speed until creamy. Add orange juice, orange zest, and vanilla extract, and beat well. Add the flour mixture to the creamed mixture, and beat until well combined. Fold in the egg whites with a rubber spatula. Pour cake mixture evenly over the fruit, and smooth with the spatula.
Bake for 40-45 minutes, or until cake is golden and a toothpick inserted into the center comes out clean. Place on a wire rack to cool for 10 minutes. Run a blunt knife around the edges of the pan to loosen the cake. Invert carefully onto a plate. Serve warm or at room temperature.
You might also like these spring-time desserts:
Quick Chocolate-Cinnamon Mousse with Cherries
Mini Custards with Limoncello-Spiked Raspberry Sauce
Strawberry-Rhubarb Sponge Pudding
PS--Witty Nuria just reminded me of that great 1974 song "It Never Rains in Southern California." It's an ideal match for my post, so I'm sending it to Elly for her fun Eat to the Beat event that runs through June. Make sure you watch this Albert Hammond You Tube video--it's worth it just to see his bell-bottoms and Bee-Gee's permed hair. Yikes.
Save This Page on Del.icio.us
Sunday, May 25, 2008
How Many Whole Grains Can You Name?
So you call yourself a foodie, huh?
OK, quick, how many whole grains can you name in 1 minute?
Time's up!
- If you named zero
- You're probably still eating Fruit Loops for breakfast and need to acquaint yourself with Kashi (no, it's not a country in Middle East).
- If you named 1-5
- You're actually reading your cooking magazines instead of just using them for coasters. Good for you!
- If you named 6-10
- Then you likely have posters of all the Iron Chefs in your bedroom.
- If you named 11 or more
- Then you either just Googled "whole grains" or you are a true smarty-pants and find you sometimes have difficulty getting along with others.
- amaranth
- barley
- buckwheat
- bulgur
- corn
- farro
- grano
- kamut
- millet
- oats
- quinoa (keen-wa)
- rice
- rye
- sorghum/milo
- spelt
- teff
- triticale (trit-i-kay-lee)
- wheat
- wild rice
So why should you eat whole grains?
- They contain complex carbs, which your body digests more slowly, keeping you satiated longer.
- They are associated with a decreased risk of cardiovascular disease, diabetes, and stroke.
- They contain beneficial vitamins and are high in calcium, which is needed to build strong bones.
- They taste great.
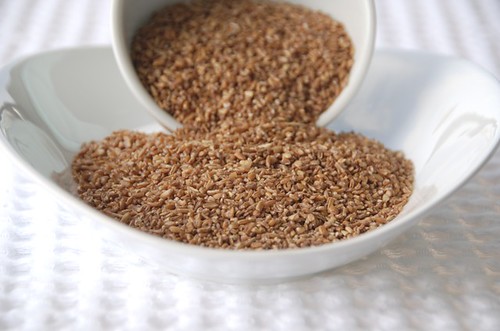
When purchasing bulgur, buy those packages labeled either "bulgur" or "bulgur wheat." (It might also be spelled "bulghur.") Do not however buy "cracked wheat" which has not been parboiled and takes much longer to cook. I learned that the hard way.
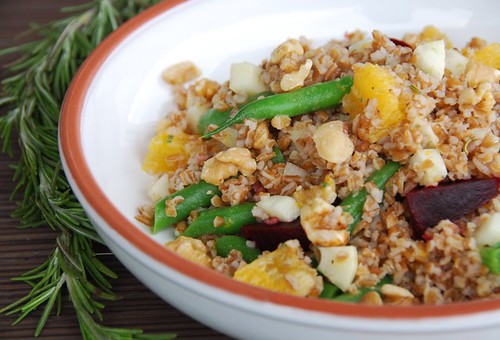
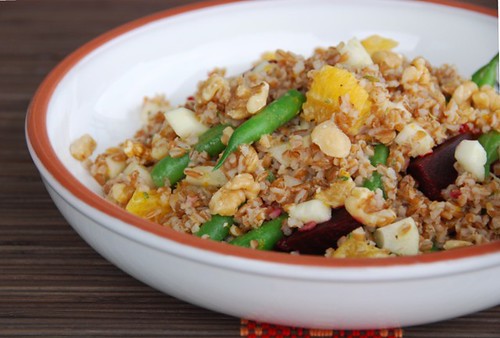
This dish has a number of calcium-rich ingredients: bulgur, fennel, oranges, string beans, chick peas, nuts, and rosemary. Earthy beets, licorice-scented fennel, and sweet oranges, are enhanced by a warm and tangy fennel-honey-mustard vinaigrette. And it tastes even better the next day.
Would you like to participate in Beautiful Bones? You have until May 31st; the details are here.
Warm Bulgur Salad with Beets, Fennel, and Oranges
Serves 4
Print recipe only here.
Salad:
1 cup uncooked medium coarse bulgur wheat
4 small beets, roasted and sliced
1 cup sliced green beans
1/2 cup diced fennel bulb
2 medium navel oranges, peeled, sectioned, and chopped
1 (15 oz.) can chickpeas, rinsed and drained
2 tablespoons toasted walnuts, pecans, or pistachios
Warm Fennel-Honey-Mustard Vinaigrette:
1/2 teaspoon fennel seeds, toasted
2 tablespoons olive oil
2 tablespoons red wine vinegar
1/2 cup freshly squeezed orange juice (or from a carton)
1/2 teaspoon orange zest
2 teaspoons Dijon mustard
2 teaspoons honey
2 teaspoons water
1/2 teaspoon minced fresh rosemary
salt and freshly ground black pepper, to taste
Cut off beet tops, and clean beets. (If you’re keeping the beet greens; submerge in cool water to release any dirt, then drain. Par-boil the greens by dropping them in boiling water for about 1 minute; remove and plunge into a bowl of ice water.) Shocking the greens like this will maintain their vibrant color. Drain, and store in an air-tight container in the refrigerator.
Meanwhile boil the string beans for 2-3 minutes, then plunge into a bowl of ice water. Drain and slice into 1-inch long pieces. Chop fennel and slice oranges; set aside.
To toast the walnuts, place in a small, dry skillet over medium. Shake pan handle to ensure even toasting, for 1-2 minutes or until slightly toasted and aromatic.
To make the vinaigrette, place anise seeds in a small, dry skillet over medium. Shake pan handle to ensure even toasting, for 1-2 minutes or until slightly toasted and aromatic. Add all other ingredients to skillet and keep over a low heat for about 1-2 minutes, whisking until well emulsified. Remove from heat and set aside.
In a large bowl, toss together the cooked bulgur, vegetables, oranges, chickpeas, and nuts. Drizzle the dressing over the salad and toss gently until well coated. Sprinkle individual servings with toasted nuts and extra fresh minced rosemary, if desired.You might also like:
Breakfast Quinoa with Dried Cherries, Raisins, and Pecans
Baby Artichoke and Asparagus Risotto
Italian Easter Rice Pie (though it's delicious 12 months of the year!)
Thursday, May 22, 2008
Are Your Kids Getting Enough Calcium (and Chocolate Pudding)?
Kids need calcium to build strong bones and teeth. And as much as they might wish it, chicken nuggets just ain't gonna cut it.
Here are some facts about kids, calcium, and bone health:
- Unfortunately, bone fractures are on the rise in children. Researchers believe this may be the result of decreased bone mass and reduced physical activity among today's children.
- Drinking less milk and more soda is a potentially dangerous combination for children's bones. By not drinking milk, children's bones are not absorbing the calcium necessary to build bone. Then by drinking soda, they are stripping their bones of calcium.
- Starting at age 9, kids need almost twice as much calcium as they did previously! That's because teens' and tweens' bones are growing the fastest.
- Fewer than 10% of girls and only 25% boys ages 9 to 13 are at or above their adequate intake of calcium. This lack of calcium can have a negative impact on both bones and teeth as these adolescents enter adulthood.
- 90% of adult bone mass is acquired in girls by age 18 and by 20 in boys.
- Make sure they consume their needed amount of calcium every day through well-balanced meals. Click here to find out your child's calcium needs from birth to age 18.
- Serve a healthy breakfast. Kid favorites such as pancakes, French toast, and waffles can be made with whole wheat flour and calcium-fortified milk or soy milk. Plus, did you know that children who eat breakfast tend to perform better on standardized tests?
- Serve vitamin D enriched milk, which helps the body absorb calcium.
- If your child is lactose-intolerant, then make sure he/she gets enough calcium from non-dairy sources, such as calcium-fortified soy milk and orange juice as well as lean protein, whole grains, fresh fruits and vegetables, legumes, and nuts.
- Encourage them to get some physical activity for 30-60 minutes a day.
- Make sure they see their doctor regularly.
Many thanks to all of you who have submitted entries for Beautiful Bones. We have an amazing array of calcium-rich dishes from breakfast to dessert. Would you like to participate? You have until May 31st, and can see the details here.
Now for the chocolate pudding...
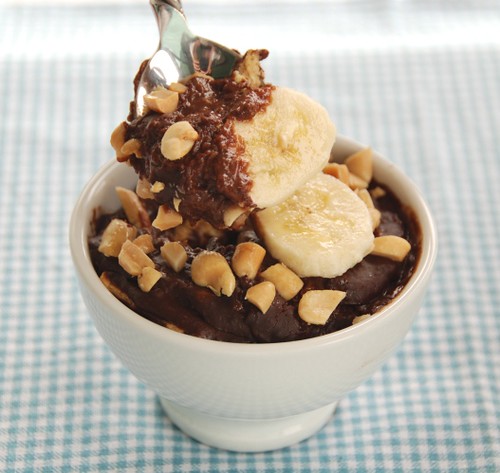
When I was kid there was nothing better than coming home from school, opening the refrigerator, and seeing those old-fashioned ice cream dessert glasses filled with Mom's chocolate pudding, bananas, and Graham Crackers. Cool, creamy, and soothing, just what any kid could use after a long day at school. Plus it's low in fat and high in bone-building calcium, vitamin D and protein.
I make pudding with soy milk for me and skim milk for Jeff, and both always come out satisfyingly thick and creamy. Even though there are no children in our house, every time I eat this pudding, I feel like a kid again.
Mom's Chocolate Pudding with Bananas and Graham Crackers
Serves 4
Print recipe only here.
This recipe also works well with vanilla or banana pudding partnered with Vanilla Wafers (my brother Paul's childhood favorite). You could also mix in some shredded coconut, chopped nuts, or Cool Whip--whatever makes your little one smile.
6 tablespoons sugar
2 tablespoons cornstarch
2 cups soy milk (or skim milk)
pinch of salt
1/2 cup semi-sweet chocolate chips
1 large egg, lightly beaten
1 teaspoon pure vanilla extract
8-10 low-fat graham crackers
1 large banana or 2 small ones, sliced
Optional garnishes:
toasted coconut shreds
chopped roasted peanuts
Cool Whip
Combine sugar and cornstarch in a medium pot over medium heat. Add 1 cup of milk, whisking until the sugar and cornstarch are dissolved. Add the second cup of milk and salt, and bring to a simmer, stirring frequently. Lower heat, cooking pudding for 10 minutes, stirring frequently. Remove pudding from heat for 2-3 minutes. Whisk in the chocolate chips. Lightly whisk one egg with vanilla extract and slowly add to the pudding, whisking constantly. (Removing it from the heat will prevent the egg from cooking). Simmer for 2-3 minutes, or until thick, stirring several times. Remove from heat.
Assemble 4 serving dishes. Place a layer of bananas on the bottom of each dish, then top with some pudding, then graham crackers, and repeat. Cover with Saran Wrap and refrigerate until chilled. Garnish with your choice of toppings.
Here are some other high-calcium recipes your kids might like:
- Kids and pancakes just go together. Why not try ricotta hotcakes? They're like pancakes, only softer and fluffier and have lots of calcium.
- Your kids might like spinach if it's tucked inside a crispy calzone with calcium-rich ricotta and mozzarella cheese.
- Make pizza healthier by using whole wheat dough, adding vegetables, and using different sauces like BBQ sauce for a BBQ pizza.
- Over 50% of kids cite strawberries as their favorite fruit. So they'll love these Fresh Strawberry, Almond, and Coconut Muffins for breakfast and this Strawberry-Rhubarb Sponge Pudding for dessert.
- Although it's well past St.Patrick's Day, what kid wouldn't love a bright green milkshake?
- Anamika: Her cakes are works of art.
- Linda : I'd love to bake in the kitchen with her.
- Nicisme: I get a sugar high looking at her sweets.
- Patricia: I become the Cookie Monster when I visit her blog.
Save This Page on Del.icio.us
Tuesday, May 20, 2008
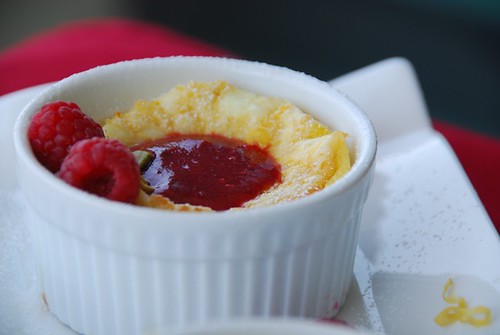
Mini Custards with Limoncello-Spiked Raspberry Sauce
There are many things I miss about not living close to my family, such as seeing my young nieces dress up for their first father-daughter dance, visiting my grandmother at the nursing home, and celebrating family birthdays (like my dad's 70th last year). Thanks to Dad, I have something new to miss: homemade limoncello.
A couple of months ago, he and his long-time Italian friend, Tony, made homemade limoncello (lee-mon-chay-low), an Italian liquer made from lemons and flavorless grain alcohol like vodka. It's vibrantly lemony and mouth-puckeringly tangy.
Limoncello isn't just for drinking though. It enlivens sweet fruit sauces and is lovely whipped into mascarpone cheese and served with fruit.
These simple lemon custards I'm sharing today are beautiful in their simplicity. Creamy lemon-infused custard is topped with a chilled limoncello-spiked raspberry sauce that makes each bite pop. It's refreshing and sweet, and did I mention low-fat? What's not to love? That's why I'm sending it to Helen of Tartelette, host of Sugar High Friday #43: Citrus.
Mini Custards with Limoncello-Spiked Raspberry Sauce
Serves 6
Print recipe only here.
Custard:
4 large eggs
3/4 cups sugar
2 tablespoons all-purpose flour
pinch salt
1 teaspoon pure vanilla extract
1 teaspoon lemon extract
1/4 teaspoon lemon zest (preferably Meyer lemon)
1 3/4 cups skim milk
Sauce:
1 cup frozen raspberries (unthawed)**
3 tablespoons water
1 tablespoon limoncello
2 1/2 tablespoons sugar, or to taste
Garnishes:
fresh raspberries
lemon zest, optional
1-2 tablespoons chopped pistachios
**I actually prefer using frozen raspberries to fresh for the sauce because it comes much thicker and clings deliciously to the custard. If you would rather use fresh berries, then just use less liquid.
Position a rack in the center of the oven and preheat to 350 degrees F. Coat 6 (3-inch-wide) ramekins with cooking spray and place on a baking sheet.
To make the sauce, puree all sauce ingredients in a food processor until smooth. Sauce can be made ahead and refrigerated in an air-tight container for up to several days. Serve chilled or at room temperature.
In a large bowl, whisk all custard ingredients until smooth. Divide evenly among ramekins.
Bake at 350 degrees F for 25 minutes, or until golden brown and puffy. Cool on a rack.
Custards can be served either at room temperature or slightly chilled. Add a couple of spoonfuls of raspberry sauce to each ramekin, then garnish with fresh raspberries, lemon zest and chopped pistachios.
When you take the custards out of the oven, they are impressively puffy. Within 1-2 minutes, they will deflate, so you'd better be quick if you want to take a picture.
You might also like these citrus-spiked baked goods:
Coconut Lemonquat Tea Cake
Date, Fennel, and Pistachio Scones (Heart Healthy & Low Fat!)
Olive Oil Cake with Rosemary and Lemon
Save This Page on Del.icio.us
Sunday, May 18, 2008
First Sweet Corn of the Season
I knew last week was going to be a good week. On Monday, I opened my Henry's Market weekly flier and right there on the front page: "California Sweet Corn 3 for $1 - First of the Season."
I dropped everything and ran to Henry's (it doesn't take much to convince me to go to the market).
When I arrived, there was a huge table covered with ears of corn stacked three feet high. It was a beautiful sight. And since it was early in the morning, I could take my sweet time selecting only the fattest ears (perhaps the firemen overslept; oh, well.)
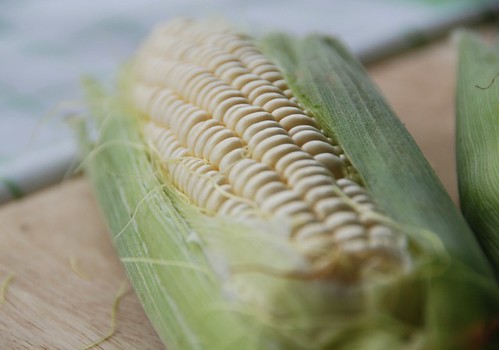
I gently peeled back the tops of the husks and what lay beneath? Thick, plump, creamy white kernels that I could practically taste drizzled with melted butter. I bought six.
They were good; not as sweet as the corn that will arrive later in the summer, but chewy and dense. This is the kind of corn that's ideal to cut off the cob and saute or add to salads and salsas. The easiest and safest way to cut corn off the cob is to cut the ear in half, then stand one half on its steady base and cut toward the cutting board.
Since I had a pristine bunch of fresh mint, I made one of my stand-bys: sauteed corn with mint, butter, and lemon. The result was a refreshing, satisfying combination of textures and flavors. A little buttery, a little tangy -- delicious.
Turns out the corn was the highlight of my week. First our washing machine died, which resulted in several trips to Mr. Bubbles and a stolen load of towels. Then we were rear-ended on the way to work, (fortunately there were no injuries). Finally our laptop croaked (for the third and final time). It is officially being laid to rest. On the bright side, I received a flier from Costco the other day with coupons for HP laptops. Plus they have great pineapples for only $2.99. Yeah, things are lookin' up again.
Sauteed Corn with Mint, Butter, and Lemon
Serves 2
Print recipe only here.
If you'd like to turn this into a main meal, just add some sauteed shrimp or tofu.
2 medium ears of corn
2 teaspoons butter
1 teaspoon fresh ginger, minced
a pinch of cayenne pepper
salt, to taste
1 teaspoon lemon juice
1 tablespoon fresh mint, thinly sliced
Cut off the corn kernels. In a large skillet over medium-high heat, melt butter. Saute corn for 2-3 minutes, or until lightly browned. Add the fresh ginger, cayenne, and salt, cooking 1-2 minutes more. The corn should be cooked through yet still firm. Add the lemon juice and mint; stir well, add a bit more salt, if necessary, and serve immediately.
You might also like these fresh vegetables dishes:
Farmers' Market Veggies with a Cumin-Chile Vinaigrette
Jacket Potatoes with a Rosemary-Artichoke Cream Sauce
Save This Page on Del.icio.us
Friday, May 16, 2008
A Pineapple Chutney that June Cleaver Would be Proud Of
I immediately began jotting down essentials I would need, like gelatin and old-fashioned Ball glass jars. I had visions of myself in a 1950's full-skirted dress, spotless white linen half apron, and pearl necklace and heels. I was going to be sooo June Cleaver.
Then I double checked the event and saw that they would accept chutney as well, which doesn't need gelatin, special jars, heels, or pearls to make properly. So I made this simple savory chutney instead.
Chutneys are sweet and spicy condiments, which are remarkably versatile. Thanks to dear Deeba, I now know chutney derives from the East Indian word chatni, which is Hindi for "to crush." That's because chutneys are often made by crushing the ingredients together with a stone.
I like sweet and sour chutneys, which often get their sweetness from fruit and sugar and their sourness from vinegar. Ingredients are simply mixed together and simmered slowly until the sugar bubbles up and thickens, creating a jam-like sauce. They're generally cooled before being eaten and can last for at least a couple of weeks in the refrigerator.
My two favorite chutneys are this mouth-puckeringly tangy kumquat and dried cherry chutney that I made several times this past winter, and today's fresh pineapple chutney. I know I'd also like Deeba's delicious spicy coriander-mint chutney.
Now if only I could find my silk sari ....
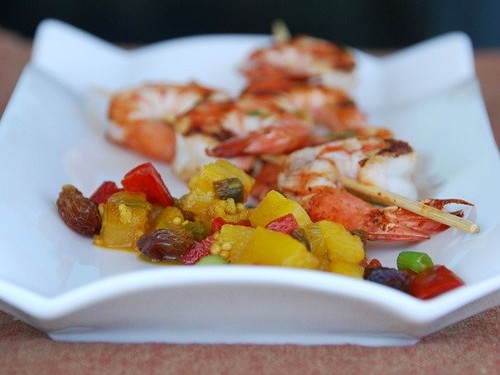
Grilled Shrimp Skewers with Fresh Pineapple Chutney
Yields approximately 1 1/2 cups
Makes 4 entree or 8 appetizer servings
Print recipe only here.
Marinade:
24 extra large or jumbo shrimp, cleaned and deveined
1 tablespoon sesame oil
3 tablespoons low-sodium soy sauce
juice of 1/2 lime
1/2 teaspoon cumin
1/2 teaspoon cayenne pepper
Chutney:
1 teaspoon canola oil
2 green onions, thinly sliced (about 1/4 cup)
1 red bell pepper, diced (about 1 cup)
1 serrano chili, minced with some seeds
2 cups fresh pineapple, diced
1/4 cup golden raisins
3 tablespoons apple cider vinegar
1/2 cup white sugar
1/2 cup brown sugar
1/2 cup orange juice
1 1/2 tablespoons fresh ginger, minced
1/2 teaspoon ground coriander
1/2 teaspoon mustard seeds
1/4 teaspoon ground cinnamon
salt, to taste
1 tablespoon fresh cilantro, finely chopped
To make the marinade, whisk all ingredients in a bowl. Pour into either a large Ziploc bag or a plastic container. Add the shrimp, shaking well. Refrigerate for at least 30 minutes or up to 1 hour.
To make the chutney, mix all ingredients from apple cider vinegar through ground cinnamon in a small bowl and set aside. Heat canola oil in a medium pot over medium-high heat. Saute green onions and red peppers for 3 minutes, or until slightly softened. Add chili, pineapple, and raisins, cooking for an additional 2-3 minutes. Add the vinegar mixture to the pot; bring to a boil. Reduce heat to medium-low; simmer uncovered, until thick and reduced, about 35-45 minutes. Once cooked, stir in fresh cilantro, and season with salt, to taste. Allow to cool before serving. (This chutney will keep for up to 2 weeks if refrigerated in an airtight container.)
Remove the shrimp from the marinade; place 3 shrimp per skewer. Grill for 2 minutes, flipping once, or until the meat is opaque and the outside is lightly charred.
You might also like:
Lamb Kebabs with Minted Cucumber Chutney
Shrimp Tacos with Citrus-Avocado Salsa
Goat Cheese and Poblano Quesadillas with Pineapple-Mango-Habanero Salsa
Save This Page on Del.icio.us
Wednesday, May 14, 2008
Exercise Helps Osteoporosis
Today's post is guest written by Exercise Blogga (Food Blogga's alter ego).
Good Morning! Did everybody have breakfast? Good.
Did everybody exercise? What? Why not? Don't you know:
- Exercise reduces your risk of cardiovascular disease, high blood pressure, Type 2 diabetes, and several cancers.
- Exercise helps you control your weight, improve your metabolism, and build muscle and bone strength to combat osteoporosis.
- Exercise alleviates stress, builds self-esteem, and helps you get a better night's sleep.
- Exercise will also make you look better in your bikini this summer. (Now have I got your attention?)
Weight bearing exercise refers to exercise in which your feet and legs are "bearing your weight," and your bones and muscles are working against gravity. Walking, jogging, and stair climbing are examples.
Resistance exercises refer to strength training such as Nautilus equipment or free weights (hand-held weights).
Of course, you should talk to your doctor before starting any exercise routine, especially if you have had bone fractures or have been diagnosed with osteoporosis.
For every positive reason to exercise, there are reasons not to, such as: I don't have the time, or I feel stupid going to a gym. Maybe I can help. I've been doing strength training and cardio 6 days a week at a gym for years now, and I love it. I didn't love it when I started, so here are my 7 personal tips for starting and maintaining a regular exercise program:
- Be realistic. You will fail if you set yourself up to fail. But you will succeed if you set achievable goals. Start slowly--perhaps 2-3 days a week.
- Be patient. Did you know it takes your brain about 3 weeks to develop a habit? That means if you can stick with an exercise plan for 3 weeks, the chances are pretty good you'll keep exercising.
- Select days and times you want to exercise and schedule it in just like you would any other important appointment.
- Resist giving in to the "I don't feel like exercising" feeling. Ask yourself, "What am I going to do instead?" If it isn't much better, then go work out, even it's just for 20 or 30 minutes.
- Do exercises you enjoy. If you hate running, then walk briskly. You'll be more likely to stick with it if you like it. Remember, however, that it's important to challenge your body with different exercises, so maybe 1 or 2 times a week, try something new like a spinning class or a few laps in the pool.
- Begin weight training with Nautilus equipment or free weights. Resistance training builds bone and muscle mass, makes you stronger, improves your metabolism, and helps burn fat even when you're not exercising.
- If you're a gym newbie, then consider hiring a trainer for 4 or 5 sessions to teach you the basics (many gyms offer this free with membership).
- Subscribe to a fitness magazine such as Women's Health or Muscle and Fitness, Hers.
- Believe me when I tell you, ladies, "You won't bulk up." You'd have to work out several hours every day, eat nothing but egg whites and plain fish, and have enough testosterone to grow a beard. I swear.
Eating well is an important part of any exercise plan, and protein drinks are a simple, healthy pre- or post-workout meal. Most protein smoothies are made with whey protein because it stimulates muscle growth and aids in recovery. If you're lactose-intolerant (like I am), then whey isn't an option since it's a by-proudct of cow's milk cheese.
I use soy protein instead; it contains all nine essential amino acids making it a “complete protein," and helps meet your body’s needs in regards to building and maintaining muscle. Also, soy protein contains isoflavones which aid the body’s absorption of calcium into bones and has been linked to a decrease in osteoporosis.
Soy protein is easily digestible and virtually tasteless (though flavored varieties are available). It is widely available at health food stores and organic markets such as Whole Foods. So why not give it a try?
Want to send a calcium-rich entry to Beautiful Bones, my osteoporosis food event? Then click here for full details. And many thanks to all of you who have already submitted recipes. There is an inspiring array of calcium-rich breakfasts, main meals, and desserts, and every one is fabulous!
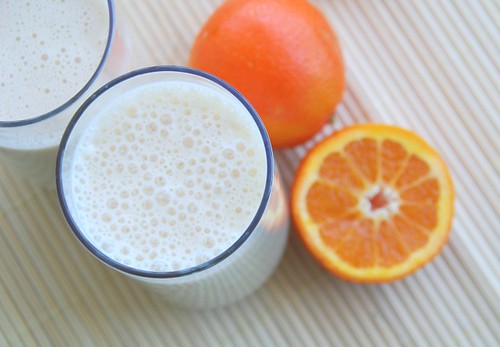
This refreshing smoothie will cool you right off after a hard work out.
Creamsicle Power Smoothie
Makes 1 serving
Print recipe only here.
1/2 cup soy milk** or skim milk
1/2 cup calcium-fortified orange juice
1/2 large banana
3 tablespoons soy protein powder
1 teaspoon sugar, Stevia, or Splenda
1/4 cup ice cubes
Place all ingredients in a blender and blend on high for 10-15 seconds until frothy. If you like it thinner, then simply add a little bit of water.
**I prefer both Organic Valley brand soy milk and Silk brand Soy Milk. Both are high in calcium and protein and taste great.
You might also like these dishes for a post-workout meal. They contain lean protein and complex carbs, which replenish your muscles after a hard workout.
Breakfast Egg Sandwich with Avocado and Chipotle-Mayo
Heuvos Rancheros with Salsa Verde
Swordfish with Pineapple-Mango Salsa
Save This Page on Del.icio.us